Final Cut Pro makes it easy to add text to your movie. Whether it is an opening title sequence, end credits, or just putting some words on the screen, Final Cut Pro provides a variety of good-looking templates and makes it easy to modify them to get just the look you want.
After a few years of making home videos in iMovie, I switched to Final Cut Pro precisely because I wanted more control over text. Now, over a decade later, I have made movies for pleasure, but still prefer using Final Cut Pro when I am working with text.
Let me show you how easy it can be to create an opening sequence for your movie by adding an animated title together with a few clips of additional text.
Table of Contents
How to Make a Title Sequence in Final Cut Pro
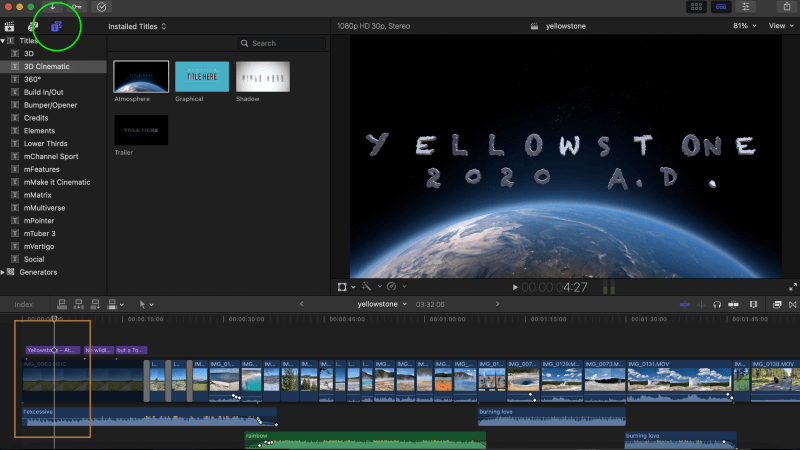
Final Cut Pro provides several title templates, including a large variety of animated titles. You can find them in the Titles area, which is revealed (circled in green in the picture below) by pressing the T icon in the top left corner of the Final Cut Pro editing screen.

The list that appears (below the green circles) are categories of title templates, with the individual templates within a selected category shown just to the left.
In the example above, I choose the “3D Cinematic” category of title templates, and then highlighted (the template is highlighted with a white outline) the “Atmosphere” template.
I choose this one for this movie I made about Yellowstone National Park because, well, it looked like stone. (Yes, that is a “dad joke” but I am a dad…)
Adding it to the movie is as simple as dragging the template onto your movie timeline and dropping it above the video clip where you want it to be seen. Note that Final Cut Pro colors all text effects purple to help you distinguish them from movie clips, which are blue.
In my example, I dropped it above the movie’s first clip, shown in the brown box in the screenshot. You can always move the title around by dragging and dropping it, or make it longer or shorter by trimming or lengthening the title clip.
How to Edit Text in Final Cut Pro
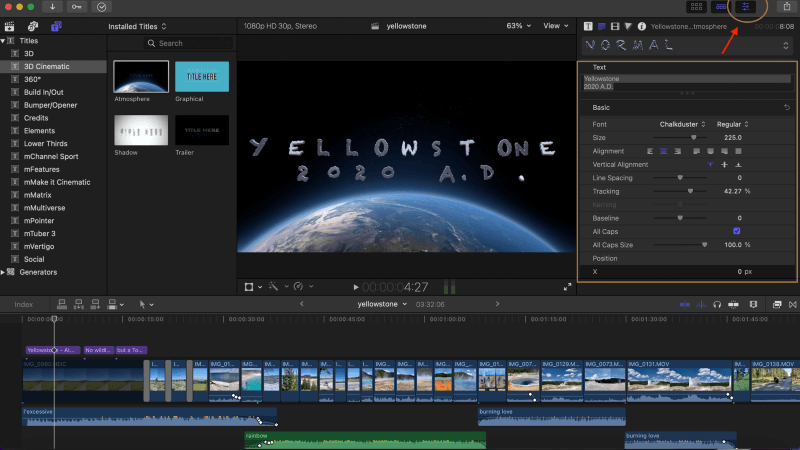
You can edit any text template within Final Cut Pro’s “inspector”. To open it, press the toggle button shown in the brown circle in the picture below. When activated, the box below the button opens giving you control over the text’s font, size, animation, and numerous other settings.

At the top of this box, currently highlighted in grey, is where you enter the text that you want in your title. I choose “Yellowstone 2020 A.D.” for the title of my movie, but anything you type will have the look, size, and animation of the settings in the inspector.
How to Add “Plain” Text in Final Cut Pro
Sometimes you just want to add some words to the screen. Maybe it is to provide the name of somebody talking on the screen, or the name of the location you are showing, or just to make a joke in the movie – which is what I chose to do in this movie.

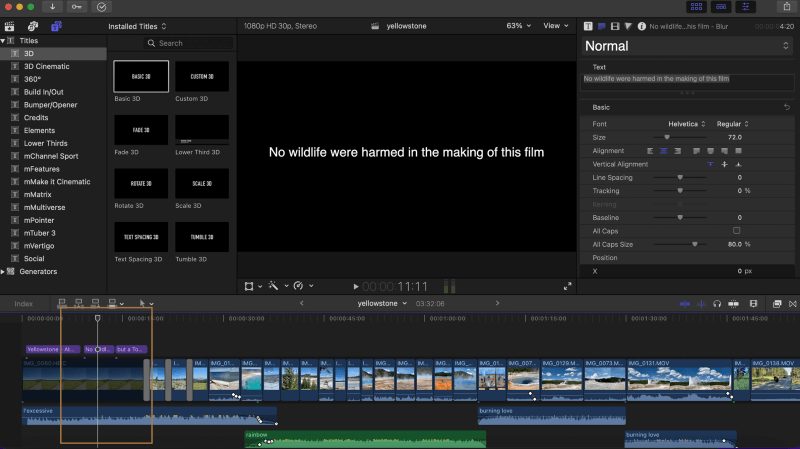
This joke took two text templates to make. The first is shown in the picture below, and the placement of the title is shown inside the brown box, coming just after the title text shown in the previous picture.
This text was chosen from the 3D category in the upper left corner of the screen, and the template chosen (Basic 3D) was the one highlighted with a white border. The inspector on the right side of the screen shows the text (highlighted in grey) that will be shown on the screen, and the font, size and other parameters below it.
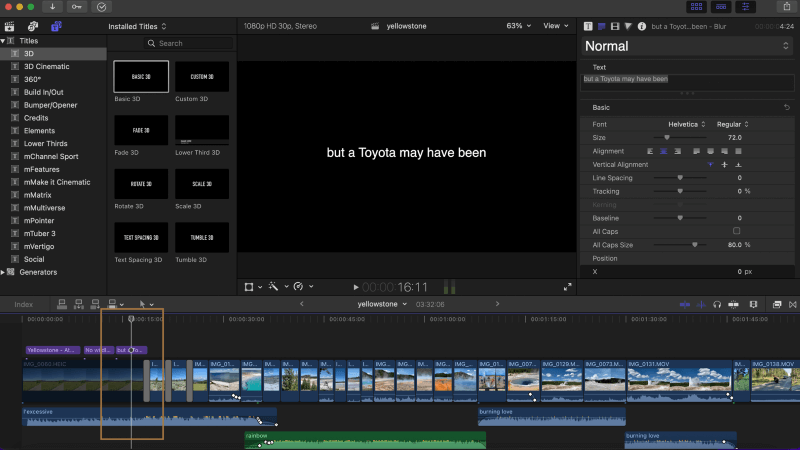
Now, to complete the joke, the picture below shows the third text template used in this movie. While it may be difficult to imagine this sequence of text clips as a movie, the idea was that the movie’s title (“Yellowstone 2020 A.D.”) appears, then the first block of plain text, and then finally the one in the picture below.

Wrapping up
While I hope you will make better jokes in your movies than I do, I trust you can see how easy Final Cut Pro makes it to open text templates, drag and drop them onto your timeline, and then modify them in the Inspector.
There is so much more that you can do with text effects in Final Cut Pro so I encourage you to play around, keep learning, and let me know if this article helped or could be better.
