A Transition is an Effect that changes the way one video clip leads to another. If no Transition Effect is applied, one clip simply ends, and another begins. And most of the time that is not only fine, but preferable.
But after a decade in filmmaking, I have learned that different scenes sometimes call for different transitions. And sometimes a fancy transition is just what you need to solve a problem you are having getting your clips to flow together.
I was working on a movie where the final sequence has the heroine swimming across a pool, then walking to her plane, where she turns and waives goodbye. I didn’t have much footage between the pool and the plane and couldn’t figure out how to make the transition feel natural. Then I realized she was swimming to the right and walking right towards the plane. A little reframing and a simple Cross Dissolve Transition – which can give the feel of a passage of time – was all I needed.
As adding Transitions is easy in Final Cut Pro I will give you the basics, give you some tips on selecting Transitions, and then help you with some of the problems you may encounter.
Table of Contents
Key Takeaways
- Final Cut Pro offers nearly 100 Transitions, all accessible from the Transition Browser.
- You can add a Transition simply by dragging it from the Transition Browser and dropping it where you want it.
- Once added, you can modify a Transition’s speed or position with just a few keystrokes.
How to Add Transitions With The Transitions Browser
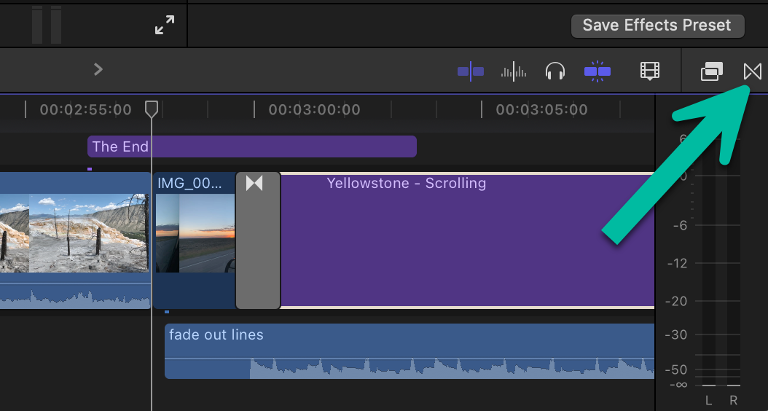
There are a few ways to add Transitions in Final Cut Pro, but I recommend starting with the Transitions Browser. You can open and close it by pressing the icon at the far right of your screen, highlighted by the green arrow in the screenshot below.

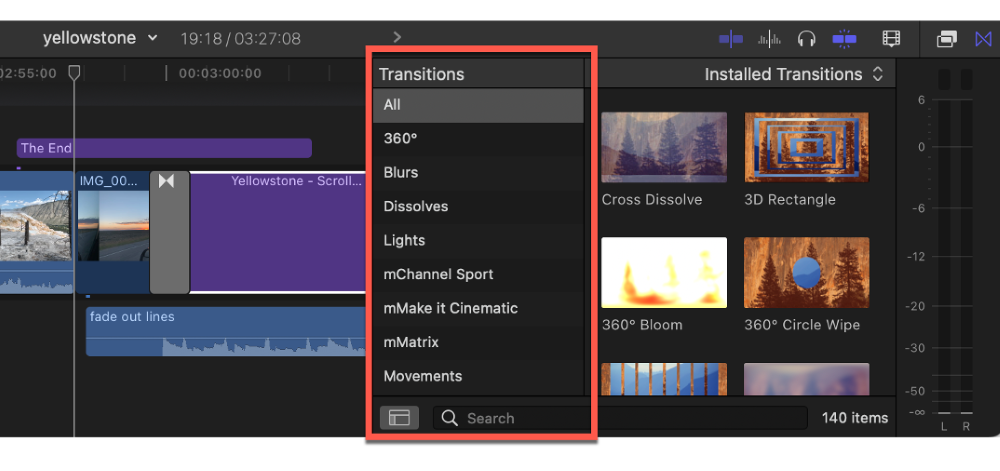
When the Transition Browser is open, it will look similar to the screenshot below. On the left, within the red box, are different categories of transitions, and on the right are the different transitions within that category.

Note: Your list of categories will look different than mine because I have a few Transition packs (the ones starting with “m”) that I bought from third-party developers.
With each Transition shown on the right you can drag your pointer across the Transition and Final Cut Pro will show you an animated example of how the transition will work, which is pretty cool.
Now, to add a Transition to your Timeline, all you need to do is click on the Transition you want, and drag it between the two clips you want to apply it to.
If there already is a Transition in that space, Final Cut Pro will overwrite it with the one you dragged in.
Tips on Selecting Transitions in Final Cut Pro
With nearly 100 Transitions to choose from in Final Cut Pro, choosing just one can be overwhelming. So I have a few tips that may help.
But remember, part of being an editor is finding ways to be creative with the tools you have. So please don’t interpret what follows as rules, or even guidelines. At best, they may give you a starting point. At worst, they may help you think about what a transition is adding to your scene.
Here are the main types of Transitions:
1. The Simple Cut, aka the Straight Cut, or just a “cut”: Like we said in the introduction, much of the time no Transition is the best choice.
Consider a scene where two people are talking to each other and you want to edit that conversation by switching back and forth between each speaker’s perspective.
Any Transition beyond a simple cut in such a scene is likely to be distracting. Our brains know both camera angles are happening at the same time, and we’re comfortable with the quick switches from one point of view to another.
It may help to think about it this way: Every Transition adds something to a scene. What it adds can be hard to put into words (this is film, after all) but each Transition complicates the flow of the story.
Sometimes that’s great and reinforces the meaning of the scene. But a lot of the time you just want your transitions to be as unnoticeable as possible.
There is an old saying in editing to always “cut on the action”. It has never been clear to me why this works, but it seems our brains can imagine that something already in motion will continue. So we cut as somebody is getting up from a chair, or bending forward to open a door. Cutting “on the action” makes the transition from one shot to another less… noticeable.
2. The Fade or Dissolve: Adding a Fade or Dissolve Transition is useful to end a scene. Watching something fade to black (or white) and then fading back into something new helps reinforce the idea there has been a transition.
Which, as we move from one scene to another, is just the message we want to send.
3. The Cross-Fade or Cross-Dissolve: As the name implies, these Fade (or Dissolve) Transitions don’t have the black (or white) space in between the two clips.
So while these Transitions still reinforce the idea that something is changing, they can be perfect for when the scene isn’t changing, but you want to signal that time has passed.
Consider a series of shots of somebody driving a car. If you wanted to imply that time has passed between each shot, try a Cross-Dissolve.
4. The Wipes: Star Wars made wipes famous, or infamous depending on what you think about them. To my eye, they are a bit in-your-face and usually feel tacky.
But they worked in Star Wars. Then again, Star Wars itself was a bit tacky, or perhaps “folksy” is fairer. And so there was something pleasantly fun about the way Star Wars used wipes and now it’s hard to imagine a Star Wars movie without them.
Which is what Wipes and so many other more aggressive Transitions do: They both shout that there is a transition happening and they do it with some unique style. Finding the style that fits the mood of your story is the challenge. Or, if you are like me, it is the fun of editing.
Adjusting Transitions in Your Timeline
One you’ve picked your Transition you may find it happens a bit too fast or too slow. You can adjust the length of a transition by selecting Change Duration from the Modify menu, and then type the length you want.
Note: When entering a Duration, use a period to separate the seconds from the frames. For example, typing “5.10” makes the Duration 5 seconds and 10 frames.
You can also drag either end of the Transition away from or towards the center to lengthen or shorten it.
If you wished your transition started or ended a few frames earlier or later, you can nudge a Transition left or right one frame at a time by tapping the comma key (to move it one frame to the left) or the period key (to move it one frame to the right).
ProTip: If you find you use a particular Transition a lot, you can set to be your default Transition, and insert one anytime you press Command-T. You can make any Transition the default Transition by right-clicking on it in the Transition Browser, and selecting Make Default.
Finally, you can delete a Transition anytime by selecting it and pressing the Delete key.
What If I Don’t Have Long Enough Clips to Make the Transition?
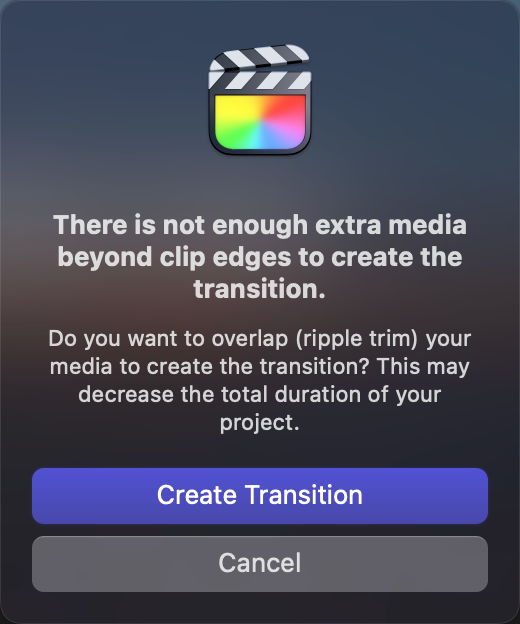
This happens. A lot. You find the perfect Transition, drag it into position, Final Cut Pro has an awkward pause, and you see this:

What does this mean? Well, recall that you trimmed your clips to get the cut exactly where you wanted it, then decided to add the Transition. But Transitions needs some footage to work with.
Imagine a Dissolve Transition – it takes some time to dissolve that image. And when Final Cut Pro displays this message, it is saying that it can still create the Transition, but it is going to have to start dissolving some of the footage you thought would be shown in full.
Generally speaking, there isn’t a lot you can do about this. If you are lucky, you weren’t too wedded to the exact spot you cut the clip at, so what’s another ½ a second shorter?
But if that isn’t going to work, you may need to experiment with either shortening the Transition or nudging it a bit right/left (with the comma and period keys) to see if you can find a new spot where the Transition looks okay to you.
Final Transitioning Thoughts
Transitions are an excellent way to add energy and character to your films. And Final Cut Pro not only provides a huge library of Transitions to experiment with but makes it easy to apply them and tweak them.
I fully expect that once you’ve tried your first few Transitions, you are likely to lose many hours trying them all…
But when in doubt, try to keep a light hand. Bold Transitions can be cool and in something very dynamic like a music video they are right at home. But in your average story, simply cutting from one shot to another is not just fine, it is normal, and for good reason – it usually works best.
Speaking of working best, please do let me know if this article helped your work, or it could use some improvement. We are all in transition (dad joke intended) so the more knowledge and ideas we can share the better! Thank you.
