You can transfer photos from your iPhone to your Mac using a USB cable, image capture, AirDrop, iCloud files, iCloud Photos, email, or another cloud storage service.
I’m Jon, an Apple techie and proud owner of an iPhone 11 Pro Max and a 2019 MacBook Pro. I often transfer photos from my iPhone to my Mac, and I made this guide to show you how.
Keep reading to learn 7 different ways of transferring photos from your iPhone to your Mac.
Table of Contents
Method 1: Use The Photos App And a Cable
If you don’t have easy access to fast internet or your connection speed is subpar, you can use your Photos app and a USB cable to transfer photos from your iPhone to your Mac.
Here’s how to do it:
Step 1: Connect your iPhone to your Mac with a USB cable. Your iPhone will display a message asking you to trust the computer. Select “Trust”.

Step 2: On your Mac, open the Photos app.

Step 3: Your iPhone will display under “Devices” in the left-hand pane in the Photos app. Click on it.
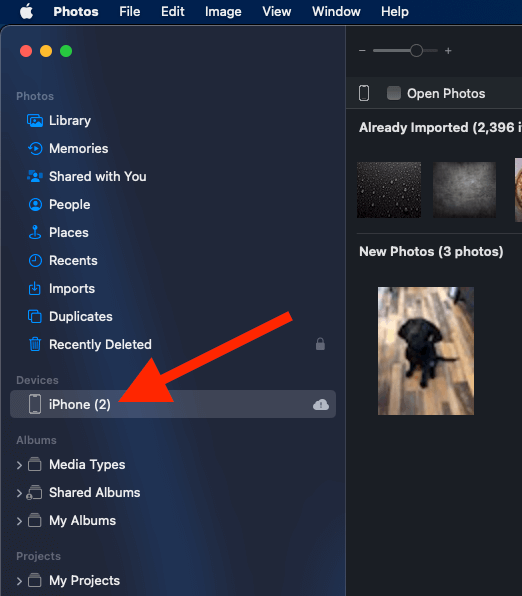
Step 4: Select the option that works best for you: “Import All New Photos” or “Import Selected” (i.e., only the photos you want to move).

Note: Your Mac will automatically detect photos already synced between your iPhone and Mac and list them under “Already Imported.”
Step 5: Click on either option to start the transfer process. Once the process is complete, you’ll receive a notification. At this point, you can safely disconnect your phone from the Mac.
Method 2: Use Image Capture
Apple offers Image Capture as a default on all macOS products. It’s easy to access photos, but you’ll also need a USB cable.
Follow these steps:
Step 1: Connect your iPhone to your Mac using a USB cable.
Step 2: Confirm access to the device by entering the password and selecting “Trust” on your iPhone.
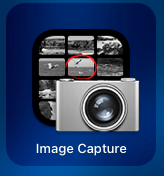
Step 3: On your Mac, open Spotlight by pressing Command + Space. Type in “Image Capture” and click on it once it pops up.
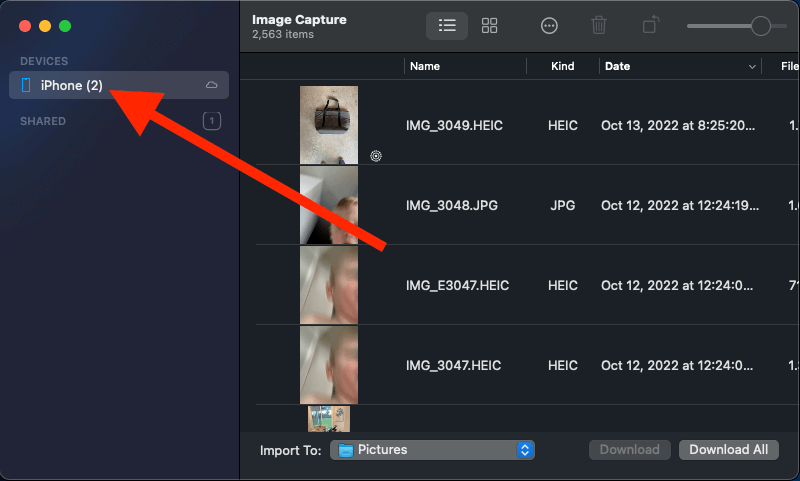
Step 4: Find the “Devices” heading, open it, and locate and select your iPhone from the list.
Step 5: Choose the location you want the photos to go after the import by adjusting it at the bottom of the page next to “Import To:”
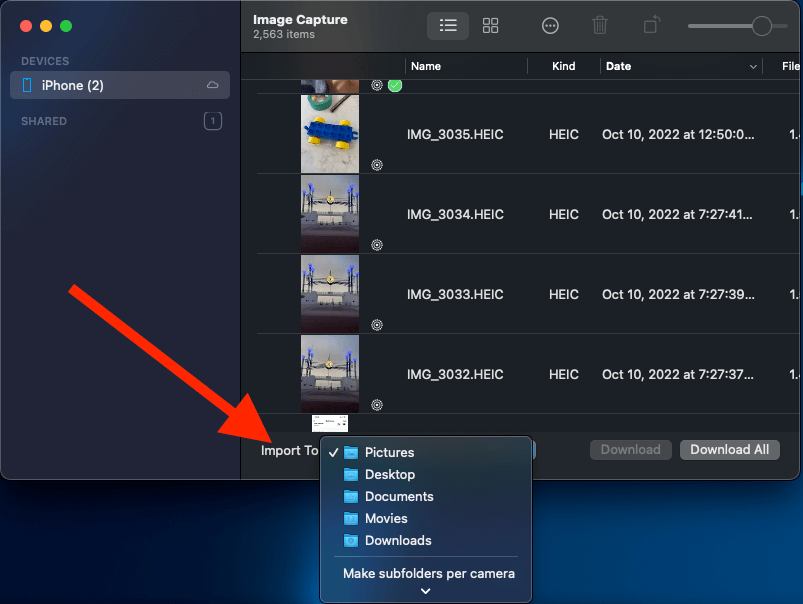
Step 6: Click “Download All” to download every photo on your iPhone to your Mac. Or select only the photos you want by holding Command and clicking each image once, then clicking “Download.”
Method 3: Use iCloud Photos
Synchronizing your devices is one of the easiest ways to access files on every linked device without a cable.
You’ll need to synchronize your iPhone photos with iCloud by following these steps:
Step 1: Sign into your iCloud account on your iPhone and Mac using the same Apple ID and password.
Step 2: Verify that each device is up to date with the newest OS update, as this can affect synchronization. Update each device as necessary.
Step 3: Confirm each device has a solid Wi-Fi connection. Next, on your iPhone, go to Settings > Your Apple ID > iCloud.
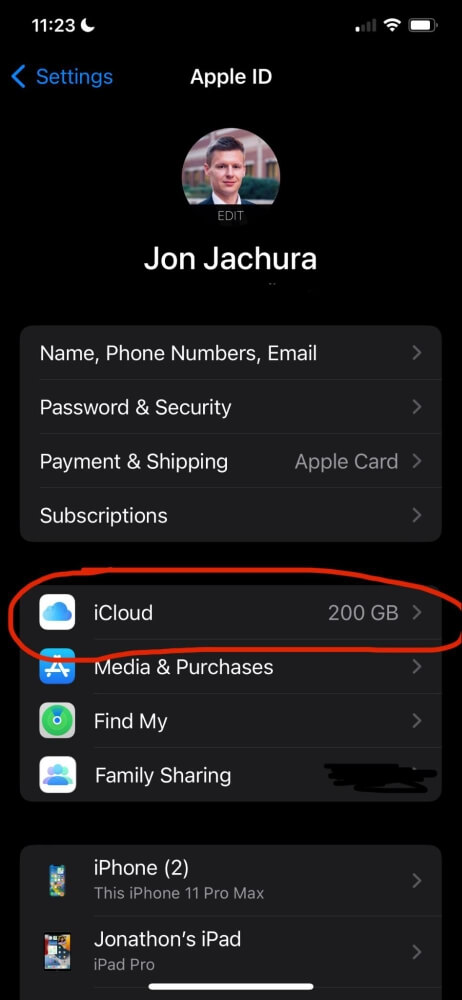
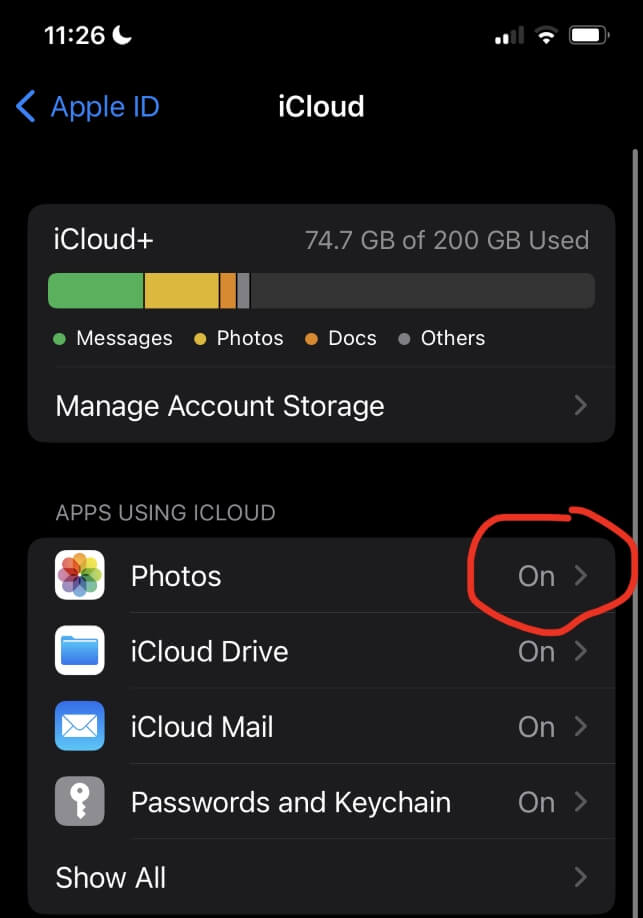
Step 4: Once you’re in, look for the “Photos” settings section. Then toggle the slider next to iCloud Photos to activate sync with the device.
Step 5: After activating this, move to your Mac. Open the Apple menu and select “System Preferences” (or “System Settings”) from the drop-down menu. Click on your name in the lefthand pane, then select “iCloud.”

Step 6: Next, activate the box next to “iCloud Photos.”
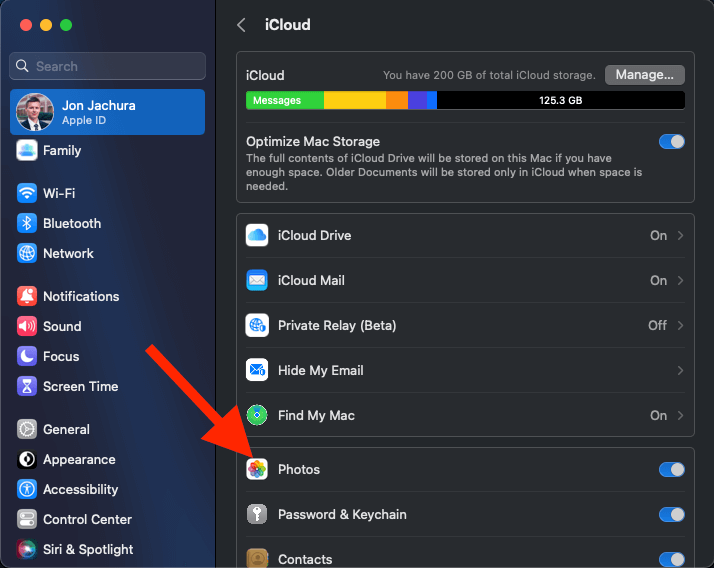
After activating synchronization, you can access images from your iPhone on your Mac as long as “iCloud Photos” is activated on your Mac.
Note: If you are synching photos from your iPhone to your Mac through iCloud for the first time, it may take many hours to complete (especially if you have thousands of photos).
Method 4: Use AirDrop
If your iPhone and Mac are within Bluetooth range of each other, you can AirDrop photos. This is an excellent option if you only have a minute or two to transfer the images.
Here’s how to AirDrop photos from an iPhone to a Mac:
Step 1: Open your Photos app on your iPhone, then find and select the photo(s) you want to send. At the bottom of the screen, click the “Share” button.

Step 2: In the menu that pops up, select “AirDrop.”

Step 3: After selecting “AirDrop,” your phone will search for and display nearby Apple users. Find your Mac on this list, tap the device, and click “Done.”
Note: If you can’t find your Mac on the list, make sure it’s an option by marking it as discoverable by “Everyone.”
Step 4: After you click “Done,” the photos will transfer to your Mac. You can find them in the “Downloads” folder on your Mac. You should see an AirDrop message in your Mac’s notification area. It may also prompt you to accept the AirDrop.

Method 5: Use iCloud Files
You can also use iCloud Files to access photo and video files. iCloud Drive is an excellent way to expand your storage capacity on your Mac or iPhone and easily synchronize your Apple devices.
Here’s how to use iCloud Drive to transfer photos:
- First, ensure that your devices are up to date with the newest firmware. Update each device as necessary.
- Sign in to iCloud on your iPhone and Mac using the same Apple ID and password, then connect to Wi-Fi on each device.
- On your iPhone, go to Settings > Your Apple ID > iCloud. Once you reach this point, scroll down until you find “iCloud Drive” and swipe right on it.
- On your Mac, click on the Apple menu, then select System Preferences > iCloud/Apple ID. Find the “iCloud Drive” section, then check the box next to it and click on “Options.” Move through other options and check the boxes next to each option you want to store on your iCloud (desktop or document folders, etc.).
- After completing this process, you can access any files stored in your iCloud drive from any synced devices.
Note: This is similar to iCloud photos. But instead of saving the images in the “Photos” app, they are saved in a folder on your iCloud drive.
Method 6: Use Your Email
If you only need to send a few photos, you can use your email to transfer the files. However, the size and quantity of images you can send are restricted, so you might not be able to send specific files. Follow these steps:
- Open your photo gallery on your iPhone and choose each photo you want to transfer.
- Next, click the “Share” icon in the bottom corner of the screen.
- Click the email account to which you want to forward the images in the menu that pops up. Ensure you’re logged into an email account. You can always email the photos to yourself if that works best.
- Send the email from your phone, then open the email on your computer and download the files.

Method 7: Use Another File-Sharing App
In my opinion, iCloud is the easiest way to transfer photos from my iPhone to my Mac (and my go-to method), but there are other Apps you can use.
For example, you can upload photos from your iPhone to Google Drive, Dropbox, Microsoft OneDrive, Sharepoint, and several other cloud-based storage drives.
Then, you can log into the app on your Mac and download the photos. All apps work similarly to iCloud, but you can’t automatically synch photos across devices as you can with iCloud.
FAQs
Here are some common questions on transferring pictures from iPhones to Macs.
Can I Wirelessly Transfer Photos from iPhone to Mac?
Yes, you can quickly move photos from your iPhone to your Mac through various options. The quickest way is to AirDrop them from one device to another. That said, you can email the photos or set up sync between the devices to easily transfer photos as well.
Why Won’t My Photos Import from an iPhone to a Mac?
If your photos don’t transfer from one device to another, there are a few areas to check:
- If you’re using a cable, ensure it’s properly connected to both devices and functions normally.
- Ensure your devices are up to date with the latest firmware.
- Double-check your Wi-Fi connection on both devices.
- Make sure you use the same Apple ID and password on both devices.
- Restart both devices and try again.
Conclusion
Transferring photos from your iPhone to your MacBook is an easy process. Whether you use iCloud, AirDrop, a USB cable, or other means, the process is quick and straightforward.
What’s your go-to method for transferring photos from your iPhone to your Mac?
