Once you have paired your Apple Pencil to your iPad, your stylus will automatically be paired with the Procreate app. You can do this by removing the cap of your stylus and inserting it into your iPad and then removing it again. Your stylus is now paired.
I’m Carolyn and I’ve been using Procreate for over three years to run my digital illustration business. As my work requires me to draw almost all day every day, I rely heavily on my Apple Pencil and I always ensure that it’s charged, connected, and ready to go at all times.
Within the Procreate app, you also have access to adjust the properties of your Apple Pencil so that you have full control over how it reacts with your canvas. Today I’ll walk you through the basic abilities of your Apple Pencil and show you how to easily make these changes.
Note: Screenshots are taken from Procreate on iPadOS 15.5.
Table of Contents
Key Takeaways
- You don’t have to connect your Apple Pencil to your Procreate app.
- You can adjust the settings of your Apple Pencil in your Actions menu and Brush Studio.
- There are other stylus brands that are compatible with iPad and Procreate.
3 Quick Steps to Connect Apple Pencil to Procreate
Once you have connected your Apple Pencil to your device, it will automatically be synced with all compatible apps, including Procreate. Here’s how to get started:
Step 1: Ensure your Apple Pencil is fully charged. When you purchase it, it should come with a connector that allows you to connect your Apple Pencil to any Apple-compatible charging cable.
Step 2: Remove the cap from the top of your stylus and place the Lightning connector (the part that resembles the tip of an Apple charging cable) into the charging port of your iPad device.
Step 3: After a couple of seconds, remove your Apple Pencil from the charging port and replace the cap. Your stylus is now connected and can be used on the Procreate app.
How to Change Apple Pencil Settings
Finding the menu is easy, but knowing the technical settings can be more challenging. Below I have shown you how to open and change the most important Apple Pencil settings.
Brush Studio Settings
Below I have outlined how to change the Apple Pencil settings on individual brushes in your brush library:
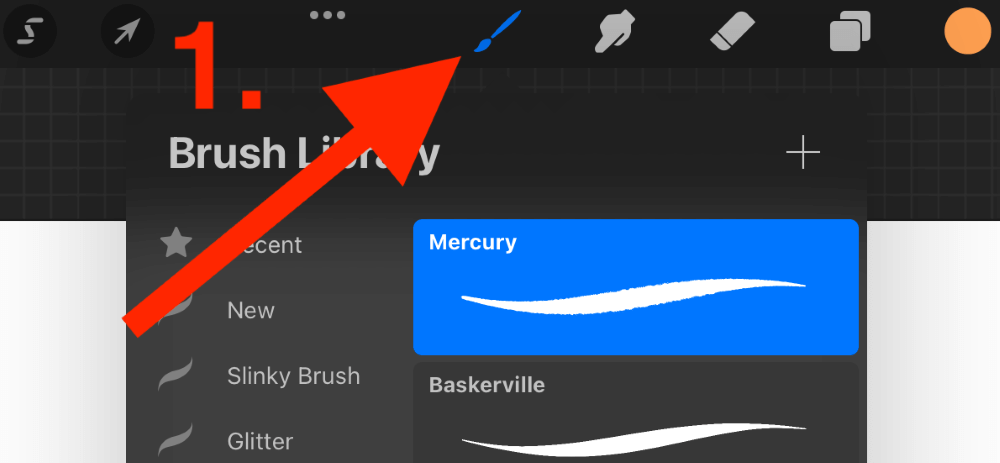
Step 1: Open your Brush menu by tapping on the paintbrush icon. Then double-tap on whatever brush you want to edit the settings on.
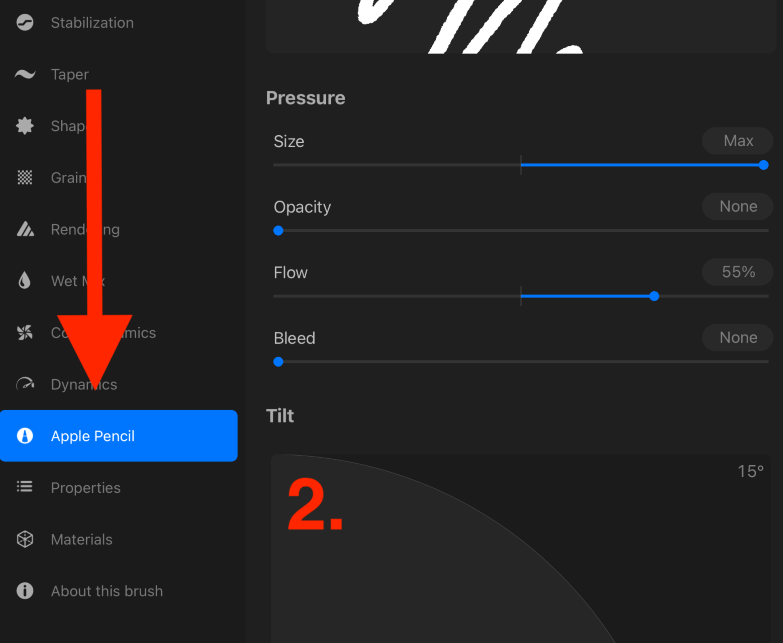
Step 2: In the left-hand side menu, scroll down and tap on Apple Pencil settings.
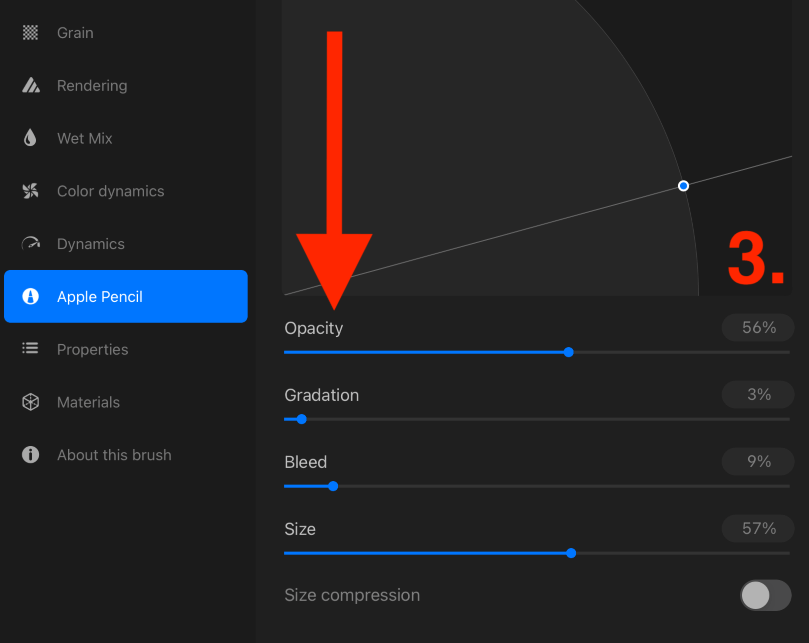
Step 3: Here you will be able to adjust everything that influences the reaction of your Apple Pencil within your chosen brush. This includes the Opacity, Pressure, Bleed, Tilt, Size, and Gradation.
Pressure & Smoothing
You can also adjust the main settings of your brush which will affect how it reacts with any aspect of the app. Here’s how:
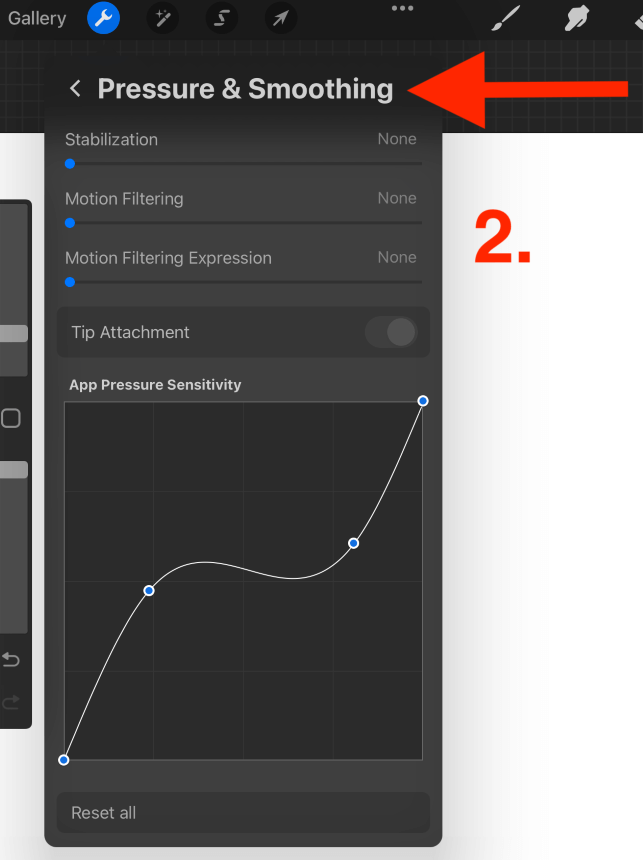
Step 1: Open your Actions tool by tapping on the wrench icon in the top right-hand corner of your canvas. Open the Prefs menu and scroll down to select Pressure and Smoothing.
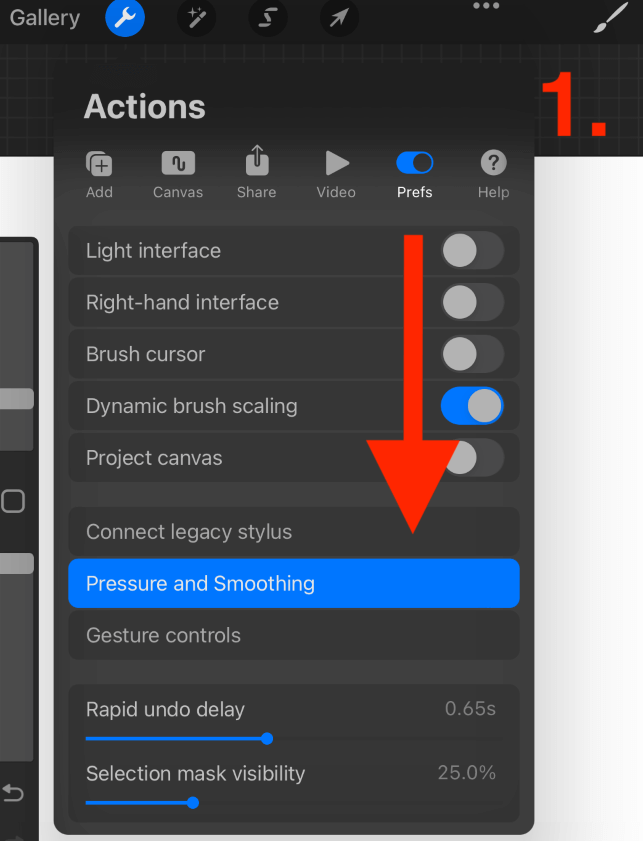
Step 2: In your Pressure and Smoothing menu, you can adjust the settings of Stabilization, Motion Filtering, Tip Attachment, and Pressure Sensitivity.
Things to Note
There are some pieces of information that may help you when you are learning about the Apple Pencil. Here are some things I like to keep in mind.
Replaceable Tip
Your Apple Pencil comes with a set of spare nibs. These come in handy as they do tend to wear out over time. If you are having any issues when drawing with your Apple Pencil, replace the tip with a new nib by unscrewing the old one and screwing in the new one.
Not Compatible with iPhone
The Apple Pencil is not compatible with the Apple iPhone so you cannot connect your stylus to your Procreate Pocket app. You can find an iPhone-compatible stylus or use your fingertips to draw instead.
Apple Pencil Issues
Apple Pencils are pretty straightforward technology and simple devices to use. If you are having issues with your Apple Pencil, you probably need to recharge it or replace the nib.
Other Styluses
Apple Pencil isn’t your only choice when it comes to compatible styluses to use with your iPad and Procreate. Even though Apple Pencil is recommended as the best option by Procreate, you can also use the Adonit or Wacom Legacy styluses.
FAQs
Below is a selection of your frequently asked questions about connecting your Apple Pencil to Procreate.
Why is my Apple Pencil not drawing on Procreate?
Your Apple Pencil could be low on battery or have been disconnected if you paired it with another device. Try charging and reconnecting your stylus by removing the cap and inserting the Lightning connector into the charging port.
Does Apple Pencil work with Procreate?
Yes. In fact, Apple Pencil is the only stylus that the Procreate creators recommend using on their app as it gives the best results.
How to connect Apple Pencil to iPad?
You can remove the cap and insert the Lightning connector into the charging port of your iPad and wait a couple of seconds. Then remove it and replace the cap again. Your Apple Pencil will be connected to your iPad.
How to change Apple Pencil tilt settings?
You can access and change your Apple Pencil Tilt settings by opening the Brush Studio in an individual brush. This setting affects the angle at which your stylus reacts to the canvas.
What to do when Apple Pencil is skipping in Procreate?
This can be caused by a low battery or a worn-out nib. I recommend charging your stylus and replacing the tip with a new nib.
Final Thoughts
The Apple Pencil is by far the superior option when it comes to Procreate compatibility. The creators specify that the Apple Pencil will give its users the best results and most control within their canvas. And from personal experience, they’re not wrong.
Apple is constantly revamping and improving its Apple Pencil so always do your research and make sure you’re opting for the one that gives you the best options for what you need. They aren’t cheap but it’s an investment as they should essentially last you at least two to three years.
Which stylus do you use for Procreate? Leave your answers in the comments section below.
