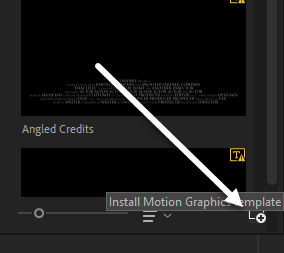
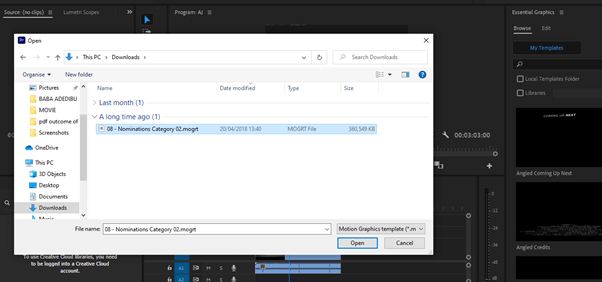
Open the Essential Graphics Panel, and click on the + box below the essential graphics timeline to import your MOGRT file into Adobe Premiere Pro. Search for your MOGRT file from your system, select it and click open. This will immediately be added to the other motion graphics templates under the essential graphics panel.
I use MOGRTs a lot for my motion graphics project. I am David, a professional motion graphics animator and apart from using Adobe After Effects, I mostly use Adobe Premiere Pro. Why? Because I have MOGRT files with me– plenty of them. They save a lot of time.
In this article, I will explain what a MOGRT file is, how to get one, different ways to import one, and how to use it in Premiere Pro. I will also cover why some MOGRT files don’t work in Premiere Pro.
Table of Contents
What is a MOGRT file?
The term MOGRT means Motion Graphics Templates. This Mogrt file is a motion graphics file created as a model that a video editor can easily assess, to speed the workflow.
It takes time and effort to keyframe on graphics, but with just a MOGRT you can drag and drop it on the sequence timeline and make a few adjustments. Then you are good to go.
You can download MOGRT files from websites like Motion Array, Envato, and Storyblocks among others, or you can choose to create your own from scratch.
How to Use MOGRT File in Premiere Pro
Before downloading any MOGRT file, you’ll need to know how to install or use the MOGRT file. Here’s a step-by-step guide on how to go about it. Make sure you have updated your Premiere Pro. Open up your Essential Graphics Panel.
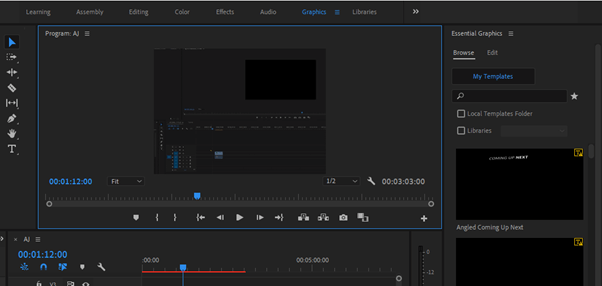
If not yet enabled, you can enable it by going to Windows > Essential Graphics. Here you will have a series of pre-made MOGRT files.
Explore the MOGRT in the graphics panel. The easiest way to use one of these MOGRT files is to just select your desired MOGRT file, drag it toward your sequence timeline, then drop it. This will take a few seconds to process, after which will appear like any other file.
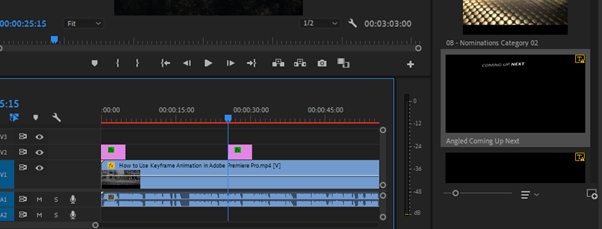
Go to the Edit Tab in your Essential Panel Graphics and edit as you like!
Importing MOGRT files into Premiere Pro
Open the Graphics menu from your Premiere Pro and proceed to the Essential Graphics panel. Navigate to the bottom of your essential graphics panel and click on the” +” icon.
Then you will be redirected to window explorer where you will locate/select your MOGRT file. You can only select one file at a time with this method. Select your desired MOGRT file and open it. It will instantly be added to your essential graphics panel.
Importing Multiple MOGRT files into Premiere Pro
Open Windows Explorer, go to Windows > Program Files > Adobe > Adobe Premiere Pro > Essential Graphics. Once you have gotten here, relax and sip a cup of coffee.
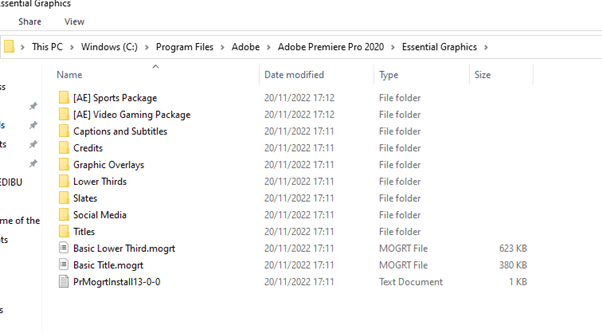
Now paste the downloaded MOGRT file into this local graphics folder. After following all these steps, you’ll be able to search these templates in your Essential Graphics panel.
Why MOGRT file is not working on some Premiere Pro?
There are a few potential reasons why your MOGRT file might not be working in Adobe Premiere. One possibility is that the file is corrupt or damaged. Another possibility is that the MOGRT file format appeared in Premiere Pro version 2018. So there may be some problems with using earlier versions of Adobe Premiere Pro.
It’s also possible that the MOGRT file itself is not compatible with Adobe Premiere. If you’re still having trouble, you may need to reach out to the creator of the MOGRT file for assistance.
Conclusion
MOGRT files are a fast and easy solution for adding motion graphics to any project in Adobe Premiere Pro. To use a MOGRT file, all you need to do is to open the essential graphics panel, click on your desired MOGRT file and drag it into your sequence timeline.
If you are finding it hard to import or use MOGRT files in your Premiere Pro as explained earlier or to import multiple MOGRT files into your local essential graphics folder. Do drop your question for me in the comment box below.
