With the advent of instant messaging, text messaging, video chat, social media, and more, many have forgotten about email. In the business world, though, email is still a critical method of communication.
If you are a regular user of email, especially for business, it’s important for your emails to look professional. Having a professional signature at the bottom of your messages can go a long way in formalizing emails that you send to coworkers, managers, and clients.
So how do you do it? If you don’t already have an email signature, or you have one but forgot how to change it, you’ve come to the right place.
In this article, we’ll show you how to add or change your email signature and make it look professional.
Table of Contents
How to Add a Signature in Gmail
Adding a signature in Gmail is easy and can be done quickly. Just use the following steps:
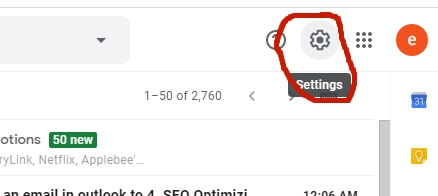
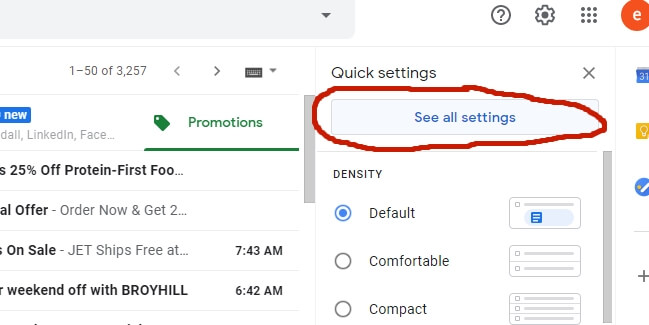
Step 1: Go to Gmail settings
In Gmail, click on the Settings icon on the upper right corner of the screen.
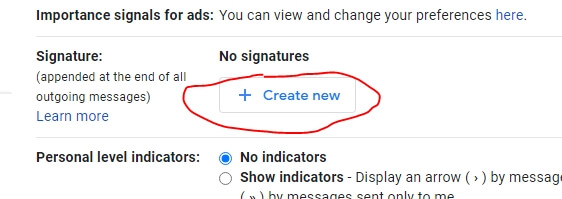
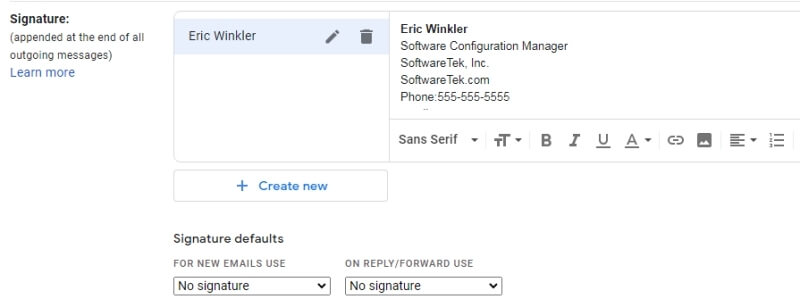
Scroll down and find the “Signature” section. It will be almost near the end of the page. Once you’re there, click the “Create New” button.
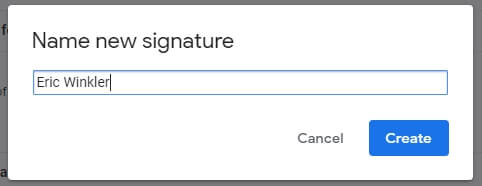
Step 4: Enter the signature name
Once you have entered the name, click the “Create” button. I just used my name in the below example, but you can type anything you want.
Step 5: Enter your signature
In the text window on the right side of the name, you can enter all the information you want to be in your signature. You can format text and even add images or URL links if you’d like.
What information should you add to make your email signature look professional? See the section below for more details.
Step 6: Set signature defaults
You will need to select a signature to be used for new messages, and one for replying or forwarding messages. You can add more than one, so you may choose different ones for new messages and reply/forward messages. If you have multiple signatures, all of them will appear in the drop-down list.
Step 7: Save changes
Don’t forget to scroll to the bottom of the screen and save your changes. Once you have, you’re done.
How to Update Your Gmail Signature
You might need to update your signature when you get a new contact number or job title. Maybe you want to change it to look more professional. Whatever the case, if you don’t like how your signature looks, no worries. It’s easy to modify.
To update it, simply follow the same steps that were used to create the new one. When you get to the signature section in your settings (Step 2), click the name, then make the changes in the text window on the right side.
It’s that simple. Don’t forget to go to the bottom of the page and save your settings.
How to Making Your Gmail Signature Look Professional
There are various ways to make your email signature look professional. Start with your full name, followed by information that pertains to your job or position. The following are things that will add the most value.
1. Name
You probably want to use your formal name instead of any nicknames or shortened names unless you have a more casual work environment or clients.
2. Title
Provide your job title. This can be critical, especially for recipients that may not know you well or have not worked with you in the past.
3. Company Name
If you work for a company, let them know who you are working for. If you don’t work for a specific company, you might put “Independent Contractor” or “Freelance Developer.”
When adding company information, you may want to add your company logo. Ask if your company has a standard format for email signatures.
4. Certifications
You may want to list any certifications that you or your company have. Some certifications come with a logo or symbol which you might also add.
5. Contact Information
Provide alternative ways for your recipient to contact you. Add your phone number, business website, or any other contact info. You can also include your email address, even though it will already be in the message on the “From” section. It doesn’t hurt to have it where someone can easily find it.
You may consider linking to any professional social media account such as LinkedIn.
7. Photo
Including a photo of yourself is optional, though it might be nice for people to see who they’re communicating with. Just make sure to use a professional-looking photo.
What You Shouldn’t Include in Your Gmail Signature
Don’t overdo it. Adding too much information will make your signature cluttered and difficult to read. If it’s full of information that no one cares about, there is a good chance that the recipient will ignore it altogether.
You will sometimes see people include a favorite quote on their Gmail signature. I would avoid adding something like that unless it’s a motto or slogan your company uses. Quotes that are opinionated, political, or controversial might offend someone—and the workplace is not where you want to do that.
Avoid making your Gmail signature distracting. Don’t make it so eye-catching that it takes away from the body of your email message.
The signature should provide information that tells people who you are, what you do, who you work for, how to contact you, and maybe why they can trust you. None of that should detract from your message.
Why Do I Need an Email Signature for Gmail?
Email signatures lend an air of professionalism to your communications. They’re a vital part of your message, even if they’re filled in automatically before you hit the send button.
A good email signature saves time. If you send out lots of emails, adding your name and information at the bottom automatically can save a lot of frustration and confusion.
It also keeps you from forgetting to provide your contact information, which might happen when you’re in a hurry to send out a vital message.
Finally, a Gmail signature provides consistency. It sends the same information, correctly, every time. Do you ever worry if you provided the correct phone number or wondered if your recipient won’t know who your email is from?
Your email address might be far different from your actual name. An email signature in Gmail ensures that the recipient knows who the message is coming from.
Final Words
Email signatures can be a vital part of your Gmail messages. They provide important information about you and give readers alternate ways to contact you. They save time by filling in essentials for you automatically. Finally, they ensure you consistently send the same info to all of your recipients.
Once you set up your email signature for Gmail, be sure to review it frequently and make sure you keep it up to date whenever any of your information changes.
I hope this article has helped you with designing your professional email signature in Gmail. Please feel free to reach out to us with any questions or comments.

