If you’re getting the Scratch Disk Full error in Photoshop, you’ve probably been wracking your brain on how to complete your project without getting rid of unwanted files or info. Thankfully there are several solutions for the error and preventative ways to keep this from occurring again in the future.
I’m Skyler, and I’ve been using Photoshop on a personal and professional level for over a decade! I’ve often encountered this problem when working on bigger projects, and running through lots of solutions before landing on the right one for me – but worry not!
I’ll be discussing how and why these scratch disk errors appear, in addition to troubleshooting the issue without losing anything of importance or risking further harm to your computer.
Note: Before we begin, you may want to back up your hard drive to ensure there is no chance of losing additional files due to human error or otherwise.
Table of Contents
Method 1: Clear Photoshop Cache
You’ve probably heard of a Cache at some point before. It’s essentially another supplemental storage that helps us access our items or actions more quickly. Similar to a temporary memory! This too though, can get bogged down and up the chances of that annoying Scratch Disk error appearing.
Photoshop usually deletes your cache when you exit the program, but no system is perfect. There is always the chance it misses a few. Plus, if you’ve ever had to Force Quit your program, then the cache stays undeleted on your next startup. This is good to keep in mind when considering your Scratch Disk errors.
So, let’s get started clearing out our Cache in Photoshop!
Go to the overhead menu and choose Edit > Purge > All.
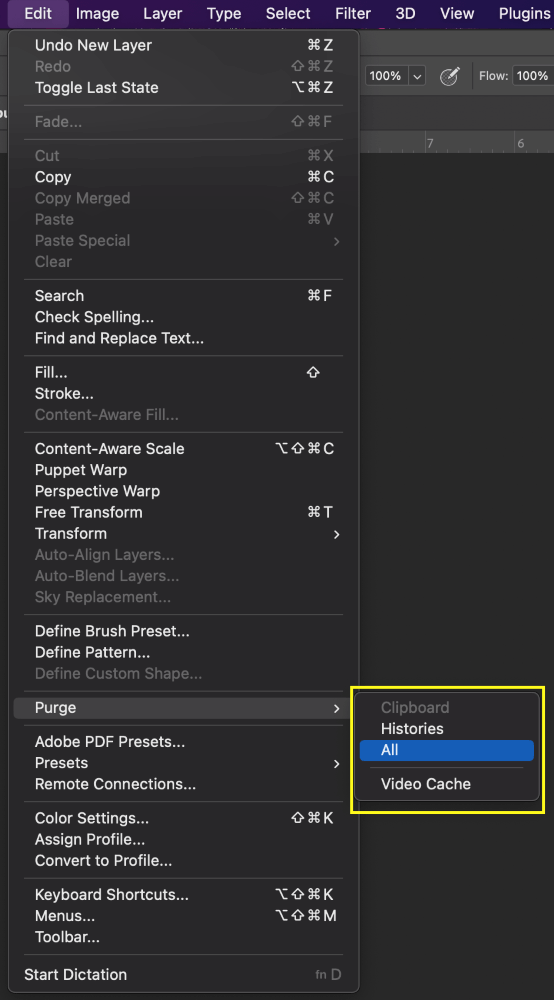
Here we can see options to clear all caches, or individual ones. Select all from the submenu, and you’re done! This is by far the easiest way to correct the Scratch Disk error and clear your cache in Photoshop.
Method 2: Delete Temporary Files
Temporary files are essentially backups for the projects you’re running in Photoshop. It can be a saving grace if say, your computer crashes or the program force quits unexpectedly – but there is a drawback, as temporary files often stick around long past their usefulness. This is another way the Scratch Disk error can appear.
So, to delete those unnecessary temporary files in Photoshop we’ll have to first of all completely save your current projects and exit all Adobe programs.
Step 1: From the Finder Window or App or on your Mac, you’ll be searching for the /tmp folder.
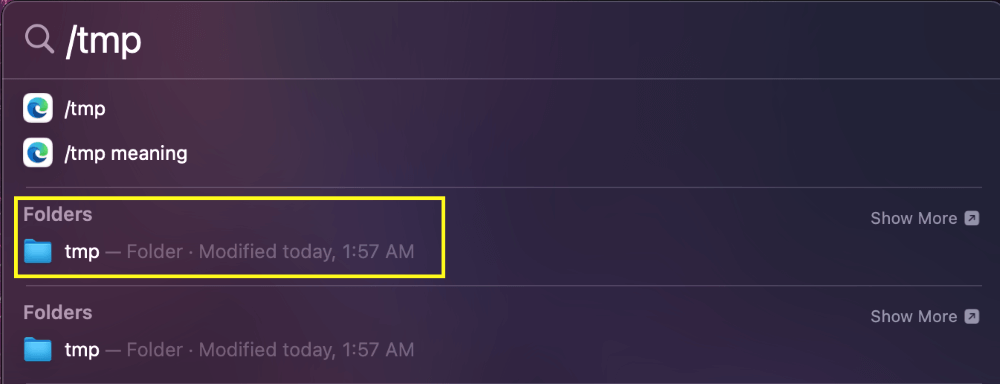
Step 2: Once you’ve located your TMP folder, open it and search for Photoshop Temp.
Step 3: Find any folders with that title, including a string of numbers. Now we can open those folders and delete any that end in .tmp
Step 4: Once this is done, clear your trash and you’re all set.
Method 3: Move Your Scratch Disk Location
This is exactly what it sounds like, but keep in mind you’ll need another location/drive big enough to better handle your files than the one it’s already located in. So if you have multiple drives on your computer and want to reorganize them, here’s how you can go about changing the Scratch Disk location!
Step 1: Go to the overhead menu Photoshop > Settings > Scratch Disk.
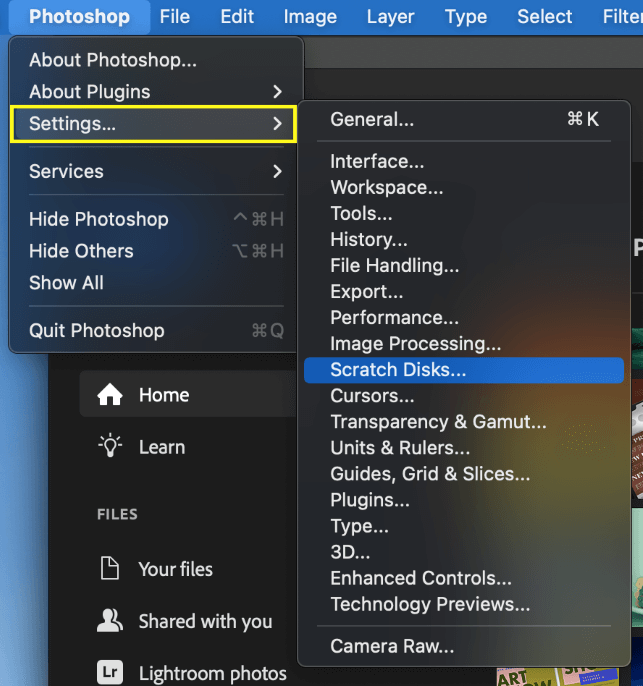
From here, a window will pop up where we can choose from all available drives. I only have one, so that’s all we’ll see here.
Step 2: Choose the appropriate checkbox option in the main window and you’re done!
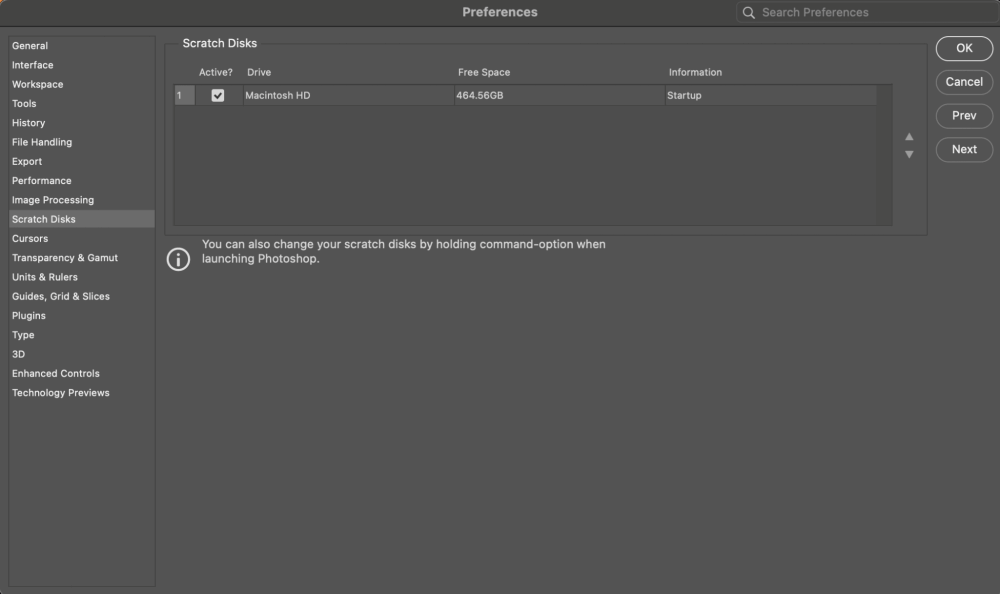
If you cannot access this menu because Photoshop will not open properly, you can hold down on the Command/Ctrl + Option/Alt keys during startup to change the location as well.
Method 4: Increase Photoshop RAM
RAM is defined as Random Access Memory, and all our programs use it to perform actions and tasks. By allowing Photoshop to use more RAM than the default setting, we can free up that much-needed disk space and clear the Scratch Disk error as well.
Simply go to the overhead menu and choose Photoshop > Settings > Performance.
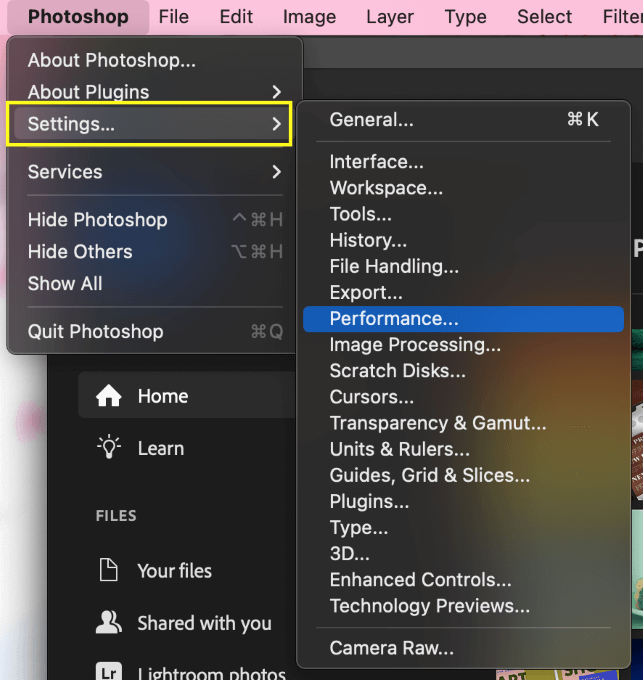
You’ll see many directories, but the only panel we need to focus on is Memory Usage.
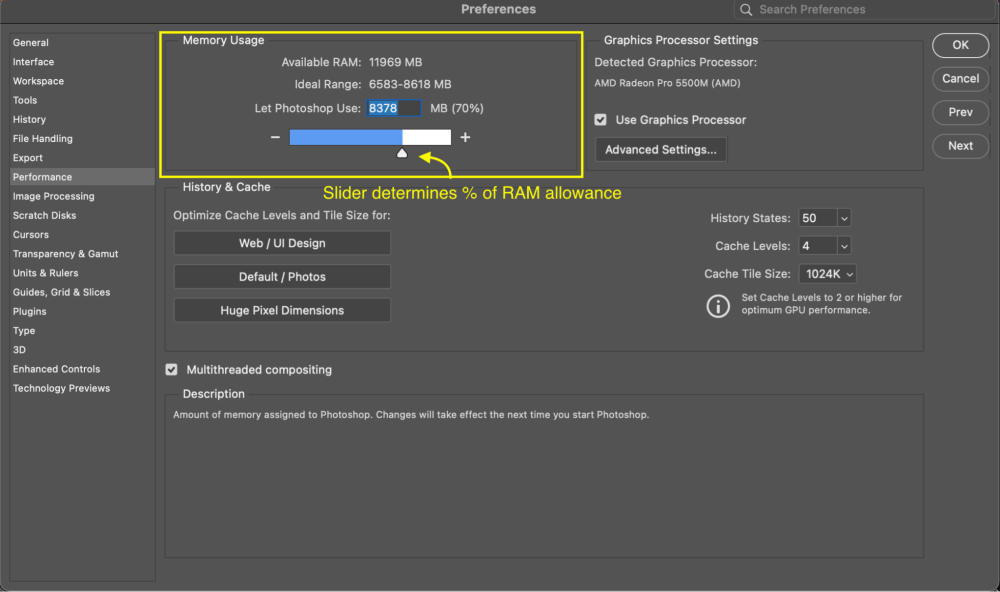
All you need to do now is to adjust the slider to your preferred RAM allowance. Then we’re done!
FAQs
Here are more questions related to scratch disks in Photoshop.
What is the Scratch Disk in Photoshop?
You can think of the Scratch Disk in Photoshop as a local storage drive that uses your computer’s Hard Drive or SSD to keep files that aren’t RAM. When necessary, Photoshop can call upon these files quickly and as needed.
What Causes the Scratch Disk Error in Photoshop?
By default, Photoshop uses our Hard Drive for this function – which may end up accumulating additional files from other programs over time. This is the main reason your Scratch Disk Errors can appear.
When full, your Scratch Disk no longer has the space to store temporary files like the history you’d normally use while running Photoshop. This error message can also appear when your Photoshop Cache is full – bogging down the usage of those temporary files again.
How to Prevent Scratch Disk Error in the Future?
For those of you who have frequent Scratch Disk errors and are constantly running through the above solutions to clear it – I have a few suggestions that may be worth looking into in the future!
Upgrade Your Drive Space
By upgrading or adding additional space to your HDD or SSD you’ll inevitably be ahead of beating those Scratch Disk errors. This will give you more room overall, and it is probably the most understandable solution long term.
Regularly Clean Your Storage
If you keep up with cleaning your storage often already, good for you! Me, on the other hand? Not so much. I have often employed some basic cleaning software to automatically rid my system of unnecessary temporary files or duplicates, and that’s been a great solution for me.
If you don’t have it in the budget or prefer to do these things yourself, then it might be best to set up a schedule – be it weekly or biweekly to ensure you don’t find yourself running into errors often.
Conclusion
As you can see there are a ton of different methods and solutions for troubleshooting that pesky scratch disk error. There is not just one good answer, but many.
After understanding the information here, I’m confident you’ll be able to make the best choice for you and your setup in the future when dealing with these errors.
