
Microsoft Paint is often used for digital drawing. If you plan on using it as such, it’s handy to learn how to erase only one color in Paint.
Hey there! I’m Cara and while I cannot claim to be good at drawing, I do know computer software. Paint is a simple program, but there’s a lot of neat stuff you can do with it – if you know the tricks.
So, let’s look at how to erase only one color in Microsoft Paint.
Table of Contents
Step 1: Draw Something with Two Colors
Again, I’m not good at drawing, so you just get squiggly lines for this example but you get the idea. Here I painted it black and then cover it with green.

Step 2: Choose the Eraser Tool
Go up to the Tools section and choose the Eraser tool.
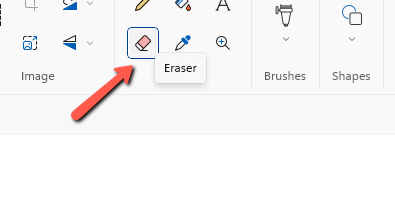
But don’t start erasing just yet. At this point, you could end up erasing everything if you don’t have your colors set correctly.
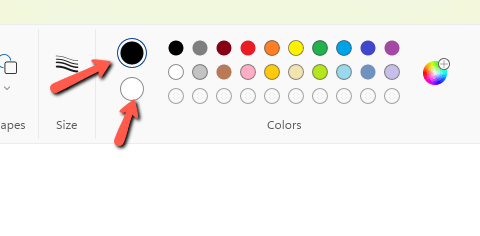
Step 3: Pick Your Colors
In the Colors section, you need to pick your primary and secondary colors. The primary color is whatever color you’re trying to erase. The secondary color is the color you want to replace it with.
In this case, I want to erase the black without messing with the green. I don’t want to replace the color, so I will set it to white.
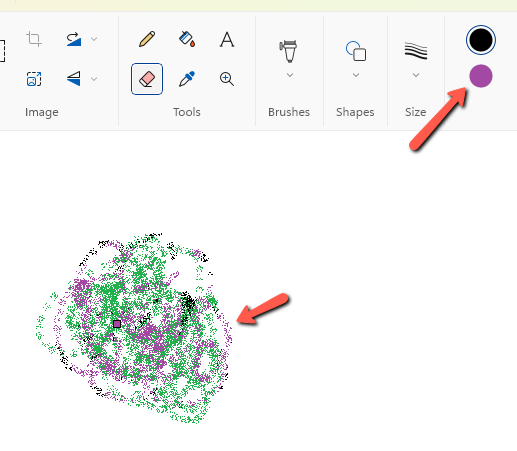
Now, right-click and drag over your drawing. It’s very important to right-click, otherwise, the tool will just erase everything.

Notice how the black is disappearing, but the green remains untouched? That’s exactly what we want!
If you want to replace the color instead of erasing it, just set your secondary color accordingly. Again, click and drag with the right mouse button for this technique to work.
Pretty nifty! To learn how to use this technique to work in “layers” in Microsoft Paint, check out this tutorial!