Are you looking to separate vocals from your audio in Audacity? You’ve come to the right place!
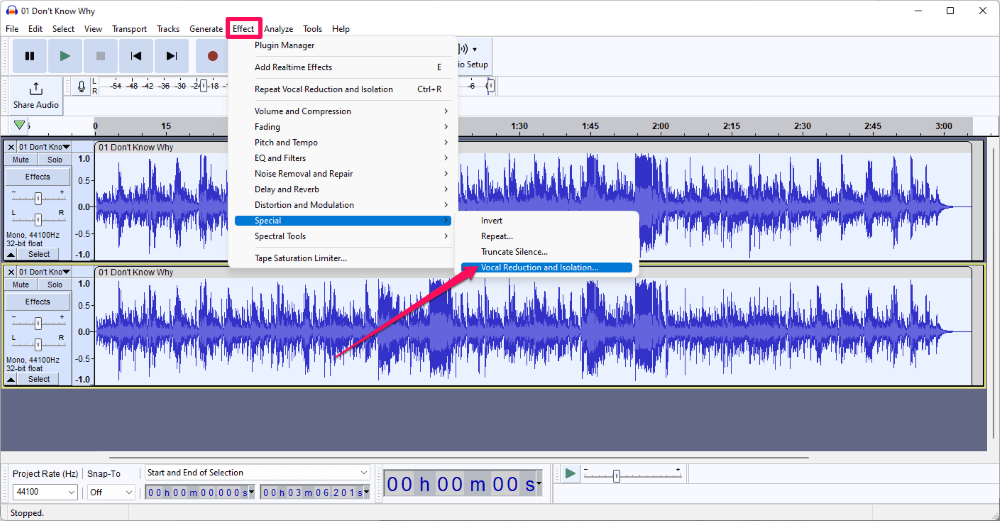
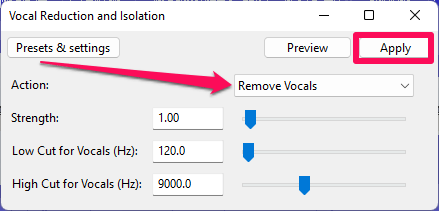
To isolate or remove vocals from a song in Audacity, click Vocal Reduction and Isolation… from the Effect > Special menu. Select Isolate Vocals or Removal Vocals, depending on your preference, and click the Apply button.
Hello, I’m Andrew, and I’ve been using Audacity in various capacities for over a decade. In this article, we’ll closely examine how to apply the vocal reduction effect, as well as some other options and alternatives to consider.
Let’s get started.
Table of Contents
How to Remove Vocals from a Song
Audacity’s built-in vocal reduction and isolation plugin makes removing vocals from a song easy. Here’s how:
- Open Audacity and import the song from which you wish to remove audio. Do this using the File > Import > Audio… menu.
- Select your track.
- Click Effect from the menu bar, then choose Special > Vocal Reduction and Isolation…

- In the Action dropdown, change the action to Remove Vocals.
- Click Apply.

Before clicking apply, you can use the Preview button to hear a sample of the song’s sound with the effect applied.
You can also adjust the strength and frequency ranges of the effect. This may be necessary depending on the pitch of the vocals in your song.
For example, the bass might be panned to the center channel along with the vocals on some tracks. Increasing the Low Cut for Vocals setting could leave the center channel bass intact while removing the higher frequency vocals.
How to Isolate Vocals from a Song
If you want to keep the vocals and remove other audio, you can use the same effect:
- Select your audio track.
- Click Effect from the menu bar, then choose Special > Vocal Reduction and Isolation…
- In the Action dropdown, change the action to Isolate Vocals.
- Click Apply.
As stated above, you might get better results by adjusting the strength and frequency range of the effect.
Considerations
While the built-in vocal effect is very convenient, you will experience varying degrees of success based on several factors. First, you should know Audacity can only apply the effect to stereo tracks because the technique splits the track and then removes (or keeps) what is common to both.
The effect is successful since vocals are usually panned to the center of the track and, therefore, the same on both left and right channels.
Nevertheless, the effect could be better. Any other audio also equally panned will be removed (or isolated). Additionally, backing vocals or voice effects can be difficult to remove from a track.
Because of the destructive nature of the Vocal Reduction and Isolation effect, it is advisable to create a backup of your source audio files.
Are There Other Audacity Vocal Isolation Plugins?
Yes, some third parties have created plugins to isolate vocals. The Audacity wiki page lists some alternatives. Some are free; others are not.
Remember that even with paid plugins, you still won’t get perfect voice removal. Many plugins have a free trial period during which you can test out the effect. Take advantage of the trials to determine if the plugin will accomplish what you desire.
Summary
To recap: select your track and click Effect > Special > Vocal Reduction and Isolation… and then choose Isolate Vocals or Remove Vocals (depending on your preference) to remove or isolate vocals. Click Apply to apply the effect.
Ultimately, the effect’s quality largely depends on the source audio, but adjust the strength and frequency settings until you get the desired results. If in a pinch, explore some third-party plugins that purport to do the same thing as the built-in effect.
Suppose you want to remove vocals for karaoke. In that case, you might first search and see if that track is already available for download on the internet because the result will likely be cleaner than what you get when trying to extract vocals from an already-mixed song.
Did you remove vocals from your song using Audacity?
