The most important part of making a logo on Procreate is knowing exactly what your client wants. The second most important part is to create a unique logo that fits your client’s brief and save it as a transparent PNG file so they can use it for all purposes.
I’m Carolyn and I’ve been creating logos for my clients for over three years. My digital illustration business is solely run using the Procreate program so I am a wizard at creating unique, memorable logos using all of the app’s amazing features and tools.
A logo is a part of the bigger picture so it’s important to do your research and think through each design element as this can be a crucial part of the success of your or someone else’s business. And Procreate provides you with all of the tools you need to make this happen.
Note: Screenshots are taken from Procreate on iPadOS 15.5.
Table of Contents
Key Takeaways
- Always start with a strong brief that incorporates all of your client’s wants or needs before starting to craft a new logo design.
- Use a large-size canvas to ensure high-quality output when saving your logo.
- Always save your logo with a transparent background.
- Provide the client with various options for the final design to ensure they have all of the options and file types they will require in the future.
How to Make a Logo on Procreate – 2 Essential Parts
There are two important parts to creating a logo on Procreate. Today, I’ll walk you through each part and how they impact each other. All you need is time, an iPad, and your Apple Pencil.
Part 1: The Brief
Whether you are creating a logo for a client or if you are the client, this part is by far the most crucial of the two. This is where you will start your design process. You’ll use this brief to make every single one of your design decisions in the future and determine their success.
The purpose of having a design brief is to ensure you have the answer to all of the questions that you need to know in order to produce a logo that will represent the company and the brand. A business logo will be used for almost all company branding so it needs to be right.
It’s good to spend some time discussing this with your client, gathering their feedback, and then reiterating this to ensure that you understand them correctly and are both on the same page. Now is also a good time to discuss a timeline for the project at hand.
The information you require will vary depending on each client so you can determine your own discovery questions before each project begins. Below is a general idea of the type of information that I attempt to get from my clients and why:
The basics
Start small and ensure you know the name of the company and how to spell it correctly. You should also know the company’s values, and its main purpose and have an idea of its main business goals and which industry it belongs to.
Design ideas
Sometimes a client will have a specific idea of what they want and sometimes they will want you to start from scratch. Either way, try to gather a clear vision of what they want or might not want with a series of this or that questions. Give your client a base for their thought process.
Logo type
This will hopefully help you and the client decide if the logo should be lettering, symbols, imagery, or a combination of any of the three. This can change a logo from a simple business stamp to a tiny little piece of artwork.
Meaning of the logo
What message do they want to convey with their logo and what should it represent? This can be simple and sometimes obvious but it’s always good to confirm beforehand. For example, you won’t use a spatula in a logo for a tree trimming business.
Purpose of the logo
What will the logo be used for? Is this an online business and it’s for Instagram Profile? Or is it a law firm that will be printing its logo on multiple pieces of mail every day? This will determine not only the level of detail but also the file types they will need access.
Part 2: Logo Design
Now the hard part is done and you know what the client wants. You have a design in mind and now it’s time to create it. Follow the steps below on how to make your logo and save it in Procreate:
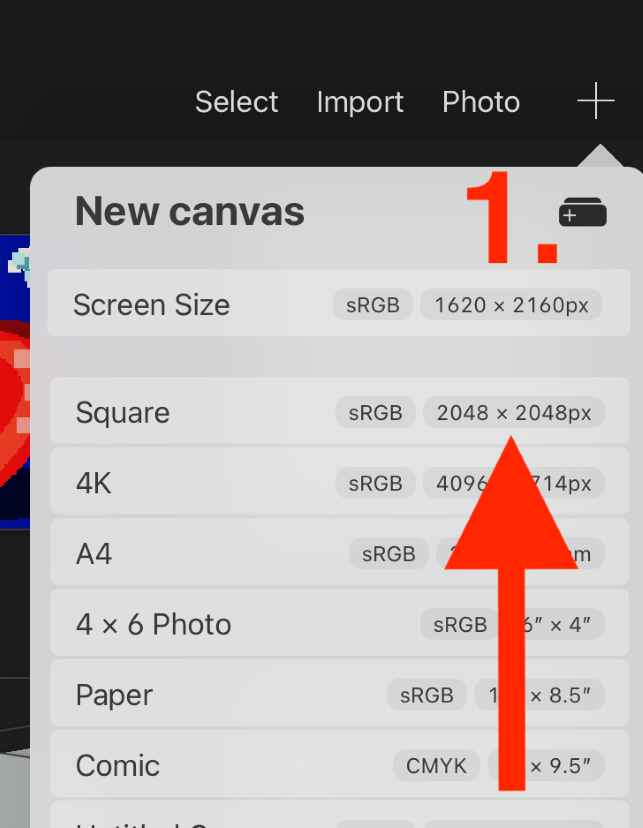
Step 1: Open a new canvas and ensure its dimensions are big enough to produce a high-quality image. I like to use 2048px x 2048px in a square format.

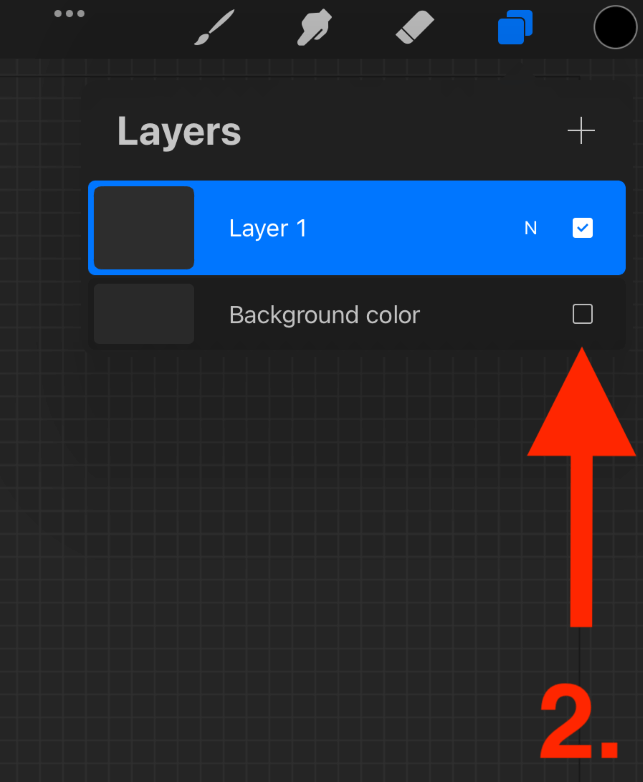
Step 2: Remove the background of your canvas by unticking the background layer in the Layers menu. This will ensure your logo will be saved as transparent.

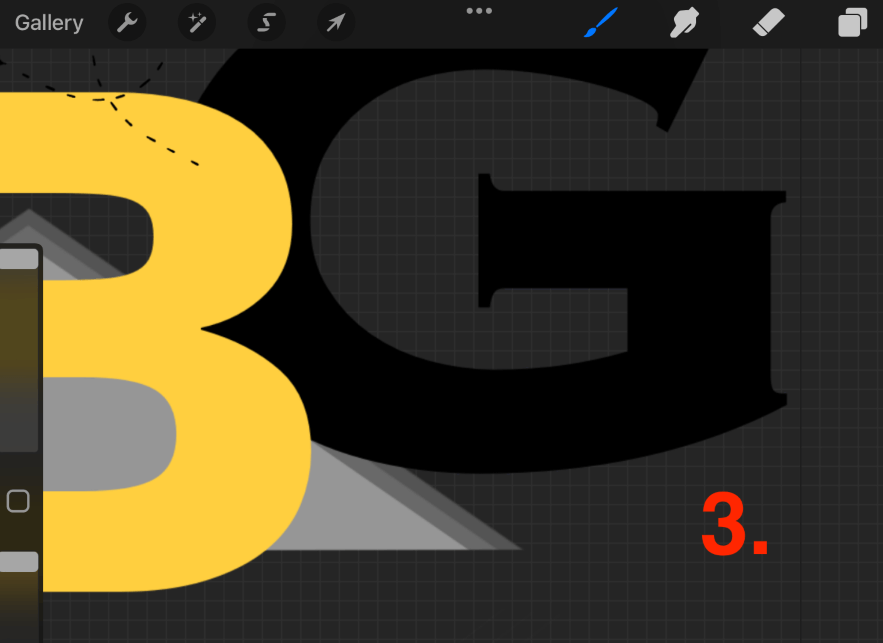
Step 3: Draw your logo. Zoom in on your design to ensure that the lines are clean and there are no errors whatsoever.

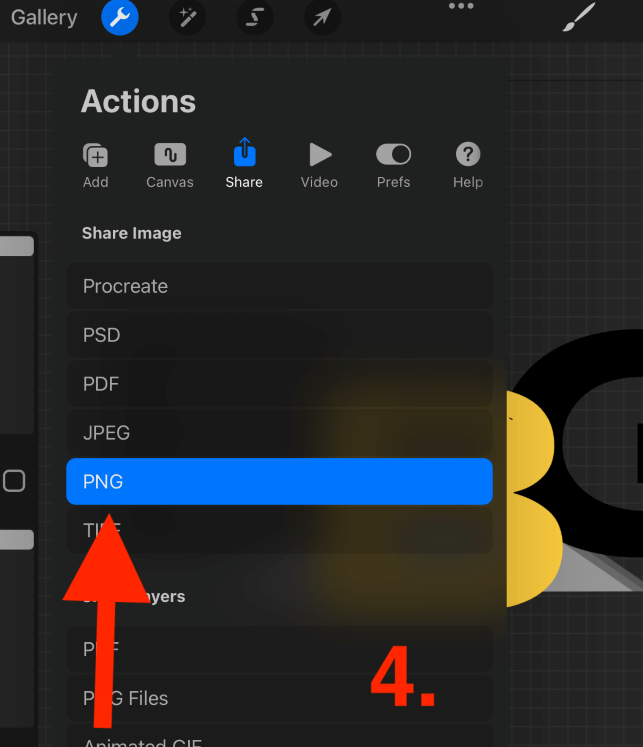
Step 4: Once you are confident that your logo is complete, it’s time to save it to your device. Tap on the Actions tool (wrench icon) and select the Share menu. Select the PNG file type and wait for Procreate to export it to your device.

Pro Tip: PNG is the best file type for saving transparent backgrounds. Not all file types will support this setting and they will automatically save onto white backgrounds.
Logo Tips
Here are a couple of things I add to my process that may also help you someday:
- Provide your client with two different options. This can be small variations on the original design but may help them to decide their preference. Changing something simple like the opacity of a letter can make a huge design difference.
- If the client requests edits, complete them as soon as possible. If you have the client’s time and attention right now, make the most of it. They may be busy and you don’t want your design to be placed at the back of their minds.
- Once your client has approved the final design, send them a couple of options. I always include an option with a black or white border especially if they plan on using your logo to print on different colored backgrounds or use online.
- Provide the client with multiple different file types of the final design and explain which each one can be used for. They may not know that PNG is best for printing or that JPEG is best for digital use so you should share your expertise with them.
FAQs
Below I have briefly answered some frequently asked questions about making a logo on Procreate:
Can I use Procreate logo template?
If you’re struggling with ideas, there are a lot of graphic design websites online that work as logo generators. You can purchase a generated logo from these businesses and use it as a template on Procreate. Make sure you are aware of trademark licensing laws before doing so.
Is Procreate good for logo design?
Procreate is one of the most popular app choices for creating logos. It offers a wide variety of functions with a friendly user interface that makes it easy to create and export logos onto your device.
Does Procreate create logos in vector format?
No. Procreate is a pixel-based design program rather than a vector-based one. This means the work you produce on Procreate will be pixel graphics.
What’s the best canvas size for a logo in Procreate?
Try to use a large-size canvas to ensure high-quality output. I like to use the dimensions 2048px X 2048px on a square transparent background.
How to make a logo on Procreate Pocket?
Procreate Pocket gives users access to a full range of the functions needed to create logos on the app. This means that you can follow the step-by-step above to create and save logos on the Procreate Pocket app.
Conclusion
Logo Design is a competitive industry as more and more AI programs are producing new technology that creates design components at the drop of a hat without even so much as consulting a real-life artist. But I wouldn’t take that as a deterrent to learning how, it’s not over yet.
This just means that we as digital artists have to up our game and always be ahead of the curve. Handmade designs and crafted logos will always have a level of authenticity that cannot be replicated by any piece of technology, yet…
Do you use Procreate for logo design? Share your pieces of wisdom and advice in the comment section below.
