To fade text in Adobe Premiere Pro, select typed text. Go to the effect panel and search for dissolve; select “film dissolve” from the list of available video transitions. Drag this film dissolve to the beginning of the text clip in a sequence timeline to fade.
I’m David, a professional video editor, and animator. I’ve done motion graphics with Premiere Pro for ten years.
So, in this article, I’ll show you how to use various techniques to fade text in Adobe Premiere Pro. Let’s dive in.
Table of Contents
How to Fade Text in Adobe Premiere Pro
Adobe Premiere Pro is powerful video editing software that allows users to create unique and creative effects with their video projects.
The ability to fade in text is a popular effect. Text that fades in and out gives a video project a nice, polished look because it allows the text to come into focus or fade out of focus gradually.
Fading text in Adobe Premiere Pro is a simple process. The first step you will need to take is selecting the text you would like to fade in.
After that, go to the effect panel, type “dissolve” into the search box, and you’ll find a variety of dissolve effects. Choose “film dissolve.” This will allow your text clip to fade in quickly.
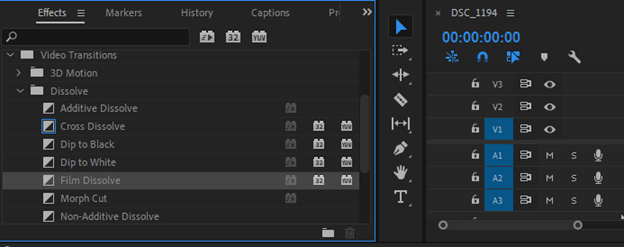
To fade in, select the film dissolve transition and drag it to the beginning of the text clip. You can also adjust the transition duration by dragging the arrows at the end of the transition clip.
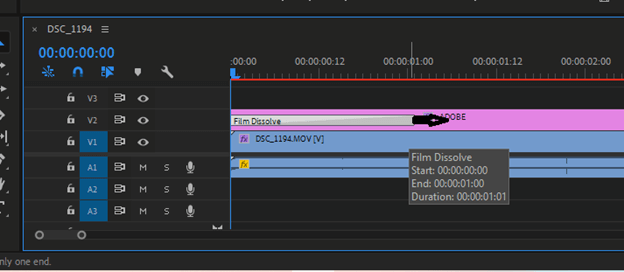
Suppose you want to repeat this effect in your sequence repeatedly. Right-click on the film dissolve in the effect panel to make it the default transition and then press Ctrl + D to apply it on any clip.
How to Use Opacity Method to Fade Text in Adobe Premiere Pro
Select the text from your timeline to fade in Adobe Premiere Pro. Once you’ve selected the text, you need to open the opacity settings in the Effect Controls panel.
Text fading in Adobe Premiere Pro makes the text appear or disappear gradually on the screen. Fading text can highlight words or phrases and add a dynamic look to your project.
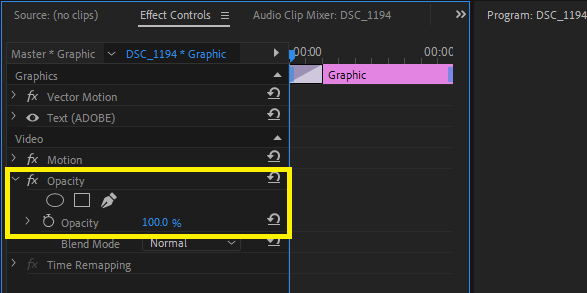
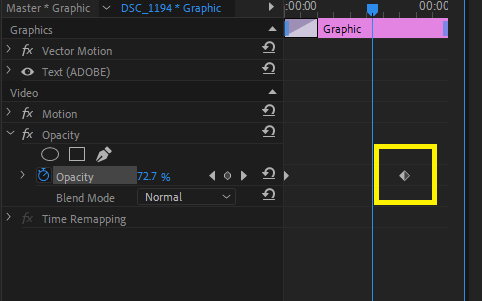
Note that it’s about time to start working with keyframes. The keyframes are set up automatically anytime you change the value of the animation opacity, or you can click on the diamond icon to create your keyframes manually.
Be clear; if you click on the stopwatch again after turning it on, you turn off the keyframe, and the keyframes created will be deleted automatically.
Let’s go into fading the text. Make sure your playhead bar is at the beginning of the text clip. Click on the stopwatch behind the opacity to set the keyframe. Automatically, the keyframe will be set to 0.
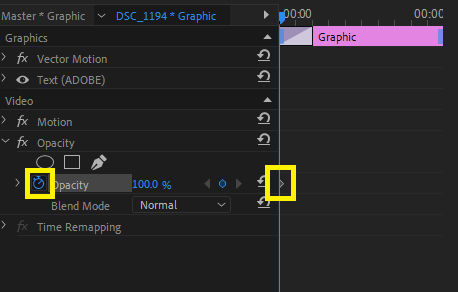
Drag the playhead bar to the point in the text clip where you want the text to be visible or appear.
Set the Opacity value back to 100%, and the second keyframe will be created automatically.
Note this, Check the speed of the animation by playing it in preview.
If you are unsatisfied with speed, move the second keyframe closer to or forward from the first. Moving the keyframe forward will slow the animation speed, and moving it closer will speed it up.
When to Use Fade-In Animation
Fading in can have a more dramatic effect since you can add it to your project after you’ve finished it or during the project. It’s also useful for logos and text transitions on-screen.
If you are using this fade effect as a transition, try to moderate it so as not to overuse it. I will oblige you to use these effects whenever you want to draw attention to your text’s beginning or end.
Conclusion
Try out this film dissolve effect on your next project now that you know how to use it to fade in your text. Let’s go over everything again.
Go to the effect panel and search for dissolve. Then choose the “film dissolve” transition and drag it to the beginning of the text clip in the sequence timeline to fade in.
This guide has helped show you how to use film dissolve fx in Adobe Premiere Pro to fade text in. If you need any additional help, don’t hesitate to contact me by dropping your question in the comment box below.
