To merge tracks in Audacity, select the tracks you want to combine, then click Mix and Render from the Tracks > Mix menu.
Hi, I’m Andrew. I’ve been using Audacity for over a decade, and in this article, I’ll show you how to quickly mix tracks before export. I’ll also provide some considerations for getting your audio just how you want it.
Let’s get started.
Table of Contents
How to Merge Multiple Tracks into One
Audacity will automatically merge or “mix” all tracks when playing back audio or exporting your project. Nevertheless, you can manually mix two or more tracks if desired.
But if Audacity automatically combines tracks, why would you need to manually merge them? Explicit mixing allows you to clean up your project by reducing the total number of tracks, so when you get a mix the way you like, this process will allow you to better organize the remaining tracks.
Furthermore, you’ll be able to see what the waveform looks like so you can adjust for clipping or other undesirable effects prior to export.
Here’s how to explicitly mix two or more tracks:
- Select the tracks you want to combine. You can hold down Ctrl (Windows) or Command (macOS) while clicking to select multiple tracks.
- Click Tracks on the menu bar, then select Mix > Mix and Render.
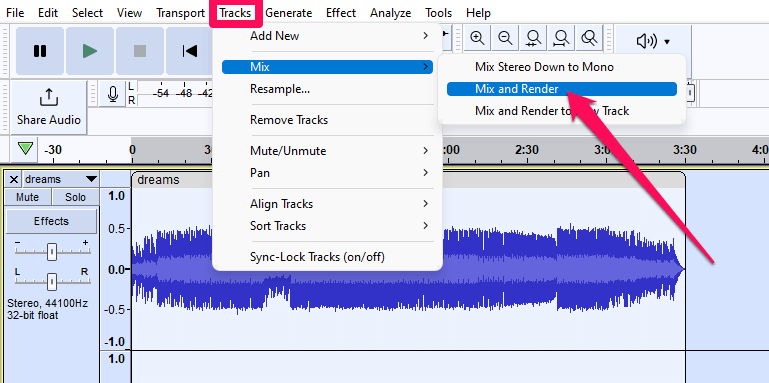
Note: you can mix the selected tracks with a new one using the Mix and Render to New Track option. This will give you a mixed track while preserving the originals.
Pretty easy, right? While the basics are simple, there are a few things to consider when merging tracks.
How to Adjust Track Levels to Prevent Clipping
The primary consideration is the dB level of your audio. Mixing tracks is additive, meaning your overall levels increase when combining tracks. Because of this, you might need to reduce the amplification before merging.
If your individual tracks approach 1.0 (0 dB), it is a good idea to lower their levels. To do so:
- Select the tracks you want to modify.
- Click Effect on the menu bar, then select Volume and Compression > Amplify…
- Use the slider, Amplification (dB), or New Peak Amplitude (dB) input boxes to adjust amplification. (All three settings are linked.)
- Click Apply.
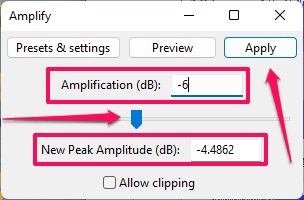
What you set here depends on several factors, including current levels and the number of tracks you want to mix and render together.
Keep in mind that in Audacity, a 1.0 peak is equivalent to 0 db and .5 is -6 dB. So if you are merging two tracks that peak at 1.0, setting the amplification to -6 should give you plenty of overhead.
Play around with the amplification settings until you get them the way you want. You can always undo changes using Ctrl+Z (Windows) or command+Z (macOS).
How to Adjust the Balance of Your Tracks
In addition to adjusting the combined level of tracks, you can also adjust their balance. In this way, you adjust the level of each track relative to the others. You must do this before executing the Mix and Render command.
To adjust the balance, use the gain slider to increase or decrease the volume for each track as desired. You can adjust the gain during playback to get real-time balance feedback.
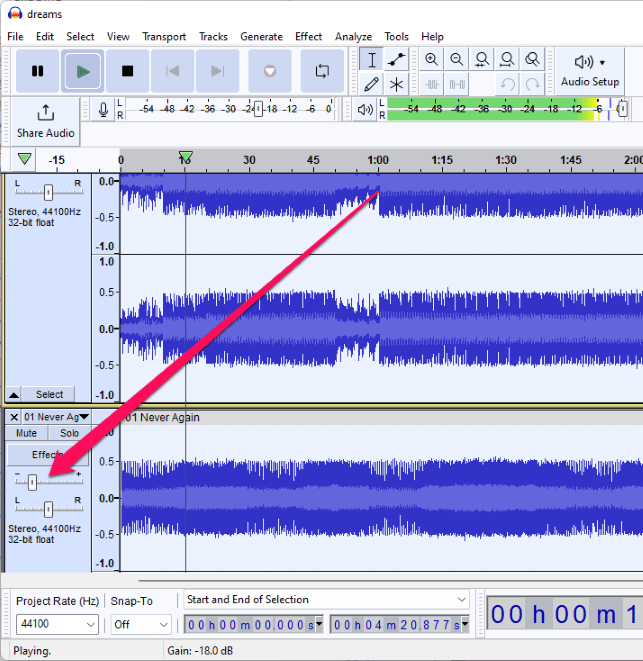
When merging tracks, Audacity will respect the gain slider settings to preserve your balance.
How to Combine Tracks End to End
If you want a second track to play immediately after the first track ends, do the following:
- Select the tracks you wish to arrange end to end.
- Click Tracks on the menu bar and choose Align Tracks > Align End to End.
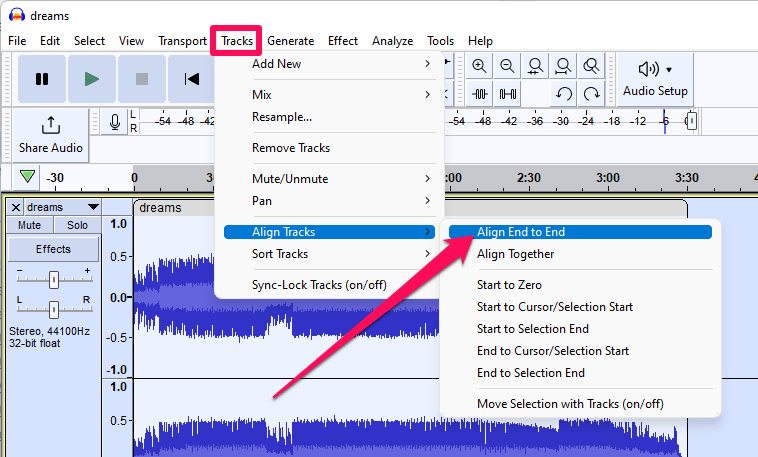
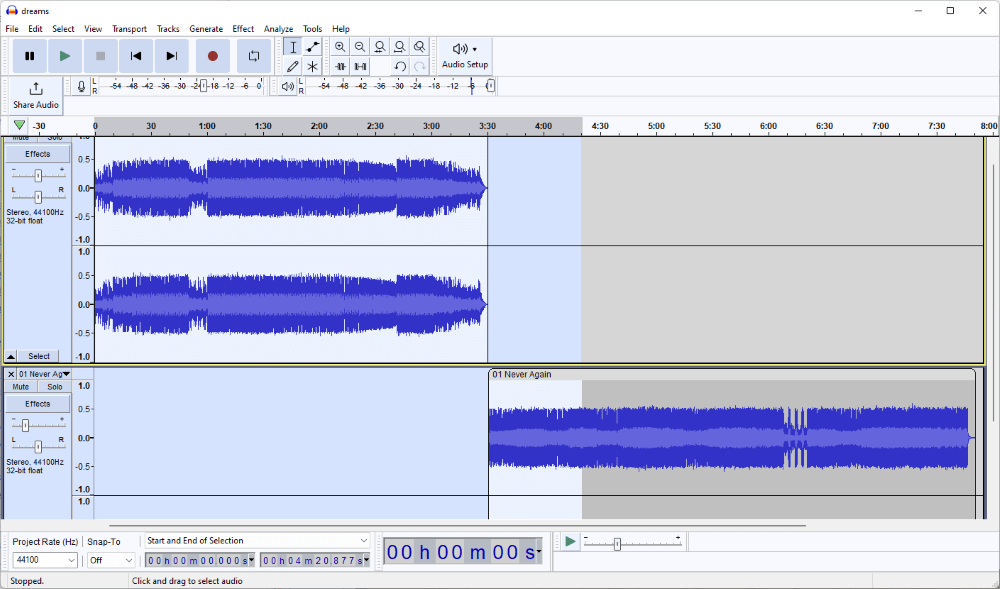
Once aligned, you can Mix and Render the multiple tracks into one continuous track.
Merge Tracks in Audacity with Just a Few Clicks
As you can see, combining tracks is easy to do. To merge tracks in Audacity, just click Mix and Render from the Tracks > Mix menu.
Be sure to pay attention to your audio levels, so your mixed track doesn’t result in clipping.
Mixing tracks results in losing the originals, so if you need those, choose Mix and Render to New Track instead. Just be sure to mute or delete the duplicate tracks before exporting your final audio.
Were you able to merge your audio tracks? Let us know in the comments!
