You can use Command+Click, click & drag, or the “Select All” toggle in the Photos app on your Mac. Selecting multiple photos at once can make things more efficient and save you time.
I’m Jon, a Mac guru, and owner of a 2019 MacBook Pro. I often select multiple photos on my Mac and made this guide to help you do it.
So keep reading to learn the easiest ways to select multiple photos on your Mac.
Table of Contents
Method 1: Use Command + Click
There are a few ways to rapidly select bunches of photos on your Mac simultaneously. The easiest way for me is using Command + click. This option is ideal when you have a few miscellaneous images scattered throughout an album or folder you want to work with.
Follow these steps:
Step 1: Open the Photos app on your Mac. You can do this in a few ways, either by clicking its circular, rainbow-colored icon in the Dock or by finding it in your Applications folder. If you can’t find it in the Dock, go to Finder, press ⌘ + Spacebar, and type “Photos.”

Step 2: Find the photos you want to work with. Ideally, they’re all in the same location to make transferring them easier.
Step 3: Click on one of the photos you want to work with.
Step 4: Hold down the Command button and click on each additional photo you want to work with to add it to your selection. A blue border will appear around each image you select, and the total number will show near the top right of the window.

Step 5: To deselect photos, continue holding the Command key and click each image you want to remove from your selection. To deselect all the photos in your selection, release the command key and click an empty space outside somewhere in the window (not on an image).
Step 6: Once you select the photos you want to work with, copy, forward, delete, export, or sort them as necessary.
Method 2: Click and Drag
Alternatively, you can use the shift key for the same result. This is ideal when the photos are right next to each other, as you can drag across the pictures you want to work with, and it will select them all.
Follow these steps:
- Open the Photos app on your Mac.
- Find the photos you want to work with.
- Click on the first photo you want to work with to add it to your selection.
- After clicking on the first photo, click and hold on empty space and drag your cursor on the last photo in the bunch. A translucent box will appear as you drag, and each photo you select will show a blue border.
- Now, all the pictures within that range are selected, and you can transfer or export them as necessary.

Method 3: Use “Select All” in The Photos App
If you want to select all images in an album quickly, you can do that with a quick shortcut in the Photos App on your Mac.
To use the “Select All” function in the Photos app, follow these steps:
- Open the Photos app on your Mac.
- Navigate to an album containing the photos you want to select.
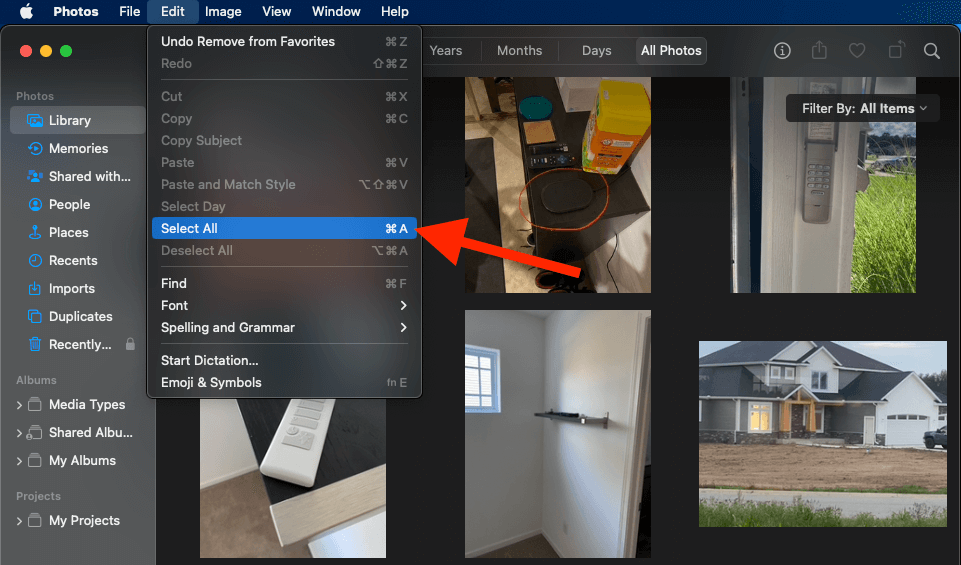
- Click on “Edit” in your menu bar and click on “Select All” in the dropdown menu. Alternatively, you can press Command+A on your keyboard.
- You can copy, forward, delete, etc., all the photos in your current album. If you want to deselect certain ones, simply hold the command key and click the photo(s) you wish to deselect once.

Conclusion
You can save time selecting multiple photos on your Mac by holding the Command key, clicking and dragging, or using the “Select All” shortcut in the Photos app. No matter which option you choose, you can speed up the process by avoiding individually selecting each photo.
What’s your go-to method for selecting multiple photos on your Mac? Let us know in the comments below!
