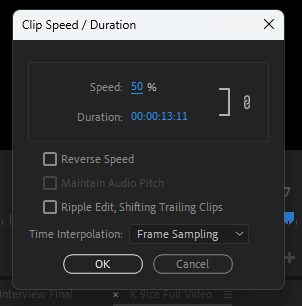
In your Adobe Premiere Pro sequence, right-click on the Video Clip, and navigate to Speed/Duration. Input a number that is below 100% to slow down your video.
Slowing down a video is a process that starts from the production stage – By using the appropriate frame rate, movement of the camera, and also the quality you are shooting. Coming out with a good result is inevitable if you plan your shoot in advance.
Slowing down your footage means spacing out the frames. In this article, you will get to know the kind of footage to slow down, and how you can slow down video clips, I will also discuss the differences between speed ramping and time remapping, and explain what a rate stretch tool is.
Table of Contents
How to Slow Down Video Clips in Premiere Pro
Slowing down video clips in Premiere Pro is an easy task. Just select the clip and right-click on it, then you will see a drop box, select Speed/Duration. After doing this, a window will open having different options. Since we intend to slow down the video clip, just lower the sequence percentage to something like 50% or your desired percentage.

But, have this at the back of your mind, the lower the percentage which you have chosen, the slower the resulting clip will be. You can choose “Reverse the Speed” of your Video clip, maintain the Audio Pitch, ripple edit, play with these options and see what works best for you.
Once you are done with the necessary adjustments from that dialogue box, simply select OK and this will apply the slow-mo effect to your video clip.
What Type of Video Can I Slow Down?
It is not all footage that is worth slowing down, because a good-looking slow-mo video depends on the amount of frame rate you use while recording. So, before recording, set your frame rate to 60fps or higher to have a good output while editing and after editing.
There are multiple frame rates you can use to create a slow-mo video, like:
- 30 fps
- 60 fps
- 120 fps
- 240 fps
- 480 fps
- 960 fps.
All these frame rates can create slow motion perfectly, although their outcome varies in look and feel.
If you shoot at 30 fps you can slow it to 15 fps and double the frames, it will look stuttering. If you shoot at 60 fps and slow to 30 fps it will look like true movement at half speed.
So, I would recommend you to ONLY slow down video clips that are shot in 60fps and above.
Speed Ramping VS. Time Remapping
Speed ramping is a type of motion control where the speed of a video clip changes between slow motion, standard speed, and fast motion. This can be done to create a smooth transition between two motion scenes or to gradually increase or decrease the speed of the scene.
Time Remapping, on the other hand, allows you as a video editor to change time at a different time across your clip, by slowing it down and speeding it up as you desire throughout, rather than having a consistent time effect.
This time remapping can be used to create speed ramps, where throughout your clip, the video speeds up or slows down.
Rate Stretch Tool Explained
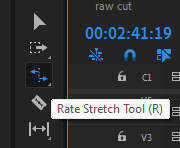
The Rate Stretch tool in Premiere Pro is a good tool that you can use to adjust the speed of your video clip, and it is also super handy for quick fixes.

To use the rate tool, select the clip and press R or select the rate stretch tool from the toolbar, then go to the end of the clip and push it inward if you want it to slow down, push the clip forward.
To make this slow-down motion smooth, right-click on the video clip and select time interpolation from the drop-down box, and select optical flow from a sub-drop-down box. This will allow you to create or generate extra frames to make the slow motion smooth.

Conclusion
To slow down your footage in Premiere Pro: first, select the clip you want to edit. Next, go to the Clip menu and choose Speed/Duration. Finally, enter a percentage lesser than 100% and click OK.
By following these simple steps, you can easily slow down your footage in Adobe Premiere Pro. Got something for me? Let me know in the comment section.
