There are two ways to use Procreate without the Apple Pencil. You can either draw and create using your fingertips or you can invest in an alternative brand of stylus. I recommend the latter as Procreate is designed to be used in conjunction with a stylus, for best results.
I’m Carolyn and I’ve been drawing on Procreate for over three years. My digital illustration business relies solely on my unique, hand-drawn artwork and I could not create the work that I create without using an Apple Pencil or stylus.
Today I’m going to share with you how to use Procreate without an Apple Pencil. But I must admit, I am biased towards this product as it has been proven to be the best iPad-compatible device for drawing. However, let’s discuss all of your options.
Note: Screenshots from this tutorial are taken of Procreate on my iPadOS 15.5.
Table of Contents
2 Ways to Use Procreate Without Apple Pencil
There are two ways to use Procreate without the amazing Apple Pencil. I’ll explain those two options below and you can decide for yourself which option is best for you.
Method1: Draw with your fingertips
If you want to go back to caveman times, go ahead. I salute you! Nothing I have ever created using just my fingertips has seen the light of day. But maybe you possess the skills it requires to successfully use this option.
The one thing that I find doesn’t require a status, is adding text. So if you’re creating lettering, you’re in luck. But when it comes to painting fine details, creating movement, clear fine lines, or shading, using a stylus will more than likely be much easier.
But why? Because the Procreate app is designed to emulate the feeling of drawing in real life with a pen or pencil. But of course, the app is used on touch screen apps so you are able to do both which is pretty cool and convenient, especially if your stylus is out of battery.
There are a couple of handy settings to be aware of when drawing using your fingertips. I have created step by steps below for each to get you started:
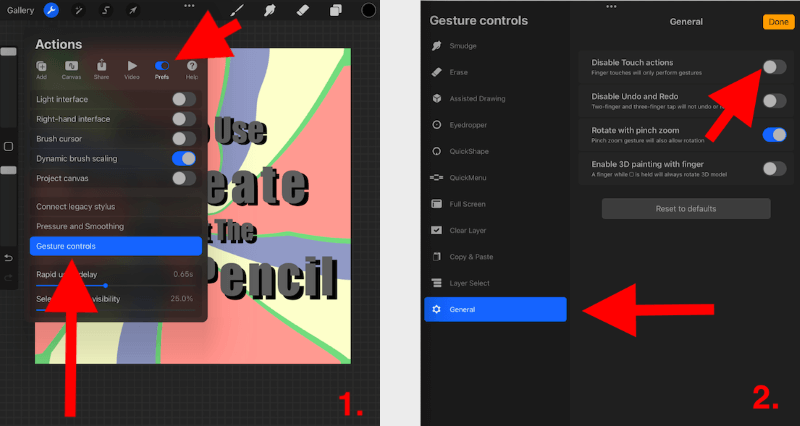
Ensure the Disable Tool Actions toggle is switched off
This should be a default setting in Procreate. But if for some reason it’s not allowing you to draw by hand, it may have been switched on. Here’s how to fix it:
Step 1: Tap on the Actions tool (wrench icon) in the top left corner of your canvas. Then select the Prefs option, this should be in between the Video and Help options. Then scroll down and tap on Gesture Controls. The Gesture controls window will appear.
Step 2:Scroll down to the bottom of the list and tap on General. At the top of the new list, you should see the heading Disable Touch actions. Ensure the toggle is switched off.

Check Your Pressure Sensitivity Settings
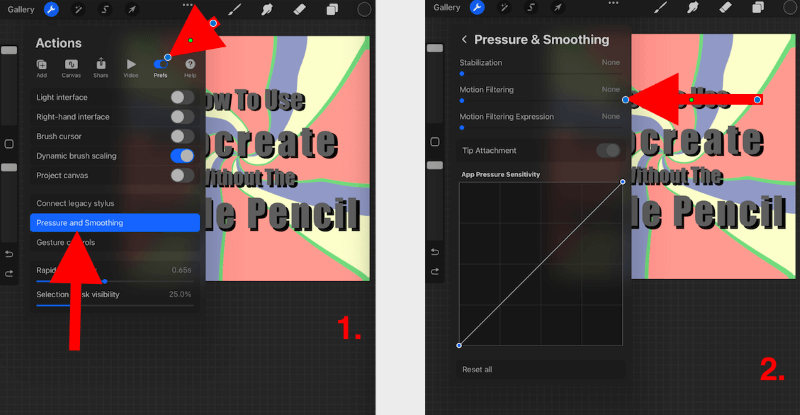
Now that your ability to draw by hand has been activated, it’s time to adjust (or reset) your Pressure Sensitivity setting. Here’s how:
Step 1: Tap on the Actions tool (wrench icon) in the top left corner of your canvas. Then select the Prefs option, this should be in between the Video and Help options. Then scroll down and tap on Pressure and Smoothing.
Step 2: You now have the option of the percentage of Stabilization, Motion Filtering, and Motion Filtering Expression. You can play around until you find the pressure that works for you or you can choose to Reset All for the default pressure settings.

Method 2: Use another stylus
As Procreate created this app to give the same sensation as drawing with a pen or pencil, using a stylus gives you the biggest magnitude of capabilities. This gives the user the same control and benefits as drawing in real life. And combined with the touch screen, it is limitless.
And although the Apple Pencil has been proven to be the best stylus for the Procreate app, it isn’t the only option. I’ve compiled a short list of alternatives below and a guide on how to sync them with your iPad.
- Adonit — This brand has a wide range of Procreate compatible styluses and they have one for every preference.
- Logitech Crayon — This stylus is great because it mimics a large pencil making it very comfortable to hold.
- Wacom — Wacom offers a large selection of styluses but their most popular range, the Bamboo range, is actually optimized for Windows. Rumor has it they are compatible with iPads but not as easy to get in the US.
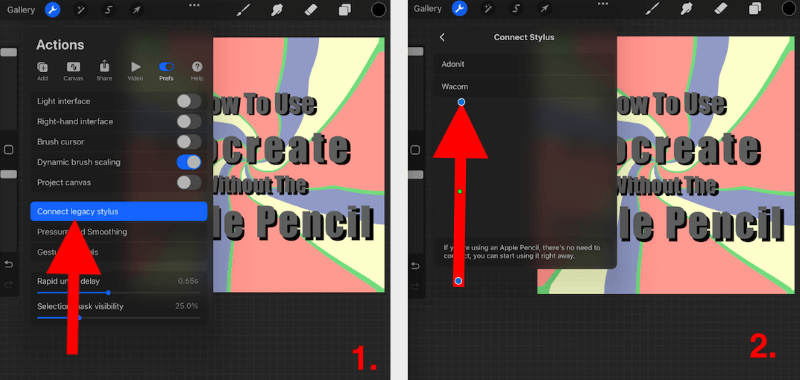
Once you have found the stylus that meets your criteria and price point, it’s time to pair it with your device. If you have an Adonit or Wacom stylus, you can follow the guide below. Otherwise, you can follow your manufacturers’ recommendations.
Tap on the Actions tool (wrench icon). Scroll down and select Connect legacy stylus. Here you can select which device you wish to pair. Ensure your Bluetooth is on and follow the directions on the screen.

FAQs
Below I have answered some frequently asked questions about using Procreate without an Apple Pencil:
How to use Procreate Pocket without Apple Pencil?
Because Procreate and Procreate Pocket offer almost all of the same capabilities, you can use the same options listed above. You can use your fingertips or an alternative stylus to draw on Procreate Pocket.
Can I use Procreate without an Apple Pencil?
Yes, you can. You can use another compatible stylus or use your fingertips to use Procreate.
Can you use a regular stylus on Procreate?
Yes. You can use any stylus that is compatible with iOS.
Conclusion
As you may know, I am a die-hard fan of the Apple Pencil. So I have a very biased opinion on the best option. Whatever you do, I highly encourage you to invest in a stylus. It allows you to have so much more control than just your finger and having a stylus means you can do both.
And on that note remember, you get what you pay for. I have even seen styluses available on fast fashion websites…They may be cheap but they are certainly not long-term options. Always refer back to the Procreate recommendations if you really want the best option.
What’s your stylus of choice? Share your opinions below and let us know if you’re a fingertip drawer, stylus user, or both.
