Having professional-looking work is an important part of being a video editor. One of the best ways to do this is by adding zoom to your text, videos, or pictures.
Luckily in DaVinci Resolve, they give us the option to use dynamic and keyframe zoom, which are both great and easy-to-use options.
My name is Nathan Menser. I am a writer, filmmaker, and stage actor. When I am not on stage, on set, or writing, I am editing videos. Video editing has been a passion of mine for six years now, so I am happy to share this easy, yet very cool effect.
In this article, I will show you how to zoom using dynamic zoom, or keyframes.
Table of Contents
Method 1: Dynamic Zoom
This method is a way around using keyframes, which will speed up the editing process.
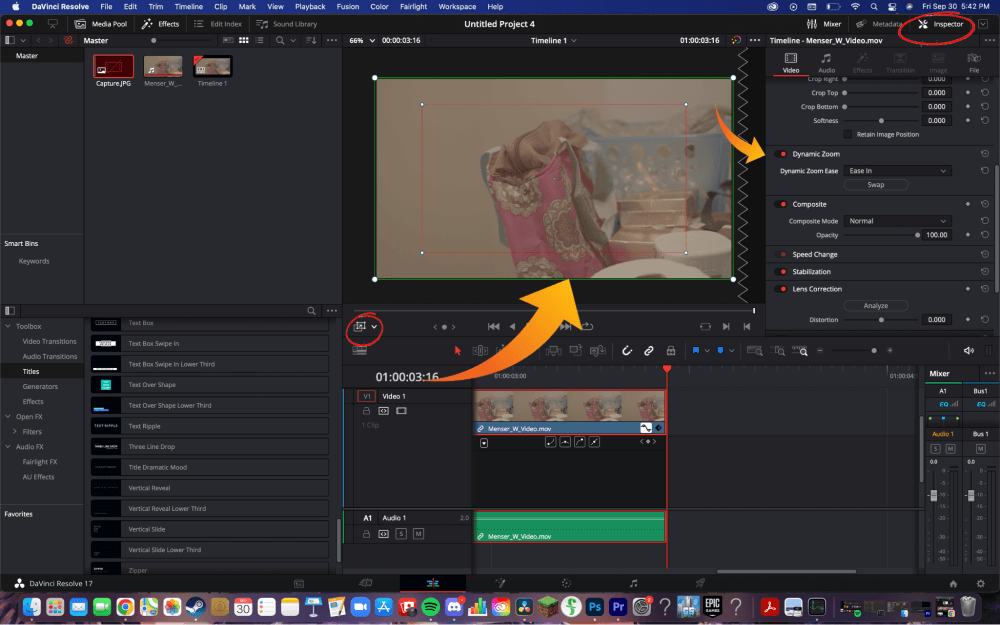
Step 1: Navigate to the Edit tab. There is a menu of icons in the middle at the bottom of the screen. Hover over each one until you locate the tab titled “Edit.” In the top right corner of the screen, select the Inspector menu.
Step 2: From the “Inspector” menu, click Dynamic Zoom. This will drop down an option called Dynamic Zoom Ease.
Step 3: Pull up the dynamic zoom options on the video playback screen. In the bottom left corner of the video playback screen, there is a small, white rectangular icon. Click it and a drop-down menu will appear. Select “Dynamic Zoom” from this menu as well.
Step 4: A green box embedded in a red box will appear in the middle of the video playback screen. The boxes represent where the zoom will end and begin. You can change both the position and size of the boxes. Adjust them as needed.

To zoom out, the red box must be outside the green box. To zoom in, you can swap the boxes by selecting “Swap” under “Dynamic Zoom” in the “Inspector” menu.
You can also change the type of zoom from “Linear” to “Ease In” or “Ease Out.” You can find these options under the “Dynamic Zoom” option in the “Inspector” menu.
Use the red and green rectangles to change how much and in which direction to zoom, while choosing the type of zoom from the “Inspector” menu.
Method 2: Keyframe Zoom
Step 1: From the Edit page, you need to access the Inspector menu. You can find it in the top right corner of the screen. Once you’ve clicked it, a menu will pop up beneath the icon.
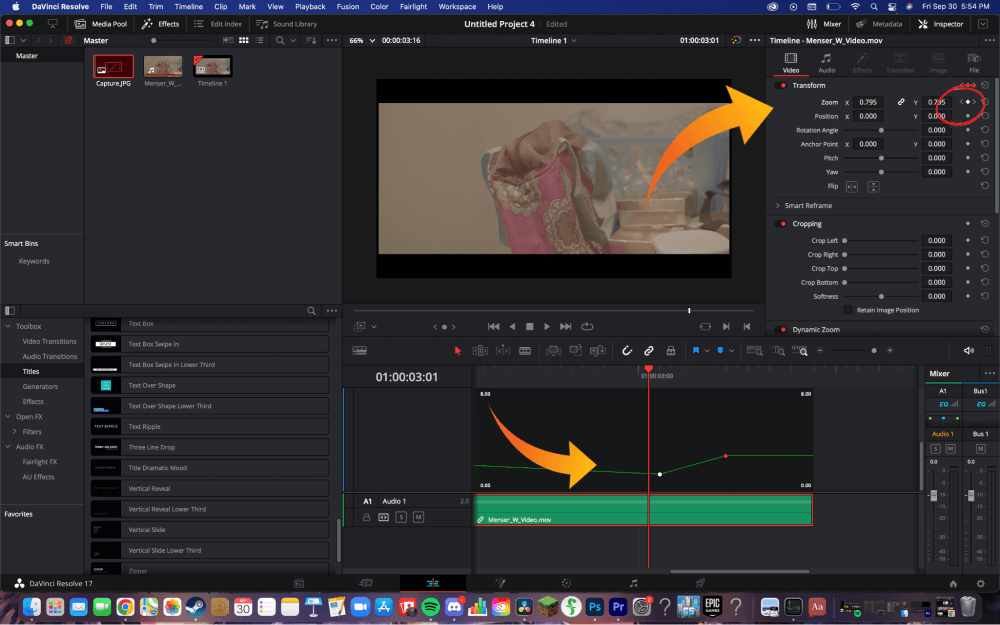
Step 2: Click Transform. That will pop up even more options, including Zoom” and Position. From here, you can alter the pixel numbers on both the X and Y axes. This will zoom in and zoom out on your video clip on the video playback screen.
Step 3: Decide when you want to zoom to begin and end. To do this, you will select keyframes. Select a spot on the timeline you need the zoom to begin by dragging the red bar to the exact frame.
Step 4: Under the “Inspector” menu, select the little rhombus next to the y-axis pixel count. The tiny rhombus will turn red. This is called a keyframe.
Step 5: Go to the video clip on the timeline. In the bottom right corner of the clip, there will be an icon shaped like a black wavy line. Click it.
Step 6: A small window will appear in your timeline allowing you to edit the keyframe. Once again drag the red timeline bar to select the exact moment in the video you want the zoom to stop. Then, create another keyframe by clicking the rhombus sign in the “Inspector” menu.

Make sure the link button between the pixel counts is white. If it’s not, the video will become distorted and unpleasant to watch.
Once you’ve created your 2 keyframes and you’ve checked that the link button is white, you can alter the number of pixels on the x-axis. The y-axis will change with it. By changing the pixel counts, you can both zoom in and zoom out.
Conclusion
That’s all it takes! Now your media can zoom in and out in DaVinci Resolve. If you want to have multiple zooms in and out, just create a new keyframe, and adjust accordingly.
Thanks for taking the time to read this tutorial. Hopefully it has helped you along on your DaVinci Resolve editing journey! Leave a comment letting me know if you have any questions or feedback.
