
If you’re not familiar with the term Print Bleed, it’s probably because you’re not used to working with other Adobe software – or perhaps you simply haven’t worked in print before. Similar programs like Adobe Illustrator and InDesign provide us with a reference that serves as a guide for this bleed, but Photoshop does not.
My name is Skyler, and I’ve been using Photoshop on a personal and professional level for well over a decade.
In this tutorial, I’ll be showing you how to achieve a custom print bleed in Photoshop. First, we’ll go over defining what a Print Bleed is, then we’ll dive into creating new guides using the Ruler functions and editing Canvas size.
Table of Contents
Key Takeaways
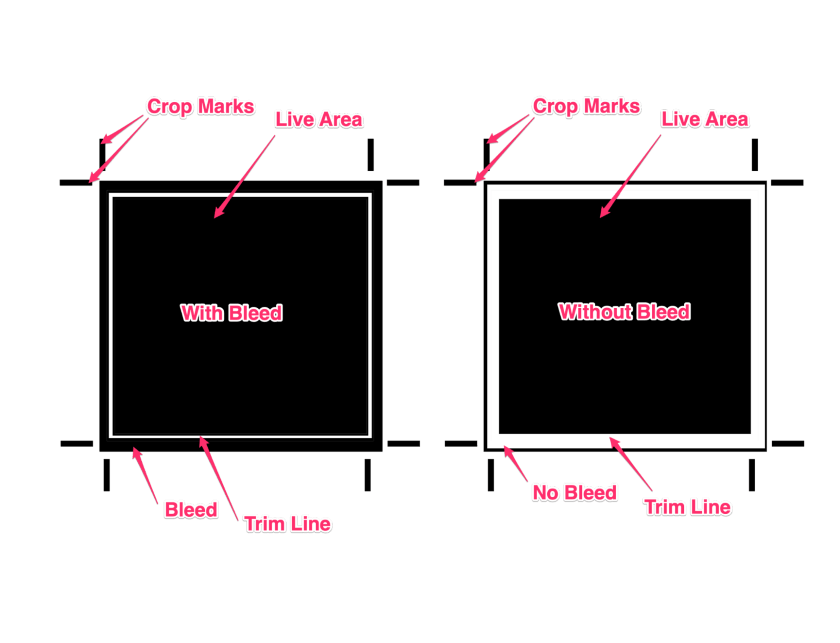
To accomplish a successful bleed, you’ll first need to have a better understanding of what exactly a print bleed is. To become more familiar with this you’ll need to know where the Crop Marks and Trim lines are typically located in a printed document.
As a guide, I’ve created the below image for easy reference while you learn.
What is Print Bleed?
In the world of printing, bleed is a term used to determine how the extra space around the outer edges of a document will be cut. Using the correct Print Bleed, we can ensure that printed images go all the way to those outer edges, eliminating any white border.
What are Crop Marks?
Crop Marks are also known as Trim Marks, and they’re used for creating the bleed in printing. They’re the small thin horizontal and vertical lines that are typically placed along the corners of your document. They’re used to show the printer where to trim.
Now, let’s jump into the steps.
Step 1: Setting Up your Document
You have two options when it comes to initially setting up your document. You can choose your desired image and open it in Photoshop, or you can start with a blank document in your desired size and later import your image!
I’m personally going to begin with a photograph and add guides for bleeding directly, but feel free to do either or apply these techniques as you go!
Step 2: Creating your Guidelines
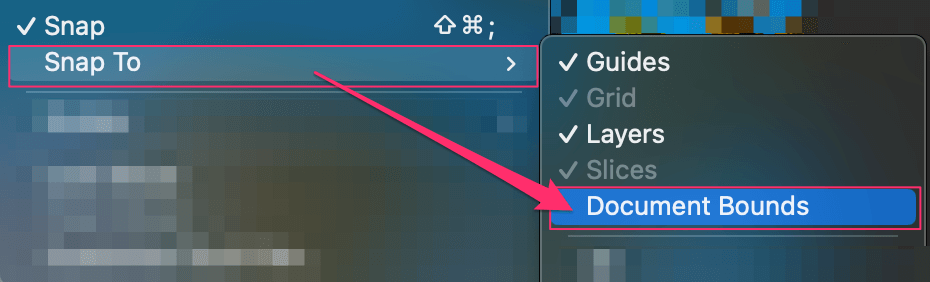
You’re going to begin to create space for your bleed by adding guidelines around the edges of your document. To do this, you’ll first have to enable the Ruler Tool in Photoshop which can be accessed by clicking Ctrl/Command + R.
After the Ruler Tool is enabled, we’ll need to take one more step to ensure the guidelines are fixed correctly. Simply navigate to View > Snap to > Document Bounds.
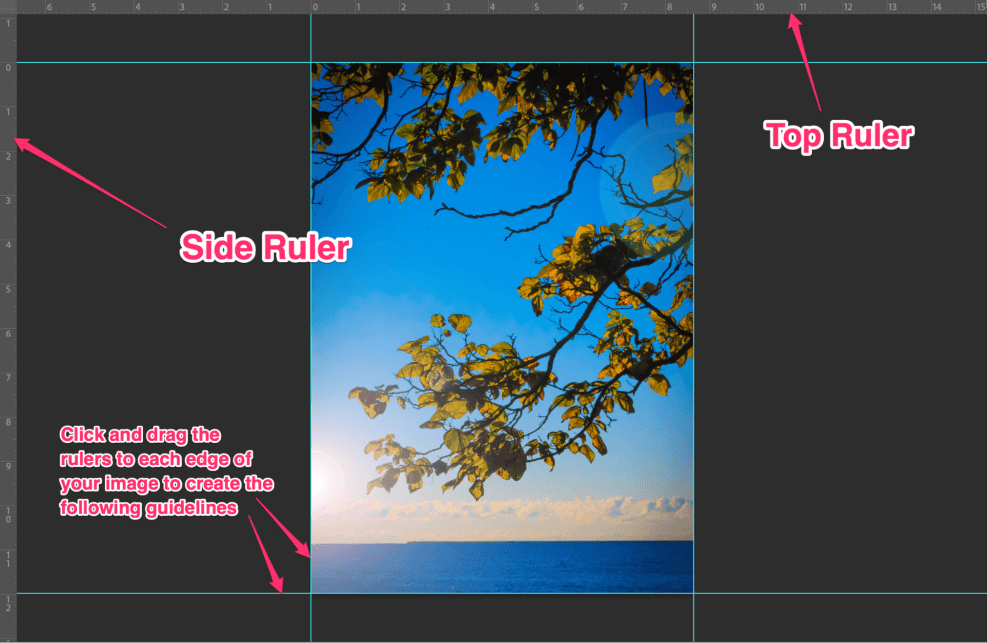
Great! Now all that’s left to do to create our guide is to click and drag the top ruler tool to the edges of your document. Repeat this process with the side ruler tool and your image should look something like this.
Great! Now that you’ve successfully set up your grid lines, we can move on to editing your Canvas size to accommodate your bleed.
Step 3: Editing your Canvas Size
To edit your canvas size, you’ll have to navigate to Image > Canvas Size. Then a window will pop up where you can edit the Width and Height values.
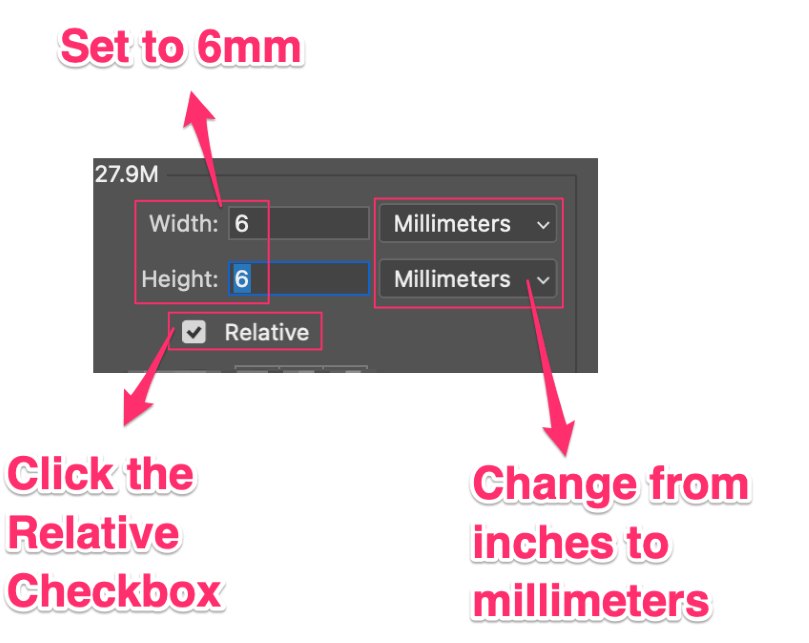
The general rule when using bleed is to add 3 Millimeters to your current canvas size for each edge of your document. So you’ll have to change the Height and Width Values to 6mm each and ensure the Relative Checkbox is enabled.
Once this is done, click OK and your document will automatically add 3mm to each side of your canvas.

Ta-da! Now that you’ve correctly edited your canvas for bleed, you can move on to finalizing your print by adding Crop Marks.
Step 4: Finalizing your Bleed for Print
So you’ve successfully set up your file for printing, but you still want to add Crop Marks to indicate where the image should be cropped for that extra clarity.
The easiest way to accomplish this is to go to File > Print and edit the bleed in the window that pops up.
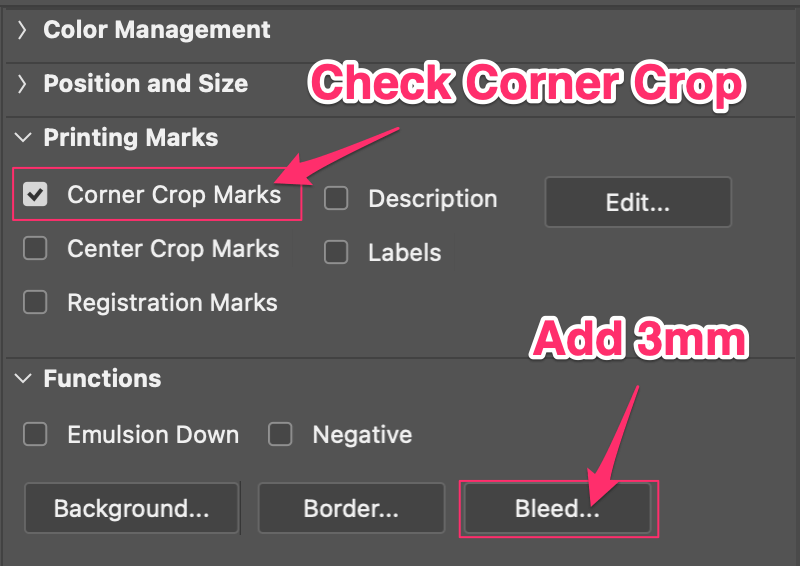
There are lots of options in the Print Setup menu, but all you need to focus on is the Bleed and Corner Crop Marks Box. Ensure the box is checked correctly, and then click the Bleed Button to enter 3mm.
Now all that’s left to do is save your PDF! Press the Print Button and one final screen will pop up where you’ll find the dropdown menu you need to save your file.
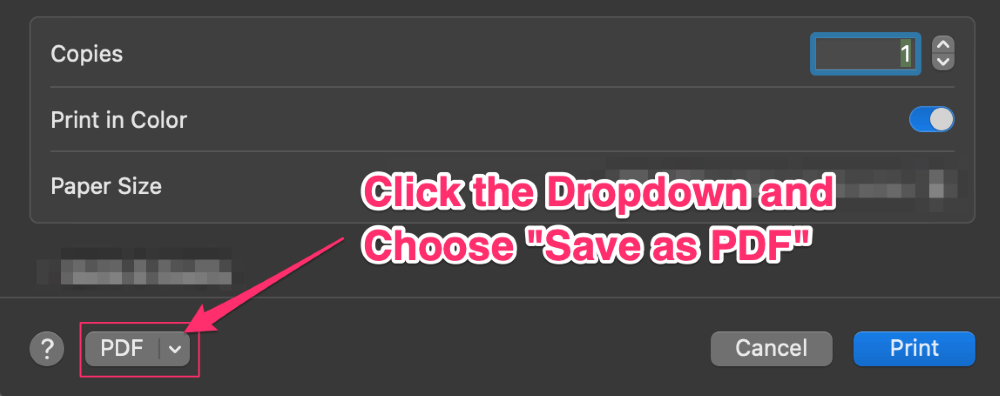
Choose Save as PDF from this menu, and then you’ll be prompted to save your file in your desired location.
This is what my PDF now looks like when exporting it with crop marks.

It’s very subtle in my case, but there you have it! You’ve successfully set up your document with bleed and crop marks for printing! Congrats.
Conclusion
Well, long story short – we can create our bleed in Photoshop using the Ruler Tool and editing the Canvas Information, despite Photoshop not offering the optimal tools for this.
It’s a bit of a roundabout process compared to the straightforward guidelines Illustrator and Indesign use to accomplish the same task, but it is nonetheless possible with some quality work.
If you want to print your images and not just share them digitally, it’s worth becoming familiar with this process!
So feel free to reference this document as needed whenever you’re working in print in the future. Meanwhile, happy editing my friends!