
To add plugins to Audacity, copy the plugin to the proper plugins folder on your computer, then, in Audacity, click Tools > Plugin Manager. Click the Rescan button. Confirm that the plugin appears in the list, then click OK.
Hello, I’m Andrew, and I’ve been using Audacity for over ten years to record and edit audio. In this article, we’ll look at the various types of plugins Audacity supports and how to install them.
In the end, I’ll answer some frequently asked questions. Let’s get started.
Table of Contents
What Plugins Work with Audacity?
Before looking at detailed instructions for installing plugins, it is important to know which plugins work with Audacity. The software supports a variety of plugin formats, including:
- VST2 (also commonly known as simply ‘VST’)
- VST3
- LV2
- LADSPA (Windows and Linux only)
- Vamp
- Audio Unit (macOS only)
- Nyquist
The most common plugins for Audacity are VST and Nyquist. Audio Unit plugins are popular on the macOS platform. To use VST3, you must be running Audacity 3.2 or later.
LV2 and LADSPA are Linux-based plugins but can work with other operating systems. LV2 is the successor to the LADSPA format.
Vamp is a plugin format for analyzing and providing information about your audio.
Nyquist is a programming language written by the co-founder of Audacity, Roger Dannenberg. As a result, Nyquist plugins are inherently compatible with Audacity and are very common. In fact, the standard Audacity installation includes many built-in Nyquist plugins such as Studio Fade Out, Notch Filter (link to How to Clean up Audio in Audacity if it has been published), and Vocal Reduction and Isolation.
Note: Audacity does not support Virtual Studio Technology Instrument (VSTi) plugins.
Installing Audacity Plugins
Installing Audacity plugins is a straightforward process that involves downloading and copying the plugin files to the proper location on your hard drive and then rescanning for plugins in Audacity.
How to add plugins to Audacity for Mac
To start, be sure you obtain the plugin version that matches your system’s architecture. Plugins written for Intel-based Macs (x86, x64) won’t work in Audacity for Apple Silicon (arm64) and vice versa.
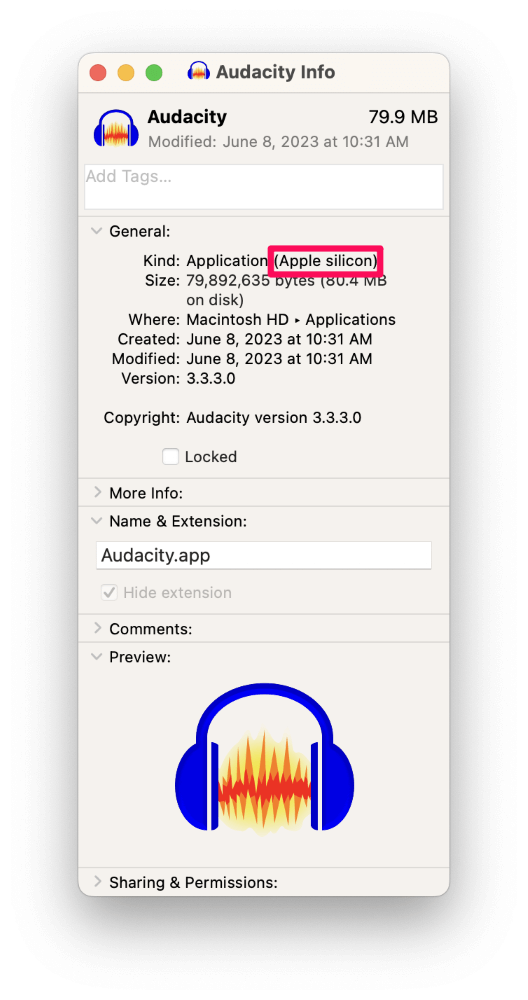
To find out which version of Audacity you have on your Mac, open Finder and navigate to the Applications folder. Secondary click (i.e., right-click) Audacity, then click Get Info. Look for Kind in the General section.
The info sheet will read Apple silicon, Intel, or Universal in parenthesis next to the word Application. The Universal build is the default download option and should be able to handle either type of plugin.
Once you’ve identified your version of Audacity, download the corresponding plugin version.
Plugin installation methods vary by developer, but essentially all you have to do is copy the plugin file (or files) to the proper directory and then rescan for plugins in Audacity.
Some plugins will automatically copy the files to the necessary folder using an installer like a .pkg inside of a .dmg. In these cases, you only need to double-click the installer and follow the prompts.
If you need to manually copy plugins to the right folder, here are the locations for each type:
- Audio Unit: /Library/Audio/Plug-Ins/Components/
- VST2: /Library/Audio/Plug-Ins/VST/
- VST3: /Library/Audio/Plug-Ins/VST3/
- LV2: ~/.lv2 or /Library/Audio/Plug-Ins/LV2 (copy the entire .lv2 folder)
- Vamp: /Library/Audio/Plug-Ins/Vamp
If you want to install the plugin just for the current macOS user, add a tilde (~) to the front of the folder path for AU, VST, and Vamp plugins. Doing so places the files in the logged-in user’s home folder.
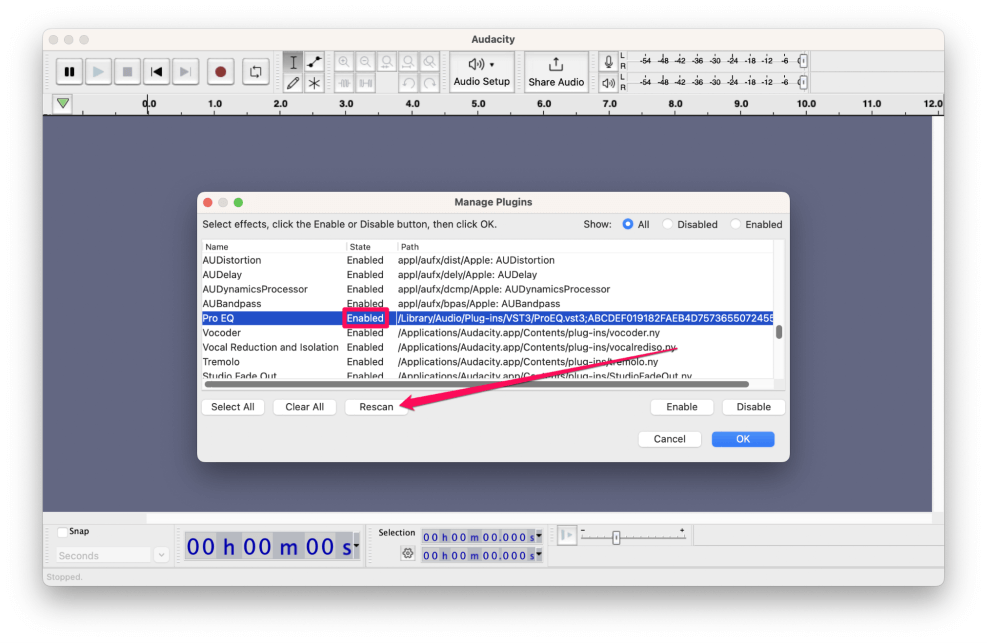
Usually, Audacity will automatically recognize and enable plugins once you install them, but if you don’t see your shiny new plugin available after moving it to the proper folder, rescan for the add-on:
- Click on Tools > Plugin Manager from the Audacity menu bar.
- Click the Rescan button.
- Look through the list of plugins to verify that yours is Enabled in the State column.
You can sort by Name or Path to help locate the plugin.
How to add plugins to Audacity for Windows
To add plugins to Audacity for Windows 10 or higher, you must also verify you have the correct plugin version. Sixty-four bit plugins only work in 64-bit versions of Audacity, and 32-bit plugins work with 32-bit software versions.
To check which version you have installed, do the following:
- Open Audacity.
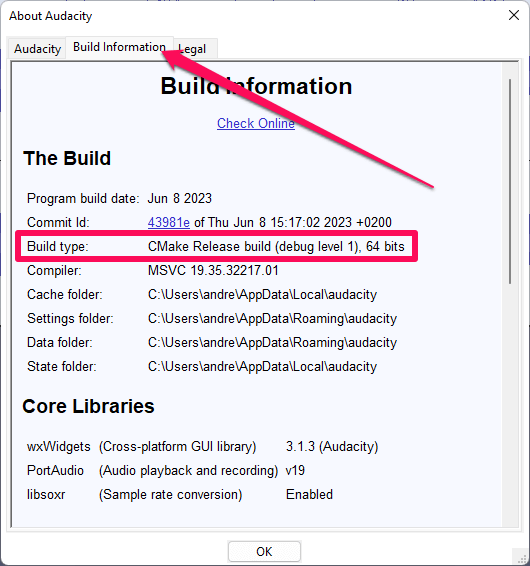
- Click on Help > About Audacity from the menu bar.
- Click on the Build Information tab.
- Next, to Build type, you’ll see either 64 bits or 32 bits.
Just like with macOS Audacity plugins, many Windows plugins have their own installer that will automatically move the plugins to the correct location. If such is the case with your plugin, simply click through the installation screens, then open Audacity to use your new plugin.
If your plugin doesn’t come with an installer, you’ll have to copy the files to the proper location on your hard drive:
- VST2: C:\Program Files\Common Files\VST2
- VST3: C:\Program Files\Common Files\VST3
- LV2: C:\Program Files\Common Files\LV2 (copy the entire .lv2 folder)
- LADSPA: C:\Users\<username>\Appdata\Roaming\audacity\Plug-ins\
- Vamp: C:\Program Files\Vamp Plugins\
As with macOS, Audacity should auto-detect and enable your plugin–assuming it is compatible–but if not, rescan for plugins. The steps are the same as for macOS. Go to Tools > Plugin Manager, then click the Rescan button.
After rescanning, ensure you can see your new plugin in the list and that it is enabled.
How to Add Nyquist Plugins to Audacity
The method for installing Nyquist plugins differs from the others, but the procedure is the same for macOS and Windows:
- Download the Nyquist plugin you wish to install. Make a note of where you save the file.
Nyquist files will have a .ny file extension.
- Open Audacity and navigate to Tools > Nyquist Plugin Installer.
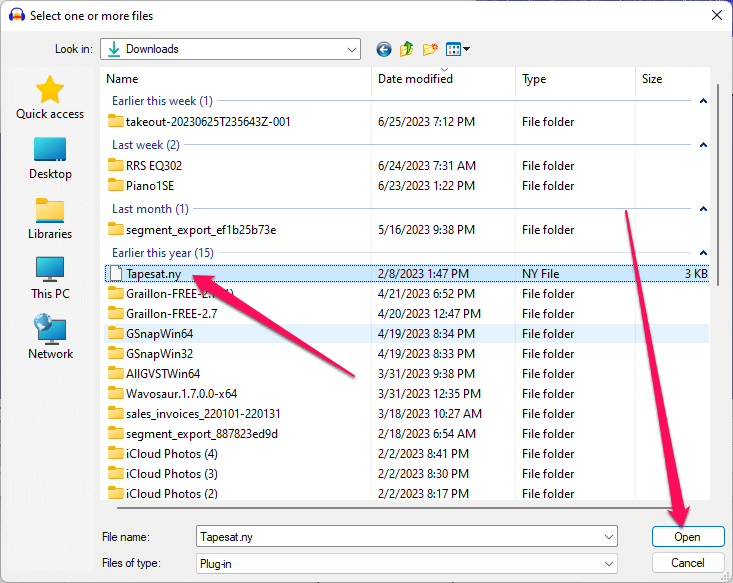
- Click the Browse button and navigate to the file you downloaded.
- Select the .ny file and then click the Open button.
- Leave Allow overwriting set to Disallow unless you wish to update an existing plugin you have already installed.
- Click Apply.
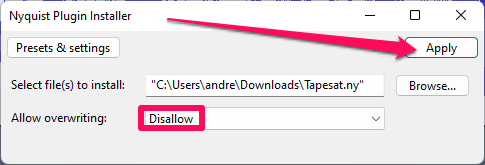
- Click OK.
- Enable the plugin in Tools > Plugin Manager by selecting the new plugin and clicking the Enable button.
How to Use Plugins in Audacity
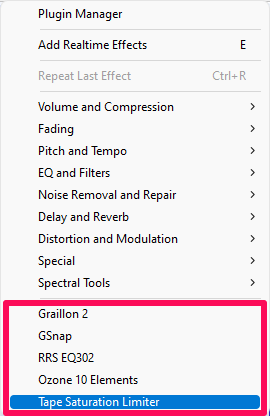
Now that you’ve installed plugins, how do you use them? To use plugins in Audacity, click on the Effect menu and look for your plugins at the bottom section of the menu. Depending on the type of plugin, you might also see these listed under the Generate or Analyze menus.
FAQs
Here are some other questions about plugins and Audacity.
Does Audacity allow plugins? Can you use plugins with Audacity?
Yes! As you can see, you can use various plugins with Audacity, including VST, VST3, AU (macOS), and Nyquist. You cannot use virtual instrument plugins (VSTi) with Audacity.
How do I enable VST in Audacity?
To enable VST plugins in Audacity, first, move the plugin file to the proper directory.
On a Mac, copy the VST to /Library/Audio/Plug-Ins/VST/. On a Windows computer, copy the plugin to C:\Program Files\Common Files\VST2.
When you launch Audacity, the software should auto-detect and enable the plugin. If not, go to Tools > Plugin Manager and then click the Rescan button.
After the rescan, locate your plugin in the list and verify it is enabled. If not, click the plugin to select it, then click the Enable button. Then click OK.
What are the best Audacity plugins?
With so many plugins available, It is difficult to name the best without an extensive list. Nevertheless, here are some of the more popular plugins.
FFmpeg allows you to import and export additional file formats not natively supported in Audacity, including M4A and WMA.
ACX Check is for audiobook producers to verify that their audio complies with Audible’s requirements for submission.
MEqualizer is a popular equalization tool to help adjust frequency levels in your audio.
These are just three of many possible add-ons. Audacity hosts a page full of recommended plugins where you can find many more quality add-ons.
It is worth mentioning that not all plugins are free. Many have a free trial or a limited version of a paid plugin.
Summary
Audacity supports many different plugin types, and installing them is easy if you know where to copy the files.
To add plugins to Audacity, download the files. If the plugin has its own installer, double-click the installer to automatically copy the files to the correct location. If not, manually copy the plugin files to the appropriate directory as notated above.
Audacity should recognize and enable these plugins on its own, but if not, you might have to run Plugin Manager to rescan and enable them.
I’ll turn it over to you now. What’s your favorite Audacity plugin? Let us know in the comments!