
Adding and removing expressions in After Effects simplifies animation, cutting down on keyframes and offering more project flexibility.
Hi, I’m Zoe, a graphic designer. I remember working on a project where I needed a repetitive motion, and manually keyframing it was turning into a nightmare. Discovering the loop expression changed everything. With a few lines of code, I had the exact animation I wanted, looping seamlessly.
In this article, I’ll walk you through the process of adding and removing expressions in After Effects, delve into best practices for optimal expression use, and conclude with some easy-to-try expressions for your projects!
Let’s get started!
Table of Contents
Key Takeaways
- Expressions in After Effects can reduce keyframes and layers, provide animation flexibility, and condense multiple properties into a single control.
- Expressions can be used with almost any property that can be keyframed, including position, scale, rotation, opacity, and more.
- Adding expressions to properties involves selecting the property, revealing the expression field, and entering the desired expression.
- Disabling and enabling expressions are as simple as toggling the “Enable Expression” switch.
- Removing expressions can be done by selecting the property and choosing the “Remove Expression” option.
Note: All screenshots from this tutorial are taken from the After Effects Mac version.
This post covers the essentials of using expressions in After Effects.
How to Add Expressions in After Effects
Adding expressions to properties in After Effects is a straightforward process that allows you to manipulate values and create dynamic animations. Here’s a step-by-step guide on how to add expressions:
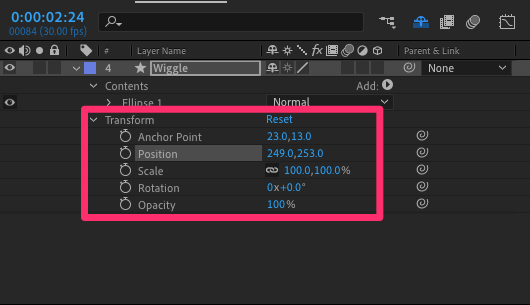
Step 1: Select the property in the Timeline panel that you want to apply an expression to. This can be any property under the Transform section of a layer.
Step 2: Reveal the expression field by either selecting Animation > Add Expression or pressing Alt + click (Windows) or Option + click (macOS) on the stopwatch button next to the property name.
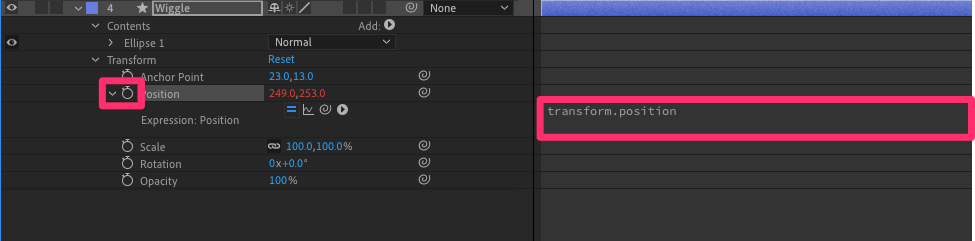
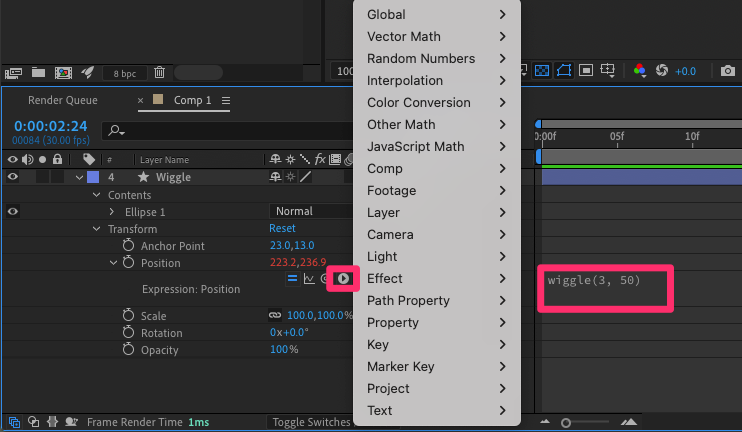
Step 3: In the expression field, enter the desired expression. You can write your own expression, click on the Expression Language Menu icon for pre-written syntax, or copy-paste expressions you find online.
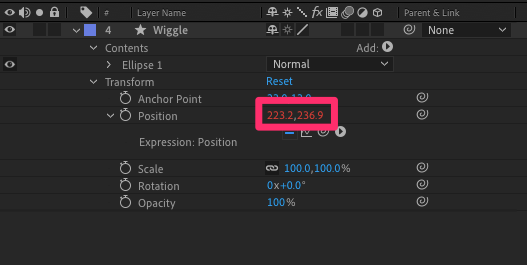
Once the expression is entered, the value will turn red, indicating that an expression is active.
Disabling and Enabling Expressions
In some cases, you may want to temporarily disable an expression to make changes or compare the results with and without the expression. Here’s how to disable and enable expressions:
Step 1: Locate the Enable Expression switch, represented by an equal sign (=), next to the expression field.
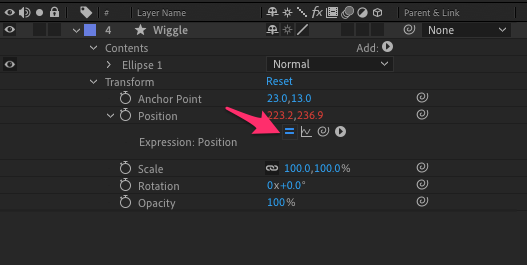
Step 2: Toggle the switch to disable or enable the expression. When the expression is disabled, a slash will appear through the switch.
Disabling an expression allows you to make modifications to the property without the expression affecting the value. Enabling the expression restores the original functionality.
How to Remove Expressions in After Effects
If you no longer need an expression on a property, you can easily remove it. Here’s how to remove expressions:
Step 1: Select the property that has the expression applied.
Step 2: Choose Animation > Remove Expression from the menu, or press Alt + click (Windows) or Option + click (macOS) on the stopwatch button again.
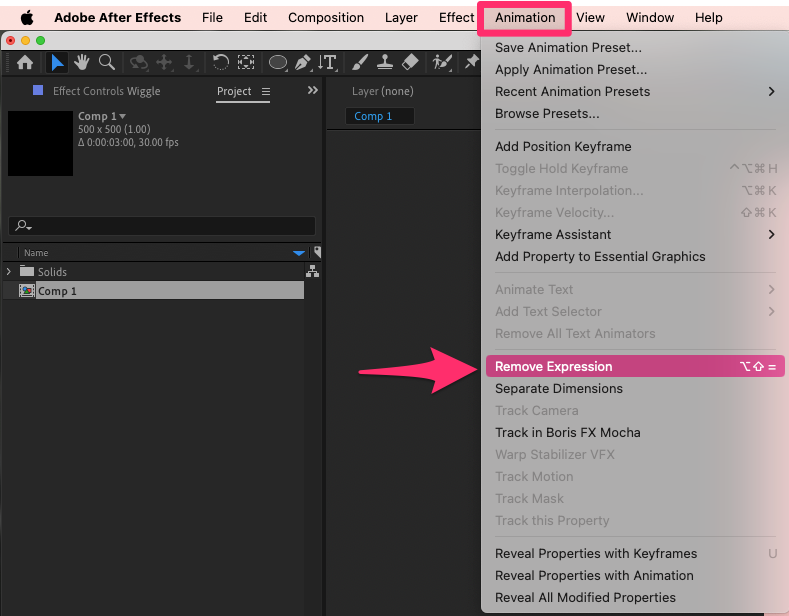
Removing an expression will revert the property to its default behavior and remove any linked values or calculations.
Best Practices for Using Expressions
While adding and removing expressions is relatively simple, understanding how to use them effectively is crucial. Here are some best practices to keep in mind:
- Comment your code: Adding comments to your expressions can help you remember what the code does and make it easier to modify in the future. Simply type “//” before writing your comment.
- Save and reuse expressions: If you have frequently used expressions, save them for future projects by copying and pasting them into a text-editing application or creating animation presets.
- Use variables: Utilize variables in your expressions to make them more flexible and easier to modify. By using variables, you can change a value in one place instead of having to update it in multiple expressions.
- Experiment and explore: Don’t be afraid to experiment with expressions and explore their capabilities. The more you practice and play around with expressions, the better you’ll become at using them creatively.
Pro Tip: Easy Expressions in After Effects
Now that you know how to add and remove expressions in After Effects, let’s take a look at simple expressions you can try yourself. These expressions can save you a lot of time and effort by automating repetitive tasks.
Wiggle
One easy yet powerful expression is the Wiggle expression. This expression allows you to create a random motion effect on any property. For example, you can apply the Wiggle expression to the position property of a layer to make it move randomly within a specified range.
To use it, simply enter the following code in the property you want to animate:
wiggle(frequency, amplitude)For example, to make a layer wiggle with a frequency of 3 and an amplitude of 50 pixels, applied to the Position Property:
wiggle(3, 50)

Loop
The Loop expression is particularly useful when creating seamless background animations or repetitive motion graphics. You can also customize the loop type to achieve different looping behaviors.
For instance, let’s create a looping animation using the pingpong loop type. This type of loop makes the animation play forward and then backward in a continuous cycle.
To use it, add two keyframes to a property, such as the Position property, then open the expression editor for Position and enter:
loopOut("pingpong");
Bounce
To add a dynamic bounce effect to your animations, such as moving an object from one side to the other, use the following expression on the position property. This script calculates the bounce based on your keyframes, adding a lively end to the motion:
n = 0;

if (numKeys > 0) {

  n = nearestKey(time).index;

  if (key(n).time > time) n--;

}

if (n == 0) t = 0;

else t = time - key(n).time;

if (n > 0 && t < 1) {

  v = velocityAtTime(key(n).time - thisComp.frameDuration / 10);

  amp = 0.05; // Amplitude of the bounce

  freq = 4; // Frequency of the bounce

  decay = 4.5; // Rate at which the bounce slows down

  value + v * amp * Math.sin(freq * t * 2 * Math.PI) / Math.exp(decay * t);

} else {

  value;

}
Squash and Stretch Expression
To give your animations an elastic feel, like a bouncing ball or a springy icon, use this Squash and Stretch expression on the scale property:
maxDev = 15; // Maximum stretch in pixels

spd = 25;   // Speed of the squash and stretch effect

decay = 0.8; // Rate at which the effect diminishes

t = time - inPoint;

x = scale[0] + maxDev * Math.sin(spd * t) / Math.exp(decay * t);

y = scale[0] * scale[1] / x;

[x, y]
Remember, this is just the tip of the iceberg, and there’s so much more to explore with expressions in After Effects!
Final Thoughts
By understanding how to add and remove expressions, you can automate tasks, create complex animations, and add dynamic effects to your motion graphics.
They may appear daunting at first, and errors can be frustrating, but the ability to disable and re-enable them provides flexibility and room for experimentation, saving you time and effort compared to traditional keyframing techniques.
Do you have any tips or insights on adding or removing expressions in After Effects? Please share them in the comments below!