
Pen pressure sensitivity allows artists to create varying line thicknesses and achieve more natural-looking brush strokes. It’s crucial to find the right settings that suit your style and preferences.
Hi! I’m Zoe, a professional illustrator. I’ve often dreaded the adjustment period that comes with upgrading to a new tablet. Much of that unfamiliarity, though, can be attributed to pen pressure settings. The good news is that these settings are easily customizable within Clip Studio Paint.
In this post, we’ll delve into the methods for adjusting both your pen and sub-tool pressure settings. Additionally, we’ll equip you with troubleshooting techniques to overcome any issues you may encounter along the way.
Let’s get started!
Table of Contents
Key Takeaways
- Adjust pen pressure settings by going to File > Pen Pressure Settings.
- Keep in mind that pen pressure settings are personal, and what works best varies from artist to artist.
- Pen pressure settings impact all tools, but you can customize how individual sub-tools respond to pen pressure.
- If you face pen pressure issues, start by updating both your tablet driver and Clip Studio Paint.
Note: All screenshots from this tutorial are taken from the CSP Mac version.
Before we dive into the how-tos, let’s first grasp why pen pressure is such an important component in digital art.
What is Pen Pressure?
Pen pressure is the feature that detects the force applied by your stylus when drawing. It translates this pressure into variations that mimic traditional drawing tools like pens and brushes.
Why is Pen Pressure Important?
Pen pressure sensitivity is the key to adding depth and realism to your digital artwork. Here’s why it matters:
- Line Variety: Pen pressure gives you control over line thickness. Light strokes create thin lines, while heavier strokes result in thicker ones, adding depth and dimension to your artwork.
- Opacity Control: With the right pressure sensitivity, you can control the opacity of your brush strokes. Light touches produce translucent effects while pressing harder creates more opaque areas.

How to Adjust Pen Pressure Settings in Clip Studio Paint
Now that we understand why pen pressure is essential, let’s get into the nitty-gritty of adjusting it in Clip Studio Paint.
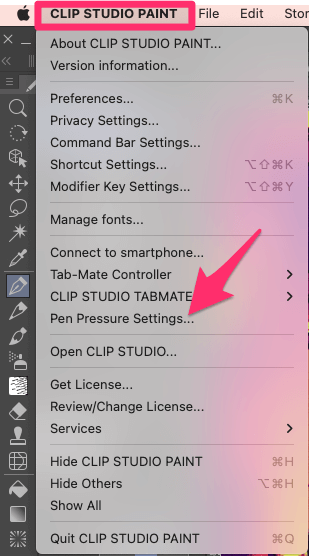
Step 1: Navigate to the File menu (Clip Studio Paint on Mac) and select Pen Pressure Settings from the dropdown menu to open the Adjust Pen Pressure dialog box.
Step 2: Fine-tune the pen pressure sensitivity by drawing on the canvas, using the pressure that feels most natural to you. Just like when using a pen, be sure to vary the pressure while drawing to test different sensitivity levels.
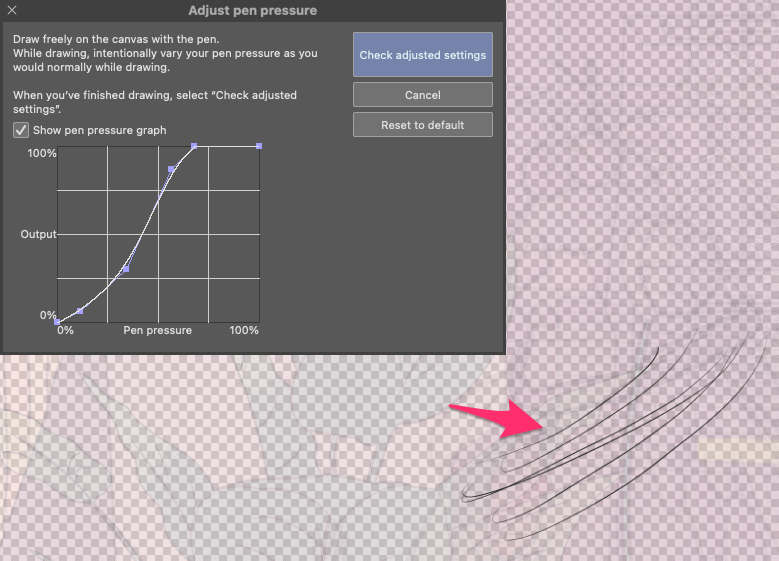
Step 3: As you draw, the pen pressure graph in the dialog box will adjust in real time. If you want to change the curve manually, you can adjust the nodes yourself.
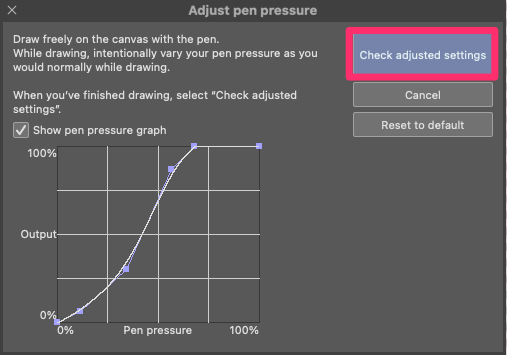
Step 4: Click on Check adjusted settings to verify the changes.
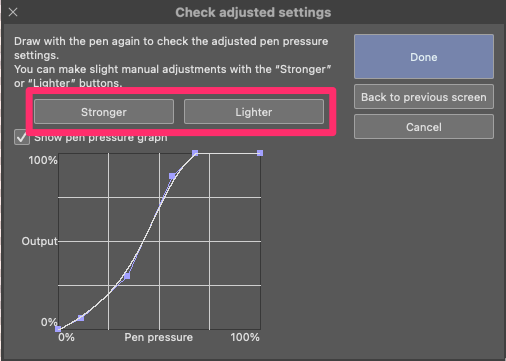
Step 5: Now, test and fine-tune the settings by drawing on the canvas again. Observe the line thickness variations as you apply different levels of pressure to the stylus.
If it doesn’t feel right, click Back To Previous Screen to make adjustments.
If you need slight tweaks, further refine the pen pressure sensitivity by clicking Stronger or Lighter to adjust the pressure response.
Step 6: Once satisfied, click Done to apply the settings and close the dialog box.
Your pen pressure settings are now tailored to your preferences. Keep in mind that pen pressure is highly personal, so take the time to find what feels comfortable.
Adjusting Sub Tool Pressure in Clip Studio Paint
Adjusting pen pressure settings affects all tools, but sometimes you want specific brushes to behave differently. Here’s how:
Step 1: Select your desired pen or brush, then click the box next to Brush Size in the Tool Property Palette.
Step 2: A dialog window with pressure graphs and options will appear. You can adjust how the sub-tool responds to pressure, tilt, speed, and randomness.
Step 3: Once you’ve found your preferred settings, click anywhere on the screen to close the dialog. Your settings will be applied to the sub-tool.
To reset to default settings, simply click the Reset to Default icon at the bottom of your Tool Property Palette.
Troubleshooting Pen Pressure Issues in Clip Studio Paint
Pen pressure sensitivity in Clip Studio Paint not working? Here are some troubleshooting steps to help you resolve these issues:
Driver vs Software Test
First, isolate the source of the problem by performing a few tests:
- Test your pen pressure with your tablet’s manufacturer’s driver software. If it works correctly with the driver but not in Clip Studio Paint, it’s likely a software issue.
- Experiment with other drawing applications like Krita (free on Windows and Mac) to check if pen pressure sensitivity is consistent. If it works in other apps but not Clip Studio Paint, it could be a software configuration issue.
Updating Drivers and Software
Outdated drivers or software can sometimes cause pen pressure issues.
- Visit the manufacturer’s website to check for driver updates for your drawing tablet. Download and install the latest drivers, following the manufacturer’s instructions.
- Additionally, ensure Clip Studio Paint is up to date. Updates often include bug fixes and compatibility improvements. You can visit this page to download the latest version.
Fixes for Windows Users
Windows users may encounter specific issues related to pen pressure.
You can toggle between Wintab and Tablet PC under Using tablet service in the Preferences menu. Some tablets require Wintab, while others work better with Tablet PCs.
With these troubleshooting steps, you can usually resolve pen pressure issues and get back to creating.
Contacting Customer Support
If you’ve tried all the troubleshooting steps mentioned above and still experience pen pressure issues, it may be time to reach out to customer support.
- Contact the manufacturer of your pen tablet or pen display for further assistance, especially if the issue appears hardware-related.
- If the problem seems to be related to Clip Studio Paint, you can reach out to the CSP support team at Clip Studio Paint Support. Your input could help uncover and resolve any hidden software bugs in future updates.
Final Thoughts
Adjusting pen pressure in Clip Studio Paint is crucial for achieving realistic and expressive digital artwork. By following the steps outlined in this guide, you can optimize pen pressure sensitivity and enhance your drawing experience.
Remember to check hardware and software compatibility, adjust pen pressure settings, and troubleshoot any issues that may arise.
If you found this guide helpful or have any thoughts to share, please don’t hesitate to leave your comments below. Happy creating!