
Adobe Lightroom Classic
Summary
Adobe Lightroom is an excellent RAW image editor backed up by solid library management and organizational tools. As part of the Adobe Creative Cloud software series, it has a wide range of integrations with other related image software, including the industry-standard image editor, Photoshop. It also can output your retouched images in a range of formats, from standard image file formats to a Blurb photo book to an HTML-based slideshow.
While Lightroom is an excellent app, it does have a couple of minor drawbacks. It doesn’t have the best performance of all the RAW editors I’ve tested, especially when it comes to generating thumbnails in the Library module. The automatic masking tools could use more precision in their selections, but the same is true of most editors. Overall, Lightroom still provides the best balance of capabilities of any RAW editor on the market today, which is a large part of why it’s one of the most popular apps for photographers of all skill levels.
What I Like: Complete RAW editing workflow. Excellent library management. Tethered shooting. Built-in AI denoising. Mobile companion app.
What I Don’t Like: Slow performance. Automatic masking could be sharper.
Do professionals use Lightroom or Lightroom Classic?
Many professionals use Lightroom Classic as the workhorse for their photographic process, but Lightroom CC is not as popular. That’s partly because it’s a newer app that hasn’t had time to develop a devoted following but also because it has a different focus. Lightroom focuses on a cloud-based workflow, but that doesn’t work for many professionals, especially those who shoot sensitive client projects or extremely high-resolution images that can take a long time to transfer to the cloud.
Is Lightroom Classic being phased out?
No, Lightroom Classic is not being phased out or removed from the Adobe Creative Cloud. When they launched the confusingly named Lightroom CC (distinct from Lightroom Classic), that may have been the plan, but Lightroom CC’s focus on a cloud-based workflow doesn’t provide the same functionality as Lightroom Classic.
Can you buy Lightroom without a subscription?
Unfortunately, no, you cannot buy Lightroom without a subscription. In the past, it was possible to buy a standalone version, but Adobe removed this option in the mid-2010s, and there are no more copies of Lightroom CS6 available for sale.
Is Lightroom good for beginners?
Adobe Lightroom is a complete RAW photo editor which covers all aspects of a photographic workflow, from capture to editing to output. It is aimed at professional photographers who want to edit large numbers of files at once without sacrificing quality or attention to individual photos. Despite being aimed at the professional market, it’s easy enough to learn that amateur and semi-professional photographers will also receive a lot of benefits from it.
Table of Contents
Why Trust Me for This Lightroom Review?
Hi, my name is Thomas Boldt, and I wear many hats related to graphic arts: graphic designer, photographer, and image editor. I’ve been exploring the field ever since I first got my hands on Adobe Photoshop 5, and this gives me a unique and comprehensive perspective on image editing software. I’ve followed the development of Adobe’s image editors since then, through the first version of Lightroom all the way to the current Creative Cloud edition.
I’ve also experimented with and reviewed a number of other image editors from competing developers, which helps provide a sense of context about what can be achieved with image editing software. On top of that, I spent time learning about user interface and user experience design during my training as a graphic designer, which helps me spot the differences between good software and bad.
Adobe provided me with no compensation for the writing of this review, and they have had no editorial control or review of the content. It should also be noted that I am a subscriber to the full Creative Cloud suite and have used Lightroom extensively as my primary RAW image editor.
Detailed Review of Lightroom Classic
Lightroom is a huge program, and Adobe is constantly adding new features. We don’t have time or space to go over everything that Lightroom can do, so I’ll stick to the most commonly used aspects. Also, the screenshots below are taken from the Windows version. Lightroom for Mac may look slightly different, although the interfaces are nearly identical.
Lightroom is one of the first image editors that I can remember (maybe even the first app of any type, although Aperture might hold that crown) using a dark grey interface. It’s a great setup for any kind of image work, and it really helps your images pop by eliminating the contrast glare from a white or light grey interface. It was so popular that Adobe began using it in all of its Creative Cloud apps, and many other developers began to follow the same style.
Lightroom is divided up into ‘modules,’ which can be accessed using the buttons at the top right: Library, Develop, Map, Book, Slideshow, Print, and Web. The Library and Develop modules are the two that are heavily used in most workflows, so I’ll be focusing there before taking a look at the rest of the Lightroom features.
Library & File Organization
Importing files is a snap, and there are several ways to get it done. The simplest is the Import button in the bottom left, but you can also simply add a new folder on the left or go to File -> Import Photos and Video.
With tens of thousands of photos to import, some programs might choke, but Lightroom handled it quite quickly during my testing, processing the entire lot in just a few minutes. Because this was a mass import, I don’t want to apply any presets, but it is possible to apply predetermined edit settings during the import process automatically.
This can be a great help if you know you want to turn a specific set of imports into black and white, auto-correct their contrast, or apply any other preset you’ve created. You can also apply metadata during import, allowing you to tag certain photoshoots, vacations, or anything else you like. I generally don’t like applying sweeping changes to huge sets of images, but it can be a real timesaver in some workflows.
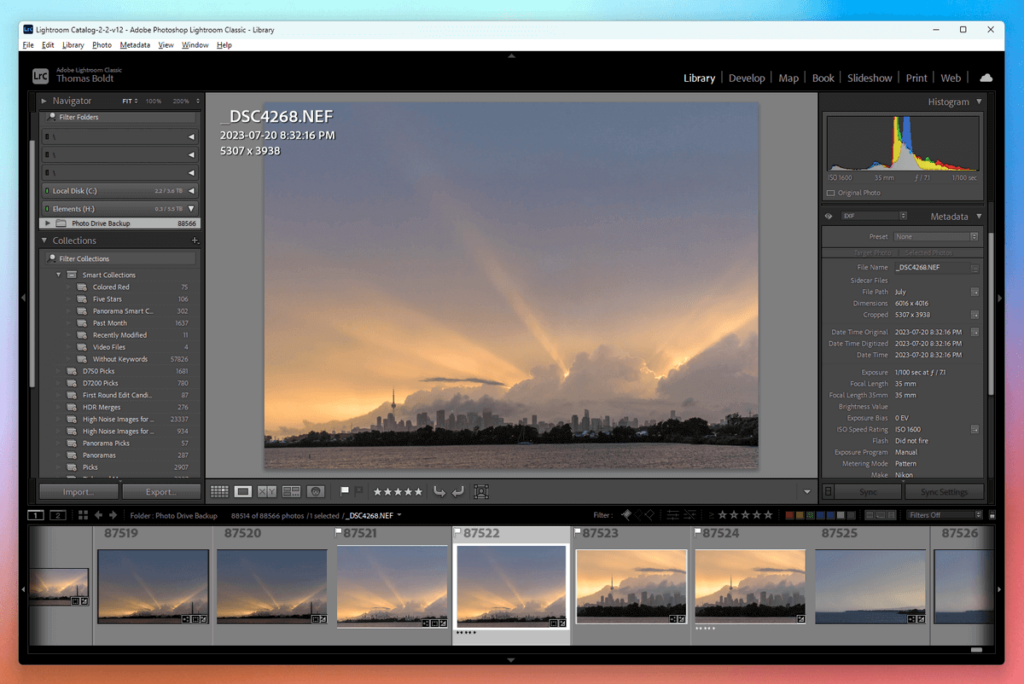
Once the library is populated with your imports, the layout of the Library screen looks more understandable. The panels at the left and right give you information and quick options, while the main window shows your grid, which is also shown in the film strip along the bottom.
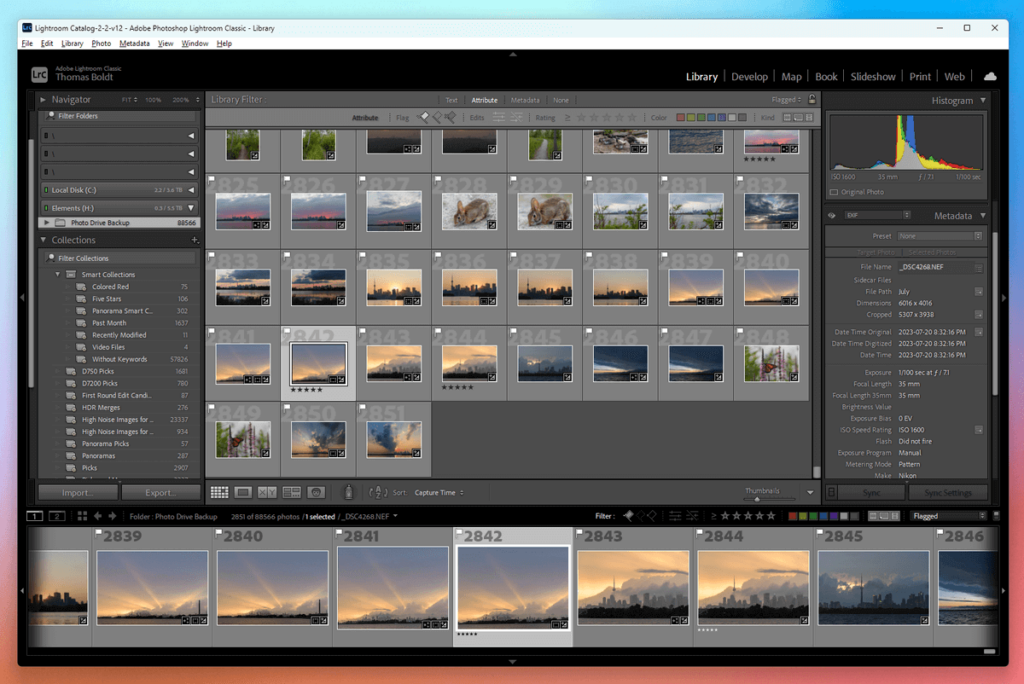
Once you switch to the Develop module to start your editing, the filmstrip showing your photos will stay visible along the bottom. While you’re in the Library mode, Lightroom assumes you’re doing more organizational work, and so tries to show you as many images as possible on screen at the same time, but you also have other options.
Many aspects of the interface can be customized to match your working style, whether you want to see a grid, as above, or show a single image zoomed in, a comparison of two versions of similar images, or even sorting by people visible in the image. I almost never photograph people so that option isn’t much use to me, but it would be a great help for everything from wedding photos to portrait photography.
The most useful aspect of the Library module is the ability to tag your images with keywords, which helps to make the sorting process much easier when working with a large catalog of images. Of course, getting in the habit of actually using these kinds of tags is another matter, but sometimes we have to impose discipline on ourselves. Note: I have never imposed such discipline on myself, even though I can see how useful it would be 😉
My favorite method of tagging works in both the Library and Develop modules because I wind up doing most of my organization using Flags, Colors, and Ratings. These are all different ways of segmenting your catalog, allowing you to go through your latest import quickly, tag the best files, and then filter your filmstrip to show only Picks or 5-star rated images or images color-tagged ‘Blue.’
My personal take: I’ve been using Lightroom to organize my photos for quite a long time, and I’m a bit concerned that it will be difficult for me to ever make the jump to another editor unless they can successfully interpret the flagging metadata for all my images. Some software is able to, while others simply ignore Lightroom’s metadata, so keep that in mind if you decide to embrace the Lightroom/Photoshop workflow.
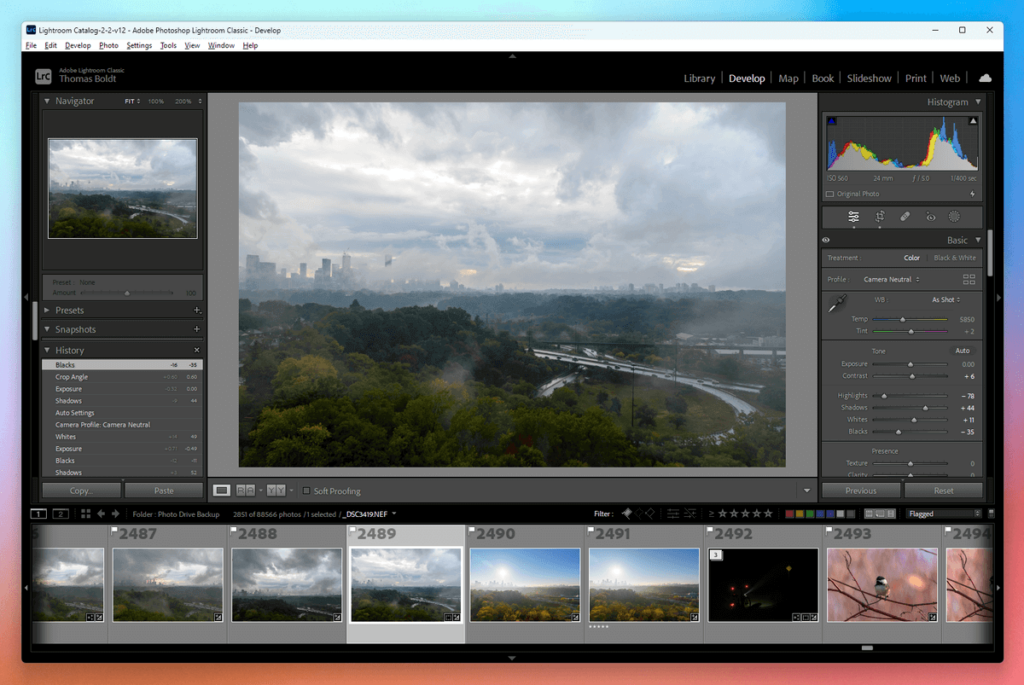
Image Editing with the Develop Module
Once you’ve chosen the images you want to work on, it’s time to dig into the Develop module. The range of settings will be very familiar to anyone who’s currently using a different RAW workflow management program, so I won’t go too deeply into detail about the more standard editing abilities. There are all the standard non-destructive RAW adjustments: white balance, contrast, highlights, shadows, a tone curve, color adjustments, and so on, and they do their jobs quickly and responsively.
The latest updates to Lightroom have added a number of useful editing tools such as automatic masks for localized edits and AI-powered denoising, although I haven’t noticed any of the performance improvements that Adobe has promised in the same updates.
The new tools are excellent, though, and fill a few major gaps in Lightroom’s editing toolkit. The new masking tools offer similar features to the automatic selection tools found in Photoshop, allowing you to automatically select your subject, the sky, or the background for quick edits.
These automatic masks aren’t always perfect, but Lightroom also allows you to modify them and combine them with the results of any of its other masking tools, which means you can now use a brush mask to modify an automatic mask that wasn’t quite sharp enough or missed an important detail.
In my testing, Lightroom was often too eager to consider the buildings along a skyline as part of the sky itself, so the ability to correct those oversights manually with a brush mask can really improve the results of your adjustments. I still wish that the selections were sharper, but I suppose we’ll have to wait a bit longer for the technology to mature a bit more.
The other modern advance that Lightroom has incorporated is an AI-powered denoising tool. This was a long time coming, and an entire industry of software plugins that provided the same feature appeared in the years while Adobe was doing painstaking testing of their new feature.
The new Denoise tool works quite well, although I’ve noticed during my testing that it’s often necessary to boost your sharpening higher than normal after using the tool. It also relies heavily on your GPU to do the necessary calculations, which means there can be a huge variance from computer to computer in the time it takes to run.
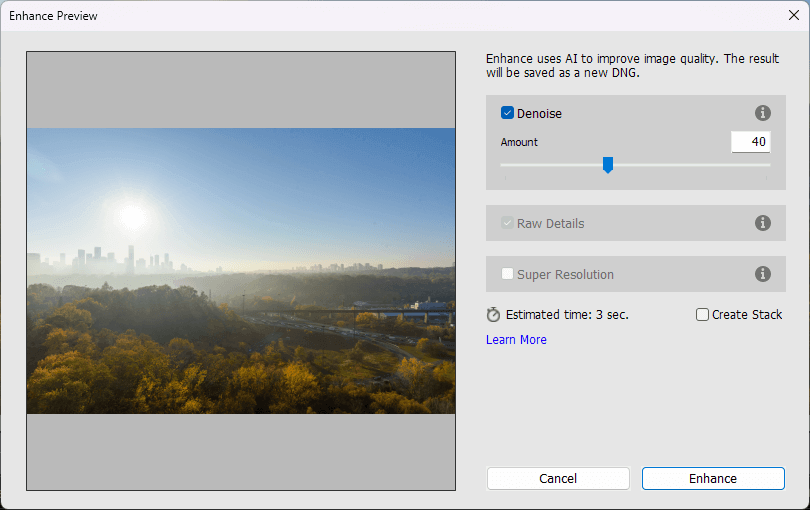
On my aging 2015 iMac, the Denoise tool takes around 9 minutes to run on a single 24-megapixel photo, but on my beefy PC with an nVidia RTX 4090 GPU, the same operation takes 3 whole seconds.
My personal take: Adobe is slower than I’d like when it comes to releasing new automatic/AI features, but when they do finally get around to it, the tools are solid.
Batch Editing
Lightroom is a great workflow management tool, especially for photographers who take multiple similar shots of each subject in order to select the final image during post-processing. Applying the same settings to each image one by one would take forever, but there’s another way.
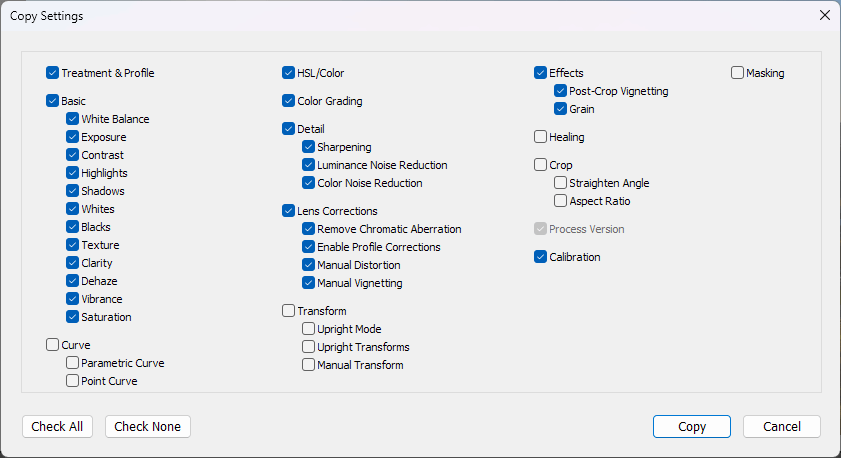
Lightroom makes it extremely easy to copy the Develop settings from one image to another, saving you the hassle of replicating the same settings on a series of images. A simple right-click on the image and choose ‘Develop Settings’ gives you the option of copying any or all of the adjustments made on one image and pasting them onto as many others as you want.
Holding CTRL to select multiple photos in the filmstrip, I can paste my Develop settings onto as many photos as I wish, saving me a lot of time. This same method is also used to create Develop presets, which can then be applied to images as you import them, saving you even more time.
My personal take: Workflow management and time-saving processes like these are what make Lightroom really stand out from the rest of the RAW image editors available on the market.
GPS & the Map Module
Many modern DSLR cameras include GPS location systems for pinpointing exactly where a photo was taken, and even those that don’t have one built-in usually have the ability to connect an external GPS unit. This data gets encoded into the EXIF data for each image, and Lightroom can then plot those images for you on a world map.
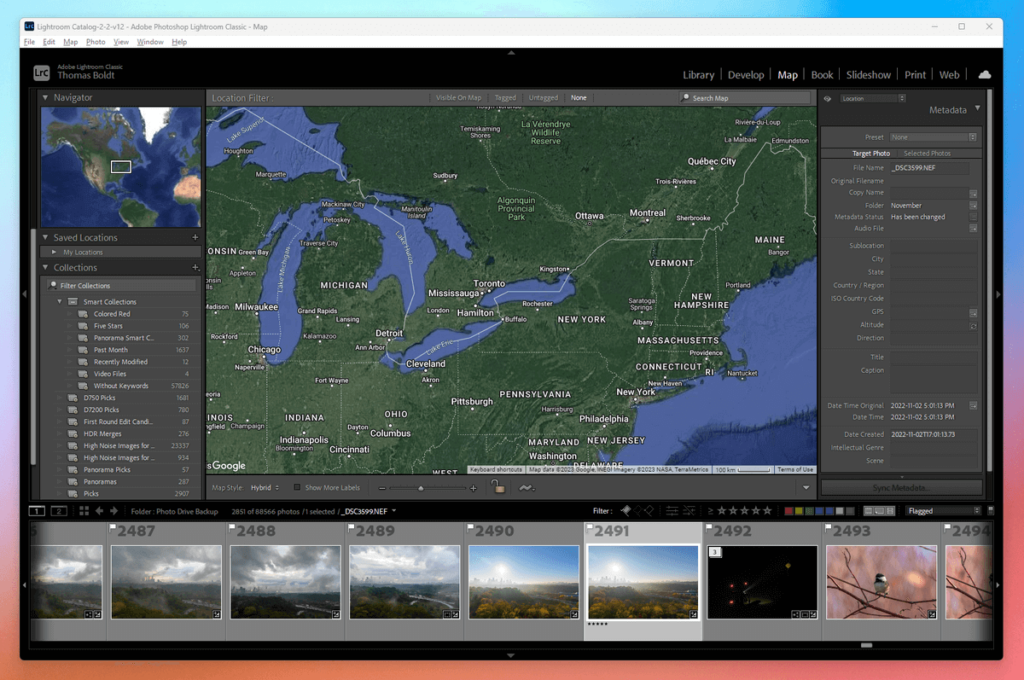
Unfortunately, I don’t have either of these GPS options on my D750, but it’s still possible to hard-code your location data if you want to use that to sort through your images. You can achieve the same thing using keyword tags, however, so I don’t really bother to use the Map module. That being said, if you have a GPS unit for your camera, it would probably be quite interesting to see how your photographic journeys have spread throughout the world!
My personal take: I’m not entirely convinced that this is a useful feature, but I guess for those of you globe-trotters who shoot around the world, it could be a big help.
Outputting Your Images: Book, Slideshow, Print, and Web Modules
Once your images are edited to your liking, it’s time to get them out into the world. Lightroom has several options for this, but the Book module is the most interesting. Part of me thinks this is a somewhat ‘quick-and-dirty’ method for creating a photo book, but that’s probably just the picky graphic designer in me – and I can’t argue with how streamlined the process is.
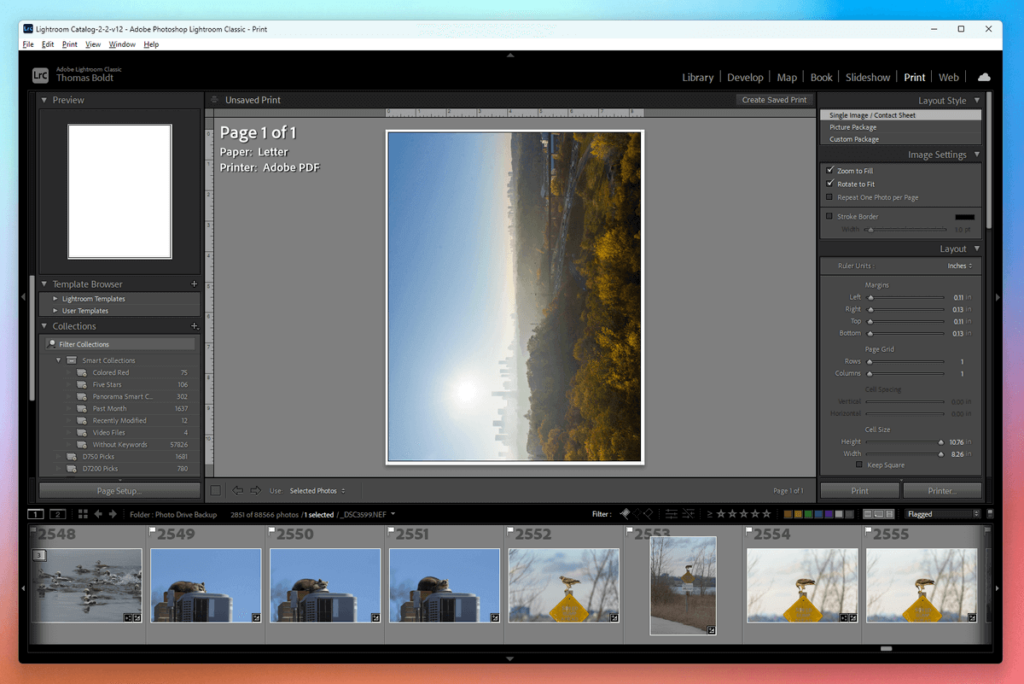
You can set up covers and configure a range of different layouts, then automatically populate the pages with your selected images. After that, you can output it to a JPEG series or a PDF file, or you can send it directly to the book publisher Blurb from within Lightroom.
The other output modules are fairly self-explanatory and easy to use. Slideshow lets you organize a series of images with overlays and transitions, then output it as a PDF slideshow or a video. The Print module is really just a glorified ‘Print Preview’ dialog box, but the Web output is a bit more useful.
Many photographers aren’t very comfortable working with HTML/CSS coding, so Lightroom can create an image gallery for you based on your image selections and configure it with a series of template presets and customized options.
My personal take: You probably wouldn’t want to use these features for professional self-promotion, but the Web gallery tool is an excellent way of generating quick previews for clients who are going to be reviewing and approving a selection of images.
Lightroom Mobile
Now that there is a smartphone in almost every pocket, mobile companion apps are growing extremely popular lately, and Lightroom is no exception. Lightroom Mobile is available for free on Android and iOS, although you need an accompanying Creative Cloud subscription in order to get the most benefit out of it.
You can shoot RAW images using your mobile phone camera and then sign into your Creative Cloud account to sync your images automatically from Lightroom Mobile to the desktop version.
You can then work on the images the same way you would any other RAW file, which adds an interesting twist to the value of a smartphone camera – especially the newest, high-quality cameras found in the latest smartphone models.
My personal take: While you probably won’t want to use your smartphone for serious photos, it can be a great help for location scouting, especially when you can incorporate your photos directly into your Lightroom catalog.
Reasons Behind My Lightroom Ratings
Features: 5/5
Lightroom’s primary tasks are to help you organize and edit your RAW photos, and it does the job beautifully. There is a robust feature set behind each of these main goals, and the thoughtful extra touches that Adobe tends to include in their software make managing a total RAW workflow extremely easy. Working with large image catalogs is smooth and fast, although thumbnail generation and display can be a bit slow.
Pricing: 4/5
While I wasn’t overly happy with the idea of the Creative Cloud subscription model at first, it’s grown on me. It’s possible to get access to Lightroom and Photoshop together for a mere $9.99 USD per month, and new versions have been released regularly since Lightroom joined the CC family in 2015 without increasing the cost. That’s much more effective than purchasing a standalone piece of software and then having to pay to upgrade it every time a new version is released.
Ease of Use: 4/5
Lightroom is very easy to use, although some of the less popular tools such as the automatic galleries and photo books could use a bit more polish to become properly user-friendly.
Support: 5/5
Because Adobe is a huge developer with a devoted and widespread following, the support available for Lightroom is arguably the best you can get for a RAW editor. In all my years of working with Lightroom, I’ve never had to contact Adobe directly for support because so many other people use the software that I’ve always been able to find answers to my questions and issues around the web. The support community is huge, and thanks to the CC subscription model, Adobe is constantly putting out new versions with bug fixes and increased support.
Alternatives to Lightroom Classic
DxO PhotoLab is an excellent RAW editor, allowing you to instantly correct for a number of optical lens and camera distortions thanks to DxO’s extensive collection of lab testing results. It also boasts an industry-standard noise reduction algorithm, which is essential for anyone who regularly shoots with high ISOs. Unfortunately, it doesn’t really have much of an organizational side to it at all, but it’s an excellent editor, and worth testing out the free trial before paying for the Elite edition or the Essential edition.
Capture One Pro is an incredibly powerful RAW editor, and many photographers swear that it has a better rendering engine for certain lighting conditions. However, it’s primarily aimed at photographers shooting with extremely expensive high-resolution medium-format digital cameras, and its interface is definitely not aimed at the casual or semi-pro user. It also has a free trial available, so you can experiment before purchasing the full version.
Read More: Lightroom Alternatives for RAW Photographers
Final Verdict
For most digital photographers, Lightroom is the perfect balance of power and accessibility. It’s got great organizational capabilities and powerful editing features, and it’s backed up by Photoshop for more serious editing requirements. The price is absolutely affordable for both casual and professional users, and Adobe has been regularly adding new features as they are developed.
There are a couple of minor issues with performance and a couple of user interface elements that could be improved, but nothing that should prevent any user from turning their photographs into finished works of art.
Do you have a question about Lightroom that I didn’t answer in this review? Let me know in the comments below, and I’ll see what I can do to help.