
Assisted Drawing is basically Procreate doing the heavy lifting for you while you draw by perfecting your strokes to be more technical so you can focus on drawing rather than your angles. This can be activated in the Drawing Guide of the canvas menu.
I’m Carolyn and I have been running my digital illustration business for over three years. Procreate is my weapon of choice so I spend most of my days exploring and using the app to create a variety of different projects for each of my clients and I’m always learning new tools.
The Assisted Drawing tool in Procreate can be used for many different reasons which makes it one of the app’s most versatile tools that give its users more control and can be used to benefit many different techniques. This is very useful and today I’m going to show you why.
Table of Contents
Key Takeaways
- Assisted Drawing is a support feature that makes your angles and lines more technical.
- It can be very useful when using the Drawing Guide to create a perspective drawing, mirror effect, or mandala.
- You must activate Drawing Assist on each layer individually.
- This feature acts similar to using a ruler.
- You can add Assisted Drawing as a shortcut to your canvas by editing your Gesture Controls.
What is Assisted Drawing in Procreate
Procreate Assisted Drawing feature is an invisible ruler and there’s really no better way to explain it. It takes your real-time drawing strokes and transforms them into smooth, straight, and directional lines that are all based on your active Drawing Guide.
When using this feature, it’s important to remember that how your Assisted Drawing will react with your canvas is all down to the settings that you have selected in your Drawing Guide. It automatically adopts the most recent Drawing Guide used so you may need to change it.
Generally, this feature will take your free hand stroke and transform it into a straight, technical line aligned with whatever guide you have activated. It is essentially a live version of the QuickShape tool that will continue to be active until you choose to turn it off again.
Depending on which Drawing Guide you are using, this tool can be used for a variety of different things. Here is a breakdown of how each Drawing Guide will affect your Drawing Assist setting:
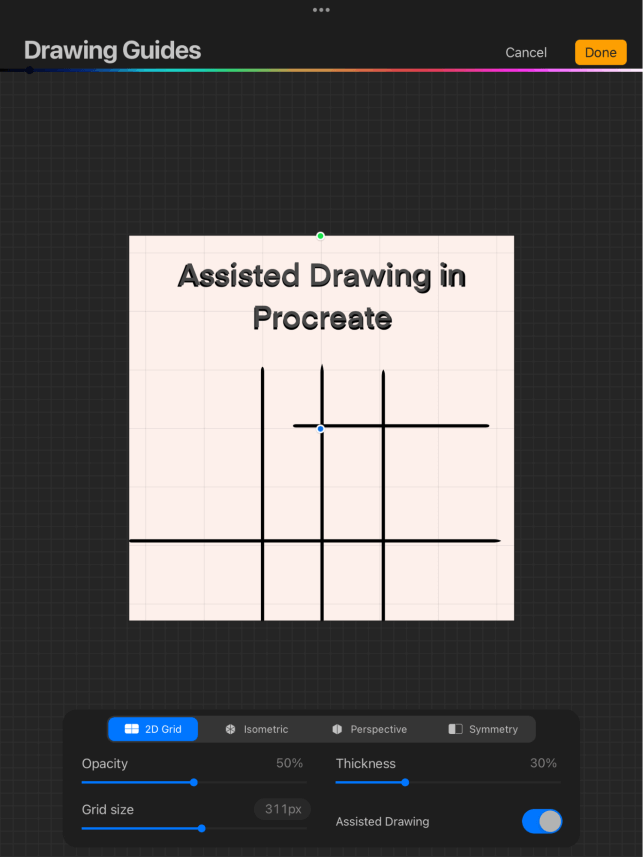
2D Grid
The main setting to be aware of when using Assisted Drawing in your 2D Grid guide is the Grid Size. Whatever size you select will create grid lines from four squares all the way to hundreds of squares.
Once Assisted Drawing is active, when you draw on this layer of your canvas, your lines will only appear in the same direction as your grid. Like below, if I were to draw a big circle shape, it would automatically flip my stroke to a straight line going either up or down.
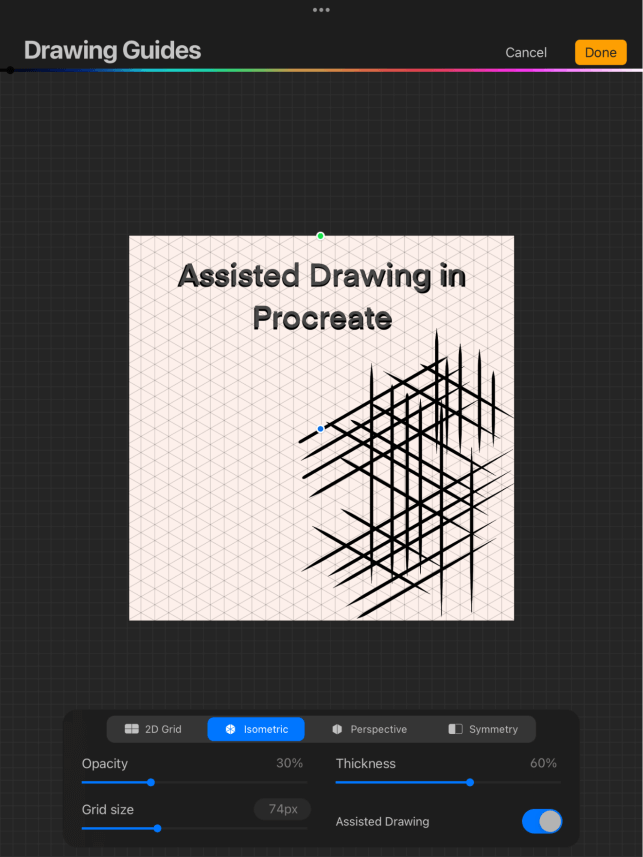
Isometric
Similar to 2D Grid, the grid that you create will determine the strokes allowed on your Assisted Drawing feature. So no matter what you draw on this layer, it will only allow your strokes to align with each direction of your grid.
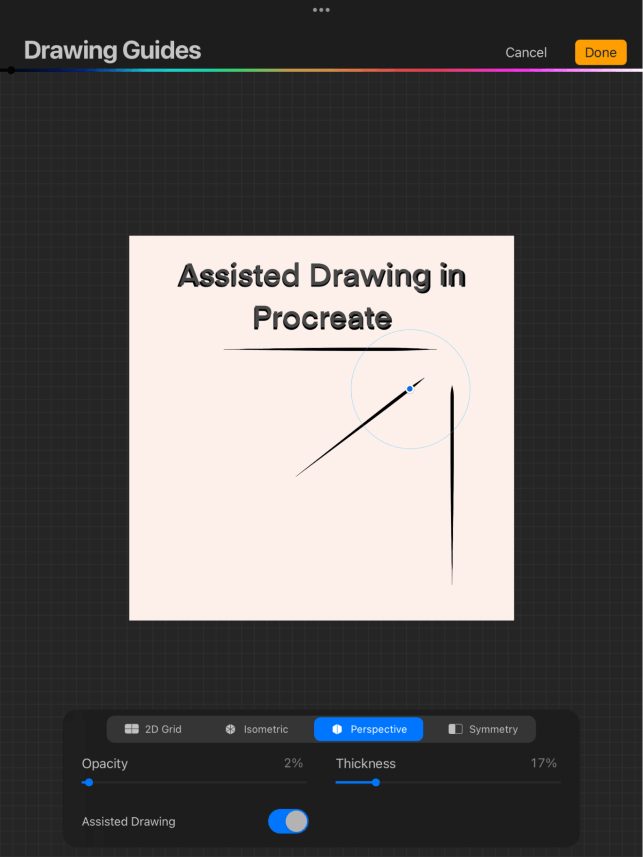
Perspective
With this Drawing Guide, you choose a Disappearing Point and you can place it wherever you wish on your canvas. This means whatever you draw on this layer, will be directly angled towards the point that you select.
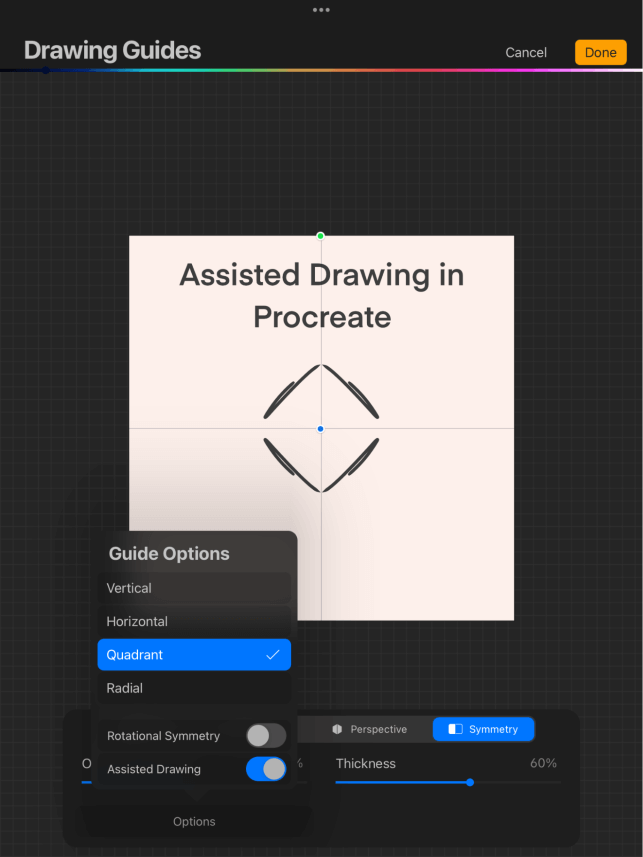
Symmetry
The Symmetry Guide has the most potential when using the Assisted Drawing feature in my opinion. These two settings are commonly combined to create unique patterns and mandalas as it creates a mirrored effect and duplicates your stroke in each section of the grid.
Your strokes will appear differently depending on which option you choose whether it’s Vertical, Horizontal, Quadrant or Radial. Either option you choose, once you draw one section of the grid, will be reflected the same in all remaining sections of your grid simultaneously.
This is awesome for mandalas because you only have to focus on drawing a design or shape in one section and it’s repeated identically through your entire grid which creates some really cool patterns and effects without the user having to think about symmetry or time spent.
How to Use Assisted Drawing (3 Steps)
It’s quite simple to activate the Assisted Drawing feature on your canvas. Just remember that you must activate it on every layer you need to use it on. Activating it once will not transcend to any other players within your canvas. Let’s get started:
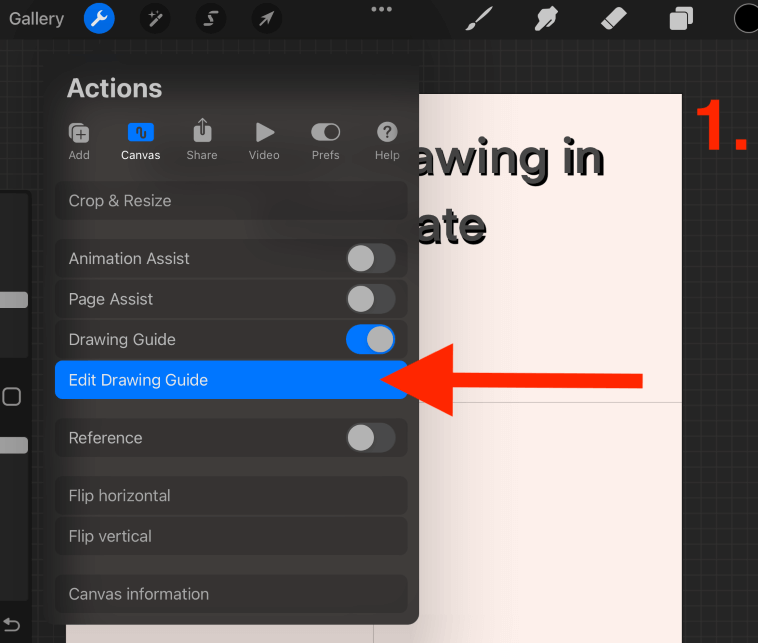
Step 1: Open your Actions tool by tapping on the wrench icon. Select the Canvas menu and activate your Drawing Guide then tap on Edit Drawing Guide.
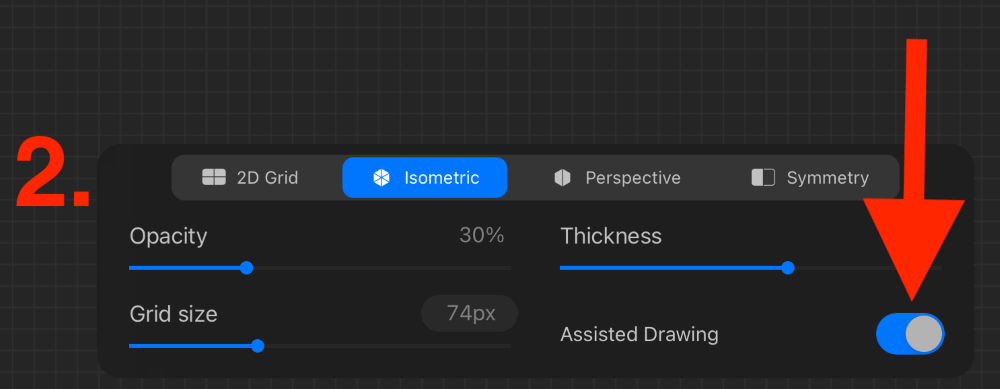
Step 2: Once you choose the Drawing Guide you want to use, look for the Assisted Drawing toggle and slide it on so that it appears blue. It will now remain on until you turn it off or begin a new layer.
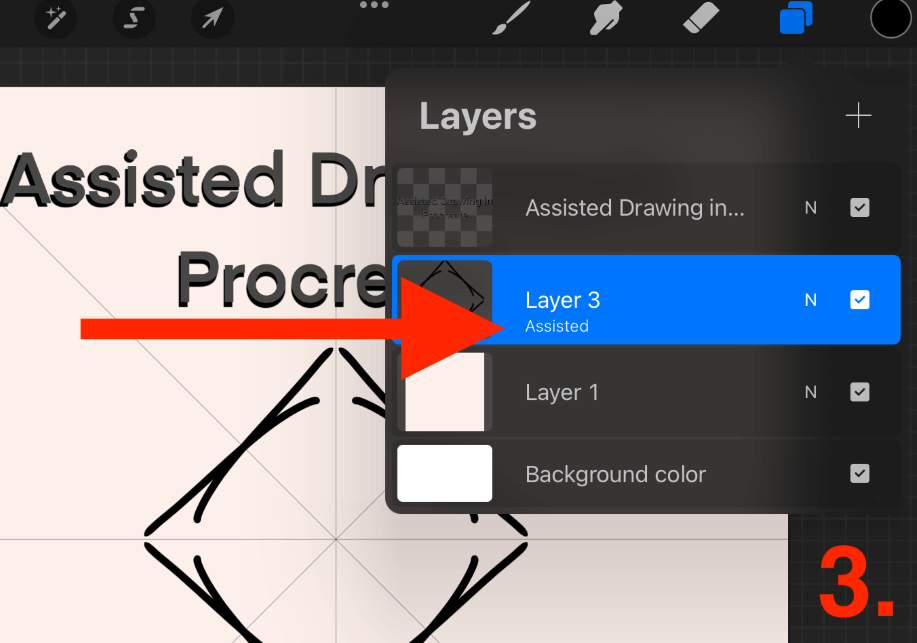
Step 3: You can see which layers have Assisted Drawing activated by opening your Layers menu. Underneath the layer title will be labeled Assisted.
Gesture Controls
If you plan on using your Assisted Drawing feature frequently, I recommend updating your Gesture Control so that you can access it quickly. Here’s how:
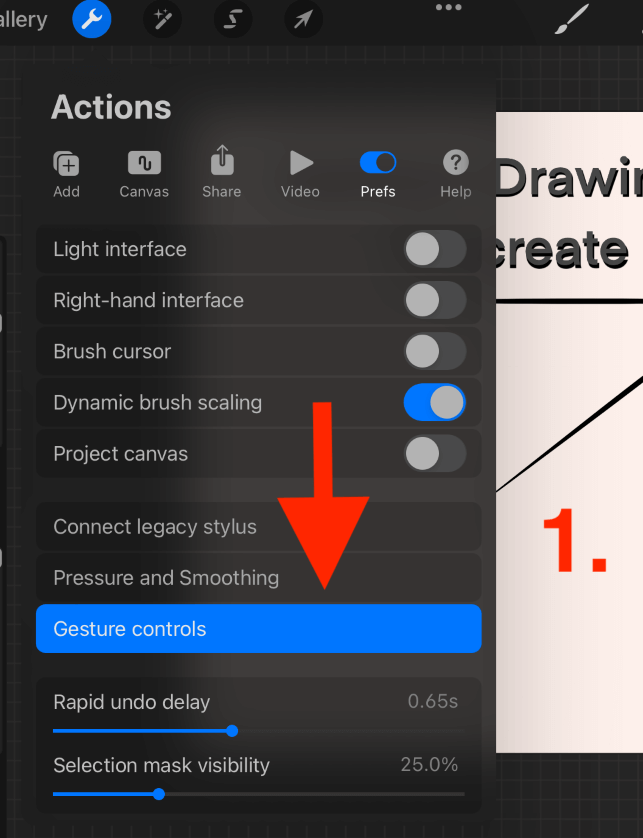
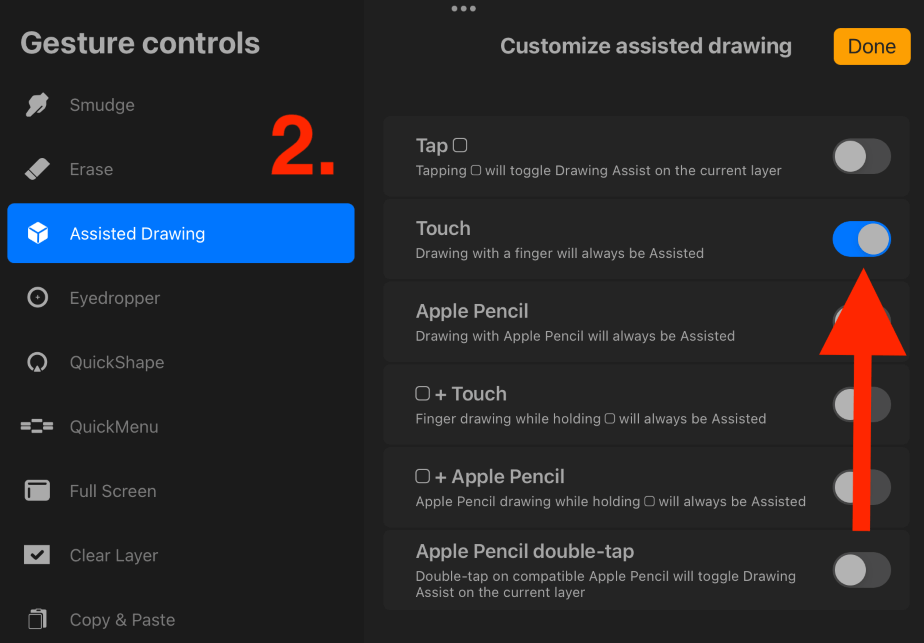
Step 1: Open your Actions tool, by tapping on the wrench icon. Scroll over and open your Prefs menu. Tap on Gesture Controls.
Step 2: In the Gesture Controls menu, open the Assisted Drawing tab. Here you can choose which quick tools you want to use when activating your Assisted Drawing feature. You can activate as many as you like by sliding the toggles to blue.
FAQs
Below is a selection of your frequently asked questions regarding the Assisted Drawing feature in Procreate.
What’s the Procreate Assisted Drawing shortcut?
You can use any or all of the Procreate Assisted Drawing shortcuts by activating them in your Gesture Controls. You can follow my 2-step method above to do this.
Where is the Procreate Drawing Assist mirror?
You can find this in the Symmetry Drawing Guide in your Canvas menu. You must choose a grid format and activate Assisted Drawing in order to achieve the mirrored results in your canvas.
What to do when Procreate Assisted Drawing is not working?
I recommend checking that your app is up to date and restarting it too. This is not a common glitch and it’s available on all devices so it should be a simple fix.
Conclusion
The Assisted Drawing feature is definitely not the first thing that most people learn to use on Procreate. Some users will go their whole artistic life without even using this function. But for those of you who like to create technical drawings or effortless patterns, this feature is for you.
It doesn’t take long to activate this tool and it can provide a lot of different results if you spend some time getting to know it. Don’t be shy and start experimenting with your Assisted Drawing feature today. It will definitely open doors for you that you didn’t even know existed.
Do you use the Assisted Drawing feature in Procreate? Let us know what you use it for in the comments section below.