
While centering or aligning your text in Photoshop seems like it’d be relatively easy, you’d be surprised by the amount of tools and steps involved in the process. If you’re an aspiring graphic designer or working in print you’ll want to make sure you know this process like the back of your hand!
My name is Skyler. In this tutorial, I’ll be showing you different ways you can center and align text in Photoshop.
First, we’ll discuss how to center text by enabling the snap guides and move tool, before moving on to a quick review of the alignment types available for your use in Photoshop. With the knowledge under your belt, I’ll be able to show you how to center or align your text to any shape, layer, image, or selection.
It may sound like a lot, but fortunately for us, Photoshop makes it simple! Once you understand the tools and get the steps down, it’s easy.
Let’s get started.
Table of Contents
Method 1: Move Tool & Snap Guides
This method utilizes both the Move Tool and Snap Guides which can be enabled in Photoshop. Once the Snap Guides are enabled and you’ve added your text it’s as simple as clicking and dragging your text to the center to position according to our Snap Guides.
Step 1: Enable Snap Guides
These guides will ensure you are one hundred percent accurate when centering your text, so there’s no room for errors or eyeballing involved.
To enable these nifty guidelines, all you have to do is navigate to View > Snap To and check off Guides, as well as Layers and Document Bounds.
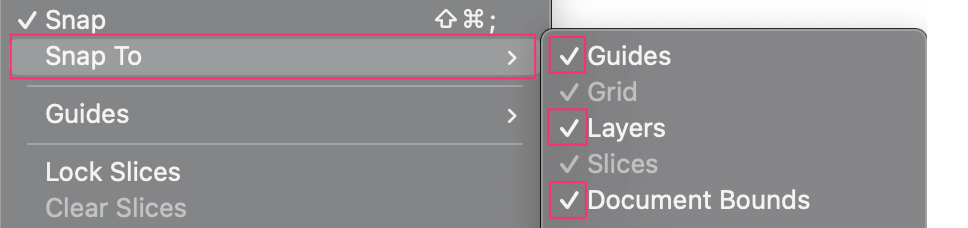
Great! Once all of those are checked appropriately you can move on to adding your text.
Step 2: Horizontal Text Tool
I’m sure you’re all familiar with the Text Tool, but in case you’re not, it can be found among your other tools with a T for an Icon. It looks like this.
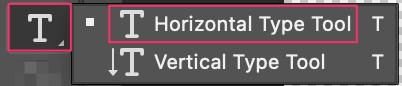
You’ll be able to choose from the Horizontal Text Tool or the Vertical Text Tool. I’ll use the Horizontal Text Tool in this example.
From here you’ll simply click on your canvas with the Horizontal Text Tool enabled and a new textbox will appear on your screen for you to type in your text.

I’ll be typing “Center Text Example” for the sake of clarity!
Step 3: Using the Move Tool
The next tool you’ll need to center your text is also located in your tools panel, and it resembles a compass, or plus sign with four-pronged arrows at each end.
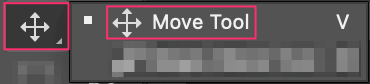
With this tool enabled, you’ll be able to click and drag your text box or other selections across your canvas and drop them into your desired location easily.
Alright! Now you’ll move on to how to use the Snap Grid lines you enabled in the first step of this process.
Step 4: Using Snap Guides
Using the Move Tool, you can go ahead and begin moving your text around the canvas. You’ll notice that depending on where your text is, purple lines will appear to guide you. This example shows how I’ve centered the text both Vertically and Horizontally so it is directly in the center.
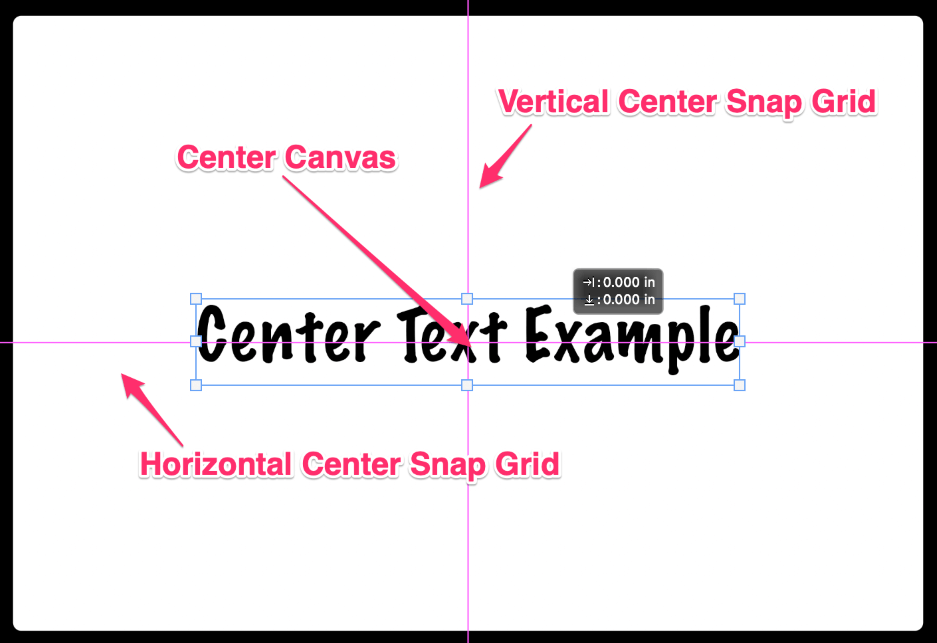
If you move your text up or down from here it’ll remain vertically centered, but the horizontal snap line will disappear.
Likewise, moving your text left or right from here will keep it centered horizontally, but the vertical snap line will disappear.
This can come in handy when you need your text centered on only a single axis, be it horizontal or vertical.
Method 2: Alignment Panel
If you’ve ever worked in Word or similar software you’re likely already familiar with the Alignment Types and some of their Icons. Understanding these will aid you when you need to properly align your text in the future.
They also allow us the ability to align our text with just a few button clicks, which will serve to aid your overall productivity.
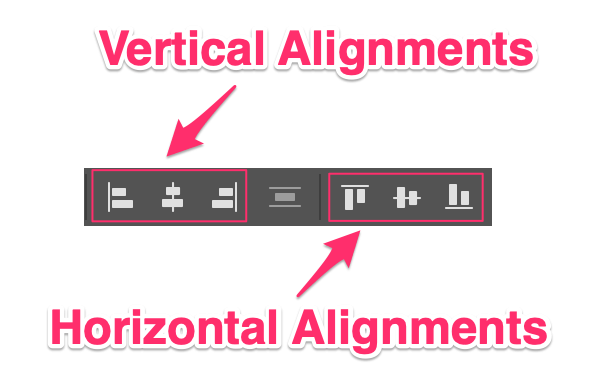
Horizontal Alignment Types
- Align Left Edge

Before you start warping our image, make sure your new layer is selected.
- Align Horizontal Center

See how I’ve manipulated the handles of the warp grid to make the darker underside of the double chin overlap and line up with the true jawline?
- Align Right Edge

That’s the goal. Continue manipulating your selection until you’re satisfied with this, then hit Enter or click the Check Mark in the top menu to finalize your manipulation.
Vertical Alignment Types
- Align Top Edge

Next, you’re going to find a soft, nonabrasive brush of your choice with the Eraser Tool enabled.
- Align Vertical Center

I’m going to be sticking with the Soft Round brush Photoshop provides, but I’ll be changing the setting so it blends my image more easily.
- Align Bottom Edges

Under the brush size and hardness, you’ll want to set Hardness to zero percent.
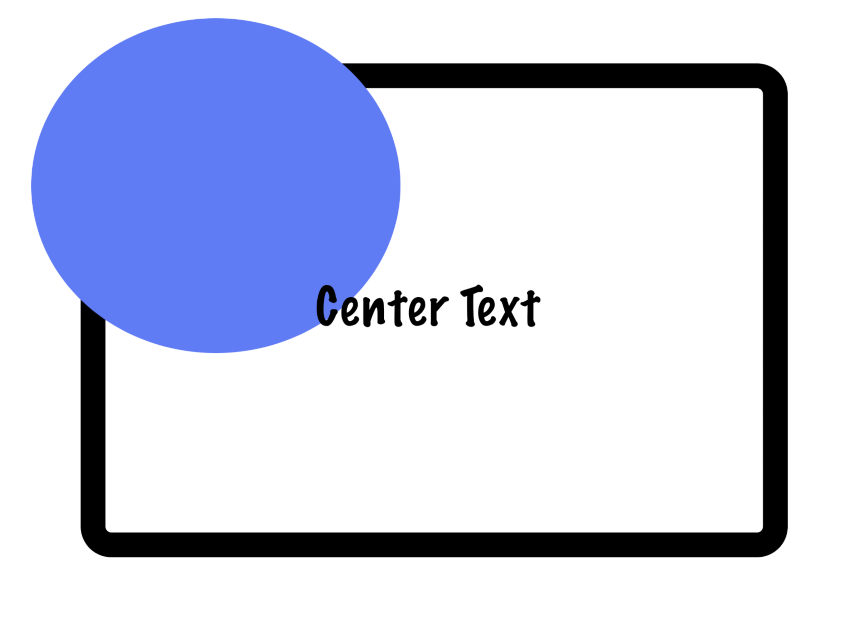
How to Center Text to Shapes, Selections, or Images
If you have a design where you need to center your text to a shape, or specific section of an Image then you’ll need to get a bit more creative, as the snap guides only apply to the entire canvas.
Don’t worry though, all you need to do is select the area you want to have your text centered in using the Marquee tools Photoshop provides. Then you can select your desired text layer in the layers panel and center it to your selection using a few simple steps.
Step 1: Select Your Layer, Image, or Shape
I’ll be using a Shape for this example, but you can apply this technique to any layer, selection, or image as well.

You can use the Marquee and Bucket Tool to make your simple shape, or you can use it to select a specific part of your image.
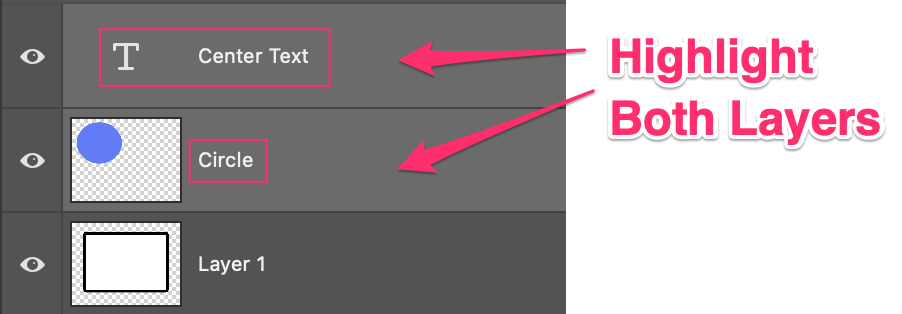
The goal is to center your text inside your selection, instead of centering it on the canvas. So, we’ll need to ensure the correct layers are highlighted as well.
Step 2: Highlight your Text Layer & Selection
Start with highlighting your text layer, and then hold down Command/Ctrl on your keyboard to highlight an additional selection.
Once this is done, find your Move Tool again.
This will bring up all of the Alignment Types we went over previously.
Step 3: Set your Alignment
Now all that’s left to do is choose your desired alignment! For example, If I wanted my text centered both Vertically, and Horizontally in my circle I’d have to click Align Horizontal Center, then Align Vertical Center!

Ta-da! Pretty cool, right? Feel free to experiment with all the different alignments and try new selections! There are lots of design possibilities with these tools, so I look forward to seeing what you’ll create.
Conclusion
Learning how to properly center your text in Photoshop is relatively straightforward, but you’ll need to understand what tools to use and how the alignment types work before diving in. Once you’ve got that down, you’re golden!