
A cut in video editing is the space where one video clip ends, and another begins. It is the invisible “jump” from one shot to another.
If that sounds a bit simple, it is because it is. You just decide to stop clip 1 on a particular frame and start clip 2 on a particular frame. But there is some art to deciding when/how you cut your clips.
So, below I’ll take you through the main types of cuts, giving you some tips about when they are particularly effective.
Just remember, your job as an editor is to tell a story. That does not mean you need to follow rules. On the contrary, finding ways to use the tools you’ll learn here in ways that your teacher never thought of us is the real art of editing.
Table of Contents
The Difference Betwen Cut and Transition
First, let me be clear that a cut is not a Transition. A transition is a technical term in video editing, referring to an Effect that changes a cut’s look and feel.
Clearly the two go hand in hand – every day I combine different cuts and transitions. I also talk about transitions in our companion article, but here we will focus on how different cuts can affect the pace of your movie and change the feel of a scene.
The fact is, different kinds of cuts generally evoke predictable reactions in your viewer. You know, feelings. So ideally you would use a cut that compliments the feeling you want the viewer to have and avoid a cut that would contradict that feeling, confusing the viewer about how they are supposed to interpret a scene.
1. The Hard Cut
The Hard Cut is also called the Standard Cut, Straight Cut, or just A Cut.
It is not meant to evoke anything. It is used to just move the story forward without any distractions or feelings added. With a Hard Cut your aim is smooth, unnoticeable edits.
Generally, you use them within a scene. For example, two people talking over dinner, or a fight scene.
In both cases, the camera angles may change dramatically. In the dinner scene, we will probably cut from one person to the other, back and forth. But – and I don’t know why – our brains get that there are different angles involved and don’t mind all the jumping back and forth.
However, to use a Hard Cut to go from one scene (a nice dinner) to another (a fight) can feel a bit jarring. It is just a little too fast for the viewer.
That said, most of the time the Hard Cut is the best cut to use because it is so simple. If you want a rule of thumb: Use a Hard Cut unless you have a reason to use another kind of cut.
2. The Cut on Action
Hard Cuts usually work best when they are done in the middle of an action. It can be as simple as a head turning, a hand reaching for a door knob – just movement on whatever the viewer is currently focused on.
Again, I don’t know why, but viewers tend to find the cut easier to accept when there is some movement. If you are doing Hard Cuts and it feels off, this could be why.
This is particularly important when the cut involves a specific action. For example, in a fight scene, where a fist is raised in a punch, and then the camera changes to a closeup of somebody getting hit.
In both cases, the camera angle changes a lot and to sell that change to the viewer it needs to feel like that first shot led to the second shot and having movement in both shots can really help.
To put it differently, if shot 1 is of somebody moving to sit in a chair and shot 2 is of them comfortably sat in the chair, it will feel abrupt. But if shot 1 is of them starting to sit and shot 2 is them finishing the sit from a different angle, our brains easily accept that something happened in between.
But getting the right point in the action where you cut can be really important.
For example, if somebody is throwing their arms up in the air after scoring the game-winning goal, waiting to cut after their arms start to come back down could really deflate the scene. Cutting as they are going up creates a sense of momentum that disappears if you cut too late.
Pro Tip: As just a frame or two can make a real difference in how well your cut works, this is a good reason to practice using the comma (,) and period (.) keyboard shortcuts. These move your clip just one frame at a time left (comma) or right (period).
3. Cutting on Camera Movement
Similar to cutting on action, it can be very effective to cut during a camera movement. Say the camera is panning to the right of a scene. If you cut to another shot where the camera is also panning right, the transition can appear more seamless.
Note that this works best when you have similar movement from one clip to another. If you are panning right and cut to a shot panning left, the effect can be quite jarring.
Pro Tip: We have all “flipped” (used its mirror image) a shot just so we could get the camera moving the same direction! Also, adding a little “motion blur” effect on the cut can really sell it.
4. L and J Cuts
L and J-Cuts are variations on the Hard Cut where the video cuts before (an L-Cut) or after (a J-Cut) the audio cuts. The cuts are named because of the way they look in your timeline.
In the screenshot below, the L-Cut – where the video ends before the audio ends – is shown with my dashed-red lines on the left, and the J-Cut (the audio begins before the video begins) is shown with the dashed red lines on the right. Do they look like an L and J now?
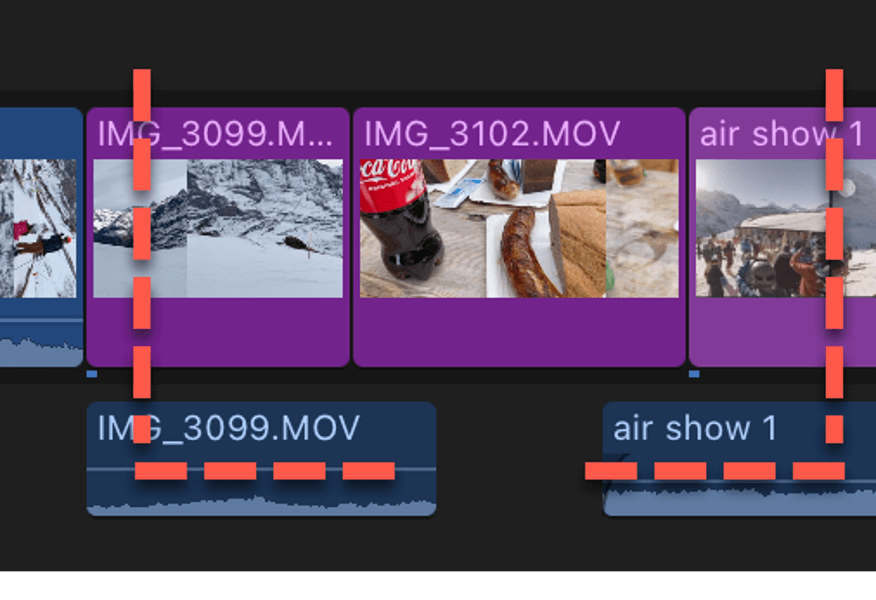
In a L-Cut, the video changes to clip 2 but you can still hear the audio from the clip 1. This happens all the time in dialogue scenes. A character starts saying something, the camera (video) flips to the person listening, but you still hear the person from clip 1 talking.
The reason this technique is so common is that it is so effective at keeping conversations flowing while the picture changes, and because it allows better reaction shots – where the camera is focused on somebody reacting to what is said or heard.
L and J-Cuts can also help with transitions from one scene to another. Again, it is a little cliché, but lots of dream sequences, flashbacks, or narrations use a L-Cut so the dialogue carries into the video of what is being talked about.
In this way, L and J Cuts are also helpful if you want to give the audience some advance notice of what is about to happen.
For example, if your character suddenly realizes he needs to drive to the hospital, you could have the sound of the tires squealing while the camera is still on her face (a J-Cut), before the video cuts to the car lurching onto the road.
5. The Smash Cut
A Smash Cut is an intentional breaking of the rule that a Hard Cut should feel seamless. A Smash Cut can be used to make a jarring, abrupt, change from one scene to another. Preferably when the audience least expects a cut.
Horror movies use Smash Cuts all the time. So much that it can feel a bit cliché. How many times have you seen a scary scene only to lurch (Smash Cut) to a person gasping awake in a bed?
But Smash Cuts do keep audiences on their toes. They can be effectively used to create or shift intensity and thereby be very engaging. Think about it this way: If you do a Smash Cut, your audience is likely to remember exactly what happens next.
Smash Cuts are often used at the end of TV episodes for a somewhat ironic example of this. If your scene ends with a Smash Cut, then fades to black, your audience is likely to be gasping, engaged, and quick to smash the “Play Next Episode” button…
And, Smash Cuts can be exhausting, so best to use them sparingly, when you really want the audience engaged.
6. The Jump Cut
The Jump Cut is as dynamic as the Smash Cut, jarring the viewer, but is not usually used to create drama or impact but rather to keep the viewer engaged. While a Smash Cut is abrupt but could well be a normal occurrence (think of a monster jumping from the bushes), Jump Cuts are almost always obvious or intentional dislocations in time or space.
Most of the time, Jump Cuts are created by simply removing some frames from a clip. Imagine a 10-second shot of somebody walking toward the camera. Now imagine that every other second is removed. That’s a series of Jump Cuts.
It’s a remarkably effective way of getting the viewers’ attention. That person lurching closer is bound to raise the viewer’s anxiety.
But this same series of Jump Cuts can be used to just signal the passage of time. Simply by adding Dissolve Transitions between these same jumps could lower the tension of that person moving toward you, suggesting only that time is passing.
Jump Cuts can also be made between different camera angles, or even depth of focus. YouTubers use this technique all the time. You just can’t stare at somebody talking for too long, so they add Jump Cuts by abruptly zooming in and zooming out.
Not – to be clear – a Zoom Transition that moves in or out over time, but a Hard Cut that is instantly closer or further away; The key to a Jump Cut is abruptness.
7. The Invisible Cut
I love this cut. There is something old school and just elegant about it.
The basic idea is that something passes in front of the camera, so clip 1 goes black (or white) for just a second, and then when it comes back you are watching clip 2.
Alfred Hitchcock used this kind of cut a lot when he wanted you to think his scene was filmed in “one shot” – he’d pass the camera across a closeup of somebody’s back or behind a pillar, and of course the picture would go to black for a quick second and then appear to continue.
But what Hitchcock was doing in that brief flick of black was making a cut… an Invisible Cut
Pro Tip: It is easier for viewers to accept a cut when they don’t have to move their eyes after the cut. For example, if somebody is running on screen from the right, your viewers will be looking at the right side of the screen. If you then cut to action on the far-left side, it may take them a second to figure out where to look, and you can lose them in that second.
8. The Cutaway
A Cutaway is when a short second clip is briefly inserted into a longer clip.
The classic example is during a long narration in a documentary. An expert is talking to the camera from his armchair in his study, but now and then the video changes to an image or a video of something the expert is talking about. That’s a Cutaway.
Like those YouTubers using Jump Cuts, the TV editors know that we can only stare at somebody talking for so long.
The technique can also be used in a more structured way to help the viewer understand something about the scene. News programs do this regularly when correspondents are reporting from the field.
For example, the video is showing a reporter talking about how bad the hurricane is and – while the reporter is still talking – the video will Cutaway to a shot of cars floating down the highway, then cut back to the reporter.
Cutaways can also be used to offer some perspective, humor, or uncertainty. Imagine a witness describing a scene, and a Cutaway shot shows the event happening differently. That simple Cutaway changes the whole meaning of the scene.
Pro Tip: Cutaways can also be used to fix problems as an editor. Say you have a great clip of somebody talking, but right in the middle, they cough. Throw in a Cutaway and delete the audio of the cough and you’re good to go.
9. The Cut-In
No, Cut-Ins aren’t the opposite of Cutaways. Cut-Ins are almost always a kind of zoom in, and you usually don’t return to the original clip. For example, maybe a character is reading a newspaper on a train, and you cut to a closeup shot of the headline: “Riding Trains Causes Cancer”.
But, imagine you have a wide shot of two characters arguing, and there is a gun on the table between them. If you cut to a closeup of the gun, then cut back to the wide shot, that wouldn’t be a Cut-In. That’s just good editing – Helping to give the story flow while setting the scene and – presumably – raising the tension.
10. The Crosscut
Cross cutting, also called parallel editing, is when you have two different scenes playing at once, and you cut between them.
The scenes are usually related and usually happening at the same time. For example, instead of showing the journey of two people to the same meeting one after the other, you crosscut them to both save time and signal to the viewer that these journeys are happening simultaneously.
Cross cutting can also be effectively used to create and raise tension. There is a classic example in the climax of The Godfather, when Al Pacino is attending the baptism of his godson, and a series of murders is carried out that, clearly, he ordered.
These scenes could have been shown sequentially but wouldn’t have had half the effect.
Sure, cross cutting these scenes does help us understand the simple narrative point that the murders are happening during the baptism. But it also provided a stunningly successful opportunity to explicitly contrast the two scenes.
11. Montage Cuts
Montage Cuts can be cheesy, so be careful. Every sports movie has a scene where the team trains, practices, and develops through a Montage Cut.
And, they typically do it to a soundtrack that not just echoes the images, but hits you over the head with them. (Think of “Eye of the Tiger” playing during a montage of Rocky training).
Nevertheless, the technique, like a Cross Cut, can be very effective in communicating information (progress, passage of time, steps to finishing the tree house) and saving precious time. Just stay clear of setting them to bad 80’s music and you’ll probably be fine…
And note that Montages can effectively use all of the other cuts we have discussed above. Jump Cuts, Cross Cutting, L and J Cuts, Cutaways, all work. And ending them with a good Smash Cut or a slow-motion shot celebrating the achievement is common (if predictable).
12. The Match Cut
Match Cuts have delighted editors, and hopefully audiences, for decades. The basic idea is that one motion or object in the outgoing cut matches with something in the incoming cut.
The classic example is from “2001: A Space Odyssey”, when an ape throws a bone into the sky. As it spins in slow motion it Dissolves into a shot of a space ship cruising the galaxy.
One of my favorite examples is in “The Godfather”, when a shot of Marlon Brando lying in bed Dissolves into a pastoral scene in Italy. The Match Cut is not obvious, but if you look at Brando’s mustache in the outgoing shot you will see it dissolves perfectly into the shape of the loan tree in the incoming shot.
Match Cuts are usually impressive. As such, they can distract the viewer from the story, but if done well, they usually also evoke an appreciative smile.
While not a classic Match Cut, I am seeing a lot more editing (particularly in advertising and on YouTube) where motion is matched. For example, a person leaping into the air is matched to another person dropping after a jump.
If the camera is also moving during these clips, such a cut could be said to be a combination of a) cutting on the action, b) cutting on camera movement, and c) a match cut. And that’s good, creative, editing.
Final Cutting Thoughts
Whether some or all of these cuts are new to you, I hope you’ve seen how much power you have as an editor. Independent of the script, the actors, the cinematographers, and everybody else crafting a movie, you can greatly affect how a performance is felt.
So don’t worry about making or memorizing the kind of cuts I’ve covered. Just think about how cutting your scene differently might make the scene feel different, and see if you like it better.
Please do leave a comment below if you have any favorite cuts I didn’t cover, or if you have any questions! Thank you.