
To export an MP4 from an After Effects project, use Adobe Media Encoder by adding your composition to the Media Encoder Queue and selecting H.264 as the format.
Hi there! I’m Zoe, a graphic designer and illustrator. When I started using After Effects, I used to export to MOV from After Effects and then switched to Premiere Pro for the MP4 conversion.
Over time, I found this method was not only time-consuming, requiring an extra step, but also temporarily clogged up my computer’s memory with large files. Switching to direct MP4 exports using Adobe Media Encoder made the process faster and much more efficient.
This article will explain why After Effects’ Render Queue can’t directly export MP4 files, explore the advantages of the MP4 format, and guide you through using Adobe Media Encoder for efficient, high-quality MP4 exports, complete with step-by-step instructions.
Let’s dive in!
Table of Contents
Key Takeaways
- You cannot directly export MP4 files using the Render Queue in After Effects; Adobe Media Encoder is required for this format.
- Adobe Media Encoder is the best choice for exporting MP4 files because it offers a wide range of codecs, including H.264.
- The H.264 codec is a widely used video compression standard for high-quality digital video, commonly used for exporting MP4 files.
- The MP4 format offers a balance of high video quality and low file size, making it widely compatible with various devices and platforms.
- Adobe Media Encoder allows for multitasking, enabling users to continue working in After Effects while the encoding process runs in the background.
Note: All screenshots from this tutorial are taken from the After Effects Mac version.
This article provides a comprehensive guide on how to export After Effects projects as MP4 files using Adobe Media Encoder
Understanding MP4 Export Limitations in After Effects’ Render Queue
If you’ve tried to export an MP4 file directly from After Effects’ Render Queue, you may have noticed there’s no option for MP4 format with the H.264 codec. This is because After Effects is primarily used as software for creating and editing videos, rather than delivering the final product.
While there are workarounds, like exporting to a MOV file and then converting it to MP4 using another program like Premiere Pro, this process can be time-consuming and may reduce the quality of your video.
What is Adobe Media Encoder?
A more efficient solution is to use Adobe Media Encoder. Media Encoder is specifically designed to handle a wide range of formats, including MP4 with the H.264 codec.
This method not only maintains the quality of your project but also streamlines your workflow. With Media Encoder, you can continue working in After Effects while your project is being encoded, saving you valuable time and ensuring a smoother workflow.
If you have After Effects, you likely already have Adobe Media Encoder. It’s typically installed as part of the Creative Cloud package when you install After Effects or Premiere Pro. If it’s not already installed, you can easily download it via the Adobe Creative Cloud app by selecting it from the Apps tab and clicking Install.

You can also download the installer here: https://www.adobe.com/products/media-encoder.html
This makes Media Encoder readily accessible for Creative Cloud users. Adobe Media Encoder is the recommended choice over the Render Queue in After Effects for direct and high-quality MP4 exports.
What is MP4?
MP4 is a video container format that houses all the necessary elements of a video, including the video itself, audio, closed captioning, and metadata. Think of it as a digital package that keeps everything together. You can identify an MP4 file by its .mp4 extension.
Using MP4 as your preferred video format offers several benefits:
- Wide Compatibility: MP4 is one of the most versatile and widely supported video formats across different platforms and devices.
- Small File Size: With efficient compression codecs like H.264, MP4 files can maintain high video quality while keeping the file size relatively small.
- Streaming-Friendly: MP4 files are ideal for streaming platforms as they allow for adaptive streaming, enabling smooth playback at various internet speeds.
- Metadata and Closed Captioning: MP4 supports the inclusion of metadata and subtitles.
MP4 vs. H.264
There is often confusion between MP4 and H.264, but they are not the same thing. H.264 is a codec used to code and decode video files, while MP4 is a video container format that can house videos encoded with various codecs. An H.264 file can have a .mp4 or .mov extension, among others.
H.264 is a highly efficient video codec that provides good video quality at relatively low bitrates. This makes it a great choice when you want to create MP4 videos.
Exporting After Effects to MP4 Using Adobe Media Encoder
Exporting your After Effects compositions as MP4 files doesn’t have to be a daunting task. By following these steps and using Adobe Media Encoder, you can easily export your projects into MP4 format:
Step 1: Open the composition in the Project panel and ensure it’s ready for export, checking all layers, effects, and settings.
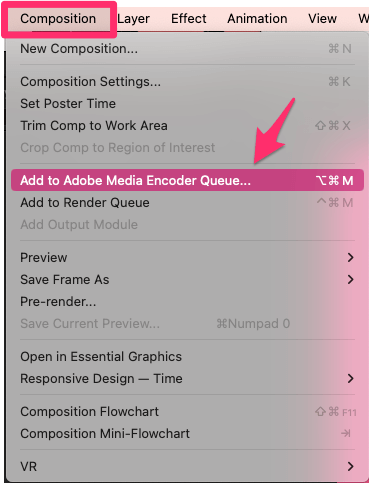
Step 2: Navigate to Composition > Add to Adobe Media Encoder Queue or File > Export > Add to Adobe Media Encoder Queue.
Step 3: Your selected composition will now be sent to Adobe Media Encoder. If Adobe Media Encoder is not already open, it will launch automatically.
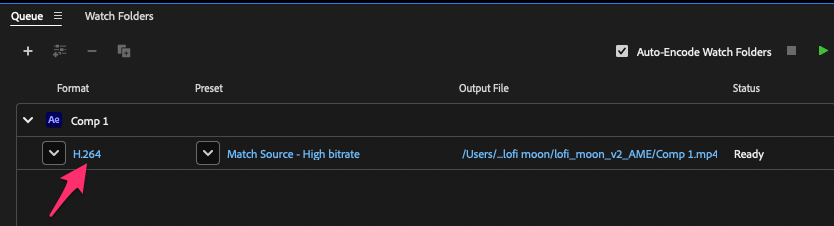
Step 4: In Media Encoder, click on the format column next to your composition in the queue to open the export settings. Choose H.264 from the format.
Note: While you might be tempted to select the MPEG-4 setting, it’s important to note that MPEG-4 is a codec, not a video container format.
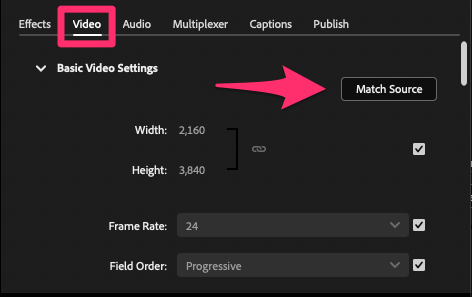
Step 5: Configure any additional settings such as resolution, frame rate, and bitrate in the Video Tab, or simply Match Source.
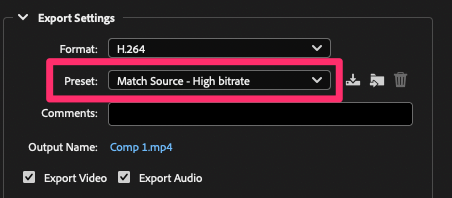
Unless you have specific needs, you can also leave the Preset at its default Match Source – High Bitrate setting.
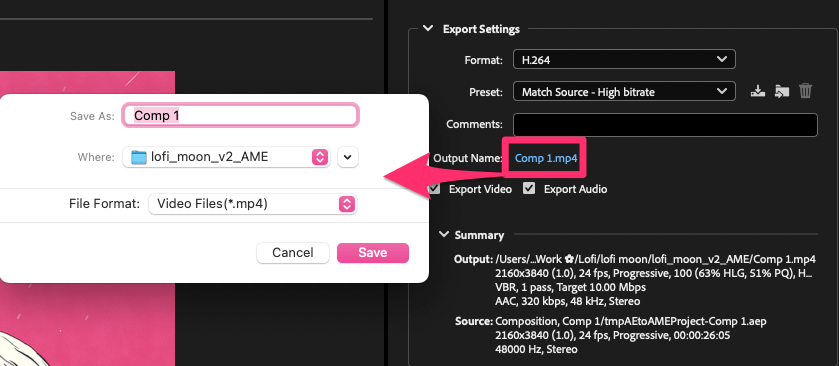
Step 6: Specify where the exported file should be saved by clicking on the Output file link.
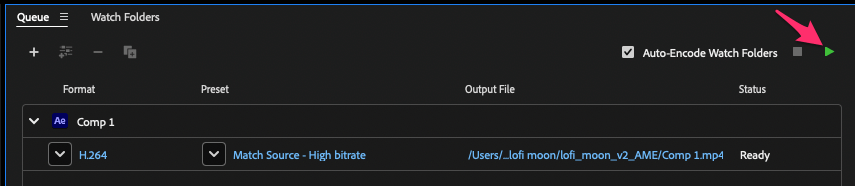
Step 7: Click OK to close the Export Settings window. Press the green play button to begin encoding.
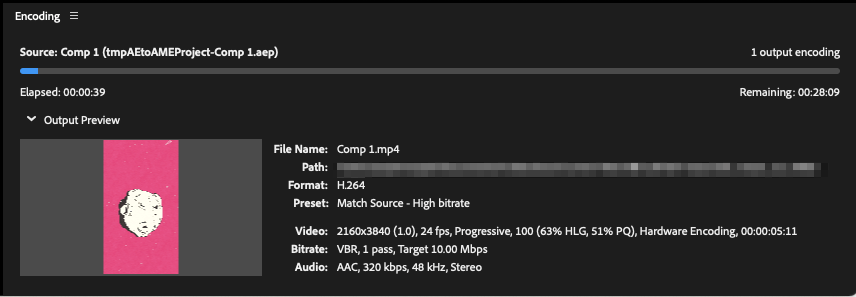
You can track the progress in Media Encoder and continue working in After Effects during the export process.
And there you have it – your After Effects project is now neatly exported as an MP4, ready to be shared and enjoyed across various platforms!
Final Thoughts:
Mastering the export process with Adobe Media Encoder is a time-saver and offers greater flexibility and control over your final outputs. Knowing how to efficiently export to MP4 is key for sharing your videos, whether they’re for social media, digital marketing, or high-resolution presentations.
By following these steps and utilizing your Creative Cloud tools, you’ll be able to easily share and showcase the effort you’ve put into your After Effects projects.
If you have any questions or insights about exporting from After Effects, or if you’ve found your own tips and tricks, please feel free to share them in the comments below!