
You’ve worked hard on your images. From choosing the perfect camera settings to applying the exact edits to create your vision, it’s been a careful process. The last thing you want to do is ruin the overall effect by posting or printing low-quality images after exporting them from Lightroom!
Hey there! I’m Cara and as a professional photographer, I totally understand your need for a perfect presentation. It is quite simple to export images from Lightroom but you need to use the correct export settings for your purpose.
This is where it can get a little tricky. Depending on where your image will be displayed, (Instagram, in print, etc.), the export settings will vary.
Let’s take a look at how to export photos from Lightroom without losing quality.
Before exporting your file, you need to decide what you’re using the image for in order to choose the best size to export photos from Lightroom.
Note: the screenshots below are taken from the Windows version of Lightroom Classic. If you are using the Mac version, they will look slightly different.
Table of Contents
Determine the Purpose of Your Image
There is no one-size-fits-all method of exporting images from Lightroom.
The high-resolution file needed for printing images is too heavy for social media use. It will take so long to load that you’ll have lost your audience. Plus, most screens can only display up to a certain amount of quality. Anything more just creates a larger file and doesn’t add any benefit.
Furthermore, many sites like Instagram and Facebook limit the file size or require a certain aspect ratio. If you don’t export to the correct settings, the platform will reject your image or may crop it weirdly.
Lightroom gives us a lot of flexibility in choosing export settings. Unfortunately, this can be overwhelming for beginning users or those who don’t know the best settings for their purpose.
Start by figuring out your purpose. In just a moment, we’ll talk about export settings for the following purposes:
- Social Media
- Web
- Moving to another program for further editing
How to Export High-Quality Photos from Lightroom
After deciding on the purpose of the photos, follow the steps below to export high-quality photos from Lightroom.
Step 1: Choose the Export Option
To export your images, right-click on the image. Hover over Export on the menu and choose Export from the fly-out menu.
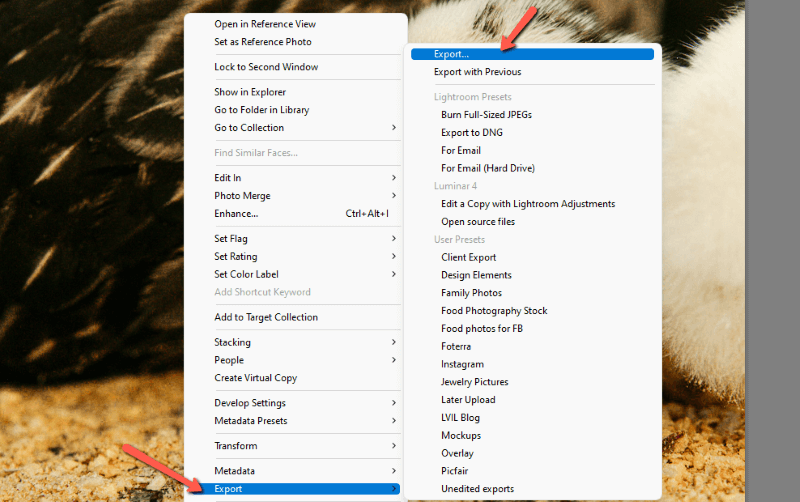
Alternatively, you can press the Lightroom keyboard shortcut Ctrl + Shift + E or Command + Shift + E.
Step 2: Choose Where You Want the Exported File to Be Saved
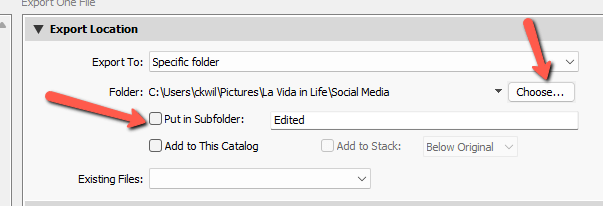
Lightroom gives you a few options. In the Export Location section, click in the Export To box to choose the folder where you’d like to save it.
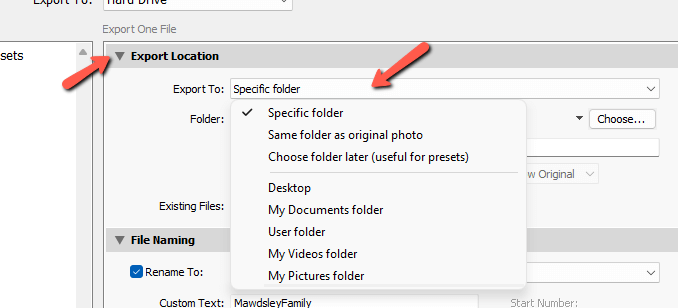
If you want to put it in a specific folder, click Choose and browse to the folder you want. You can also check the Put in Subfolder box.
For client shoots, I typically stick with the same folder as the original photo and then place the edited images in a Subfolder called Edited. This keeps everything together and easy to find.
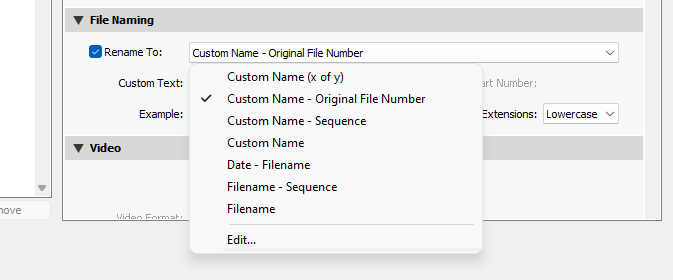
In the next section, File Naming, choose how you would like the saved file to be named.
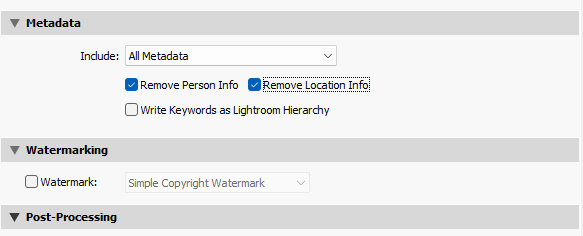
Skip down to the bottom two sections for now. Check the Watermark box if you want to add one (learn more about watermarks in Lightroom here).
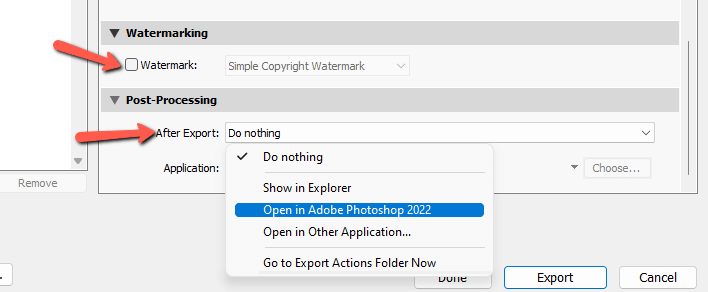
You also get a few After Export options. These are helpful if you’re exporting the image to continue editing it in another program.
Step 3: Specify Edits According to the Purpose of the Image
Now we’ll jump back up to the File Settings and Image Sizing sections. These are what will change depending on the purpose of your exported image. I’ll quickly explain the setting options below.
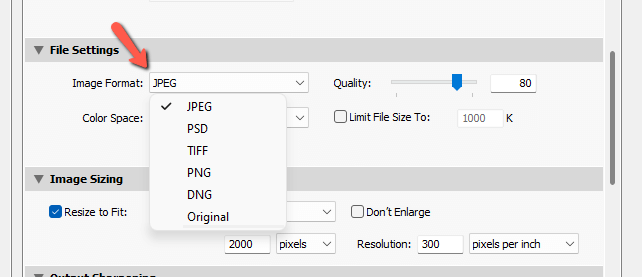
Image Format: for social media, web, and printing, choose JPEG.
You can use TIFF files for printing but these files are generally huge with minimal visible quality benefits over JPEGs.
Choose PNG for images with a transparent background and PSD to work with the file in Photoshop. To save as a versatile RAW, choose DNG or you can keep the original file format if you choose.
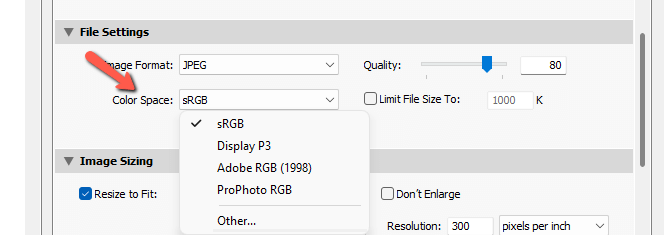
Color Space: Use sRGB for all digital images and usually for printing unless you have the specific color space for your paper/ink combo.
File Sizing: The right file size for your purpose is an important part of your export settings. For print, you should prioritize high-quality over file size.
However, the opposite is true when exporting for social media or web use. Many social media platforms have file upload size limits and won’t allow you to upload large files.
Even if you can upload them, high-resolution images can actually look worse because the platform awkwardly tries to reduce a large file size itself. Upload a small enough image and you avoid that altogether.
Let’s look at the file size reduction options Lightroom offers.
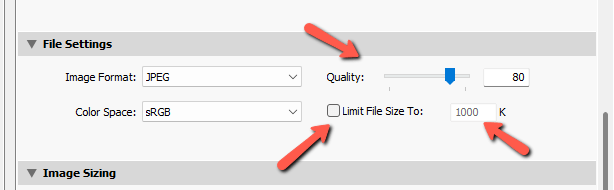
Quality: For print files, keep the quality at its max value of 100. You can also use 100 for web or social media files but whatever platform you’re using will compress them.
To avoid this compression, try exporting images at 80 quality. This is a good balance between file size and load speed.
Limit File Size To: This box offers another option for limiting file size. Check the box and type in the size you want to limit to. Lightroom will then determine what is the most important information to retain so you don’t lose perceived quality.
Lightroom also allows you to pick the exact size of your exported images. This is helpful for social media sites that have specific image size requirements. Instead of allowing the platform to resize your images automatically, you can export them at the right size.
Resize to Fit: Check this box and then open the dropdown menu to pick which measurement you want to impact. Don’t resize when exporting for print.
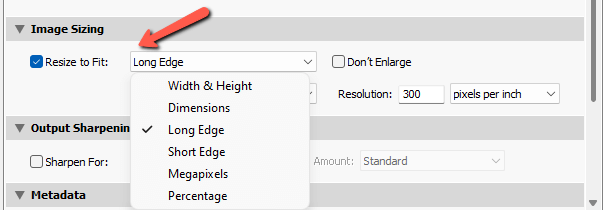
Resolution: Resolution doesn’t matter too much for digital images. You only need 72 dots per inch for viewing on a screen. Set this at 300 pixels per inch for printing
The Output Sharpening section is pretty self-explanatory. Check the box to add a touch of sharpening to your image — almost all images will benefit.
Then choose to optimize the sharpening for Screen, Matte Paper, or Glossy Paper. You can also choose a Low, Standard, or High amount of sharpening.
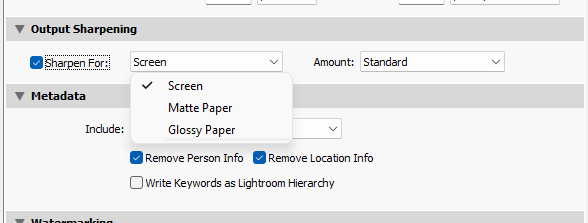
In the Metadata box, you can choose what type of metadata to keep with your images. You might add the model’s name or other information for easy sorting.
Remember that this information will travel with your images, even when posting online (except for programs like Instagram that strip the metadata).
Whew! Did all that make sense?
Step 4: Create Export Presets
Of course, here is the real question. Do you have to go through all these settings manually every time you want to export an image? Of course not!
You can set up a few export presets covering all your typical purposes. Then, when you go to export your image, all you have to do is select the preset and you’re good to go.
To save a preset, choose the settings you want to use. Then press the Add button on the left.
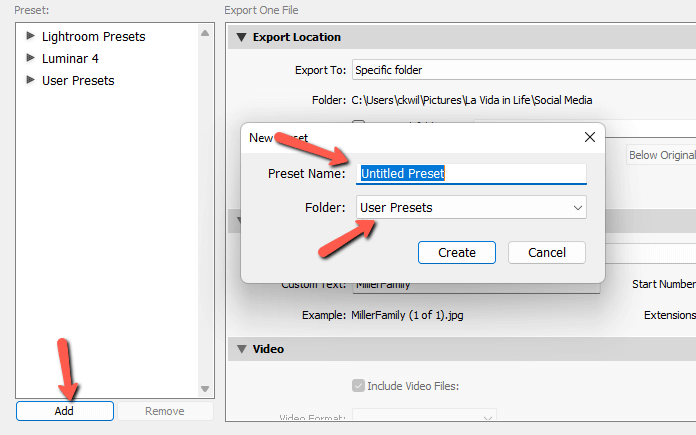
Give your preset a name and choose the folder where you would like to store it. Click Create and you’re all set! Curious about other Lightroom features that facilitate your workflow? Check out Soft Proofing and how to use it to perfect photos for printing!