
Understanding how and why we flatten images in Photoshop is an important, and very necessary skill in the creative field. I’m positive you’ll encounter many situations where a project will require you to flatten your layers or images in order to print and present them to clients for viewing.
My name is Skyler, and I currently work as a freelance sequential artist while attending my last year at the Savannah College of Art and Design. I’ll be showing you how to flatten your images or layers and further your understanding of why we need to do this for upload, print, and more!
Great! Now that we’ve got that out of the way, let’s begin by defining exactly what it means to flatten your image before moving on to why or how we accomplish this task.
Table of Contents
What Does it Mean to Flatten in Photoshop?
I know flattening an image or layer(s) in Photoshop seems like a strange concept, seeing as they are typically “flat” on our screens already. In order to understand what this actually means, we have to think of flattening in the digital sense of the word.
I find it easier to compare in terms of compression, or making our files smaller. If we think of each layer of our image in a three-dimensional sense, it’s information stacked on top of each other, right? So you create new layers over and over, adding new elements to each layer as your project grows.
Once we’re done and we go to share or export our project we’ve got layers upon layers of information stored into one thing. So flattening our layers from here then means to compile, or compress them all into one final product.
That means now, there are no individual stacks or layers, just one complete image available that’s much smaller in size! In addition, this also deters pirating when posting online, as flatting assures you that they can’t see or alter by layer.
Great! Now that you understand what flattening means and why we flatten our images, you can move on to how.
Note: Before we begin, be sure to save a copy of your project in another PSD file. This way you have a flattened copy, and the original with all layers is still available long term.
2 Ways to Flatten Layers and Images in Photoshop
While there are many different methods you can use to go about flattening your layers in Photoshop, the easiest one is available directly through the menu button on the layers panel.
Method 1: Through the Layers Panel
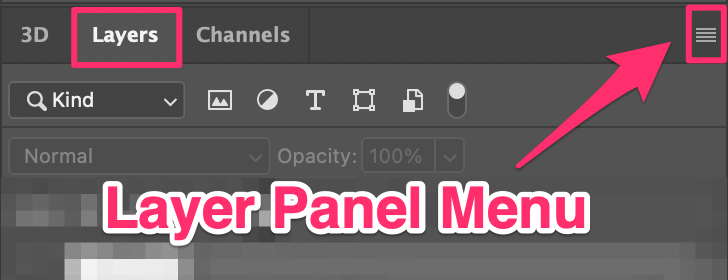
When you open up this menu and have a layer selected, you can see the Flatten Image option become available to you. Go ahead and click this option.
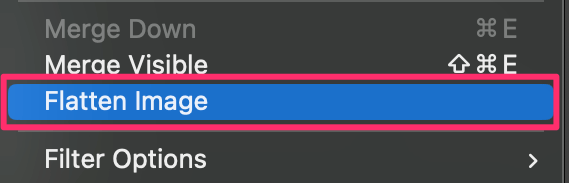
If it prompts you first to discard any hidden layers, click OK, and you’ve successfully flattened your project layer.
The other method of flattening can be found through the Layer Menu at the top of your screen.
So basically select the layers or elements you want to merge and simply navigate to Layer > Flatten Image.
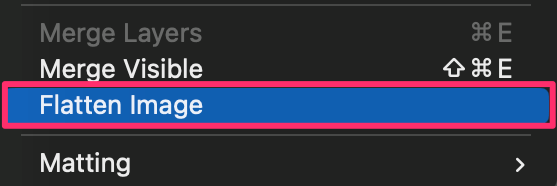
Again, if it prompts you first to discard any hidden layers, click OK, and you’ve now flattened your project layer.
Note: Keep in mind you can select multiple layers or just a single one. So to flatten all of your project, you’d have to select all of your layers by holding down on Command and clicking each one before performing the Flatten Image function. This will create one final layer, free of hidden objects or images.
Why Not Merge Layers?
You’re probably wondering, why not just merge all my layers together? Then it’s all condensed into a single layer in the same way, right? Well, I am happy to tell you that it is not the same, and if you’re looking to print your images you should take the steps to flatten your files prior to doing this.
I have personal experience with this problem, and it really stumped me for a while. I was ordering and reordering author copies of my poetry book trying to figure out why some of my images and illustrations were appearing strangely.
Turns out, I had failed to flatten my images so hidden objects or layers were still embedded in even the merged and exported files! This wasn’t actually visible on my screen or through my software – the errors only became apparent when I had the printed copy in hand.
So, the lesson would be that merging and flattening your layers are very different things, and you should take the time to understand the difference if you’re working in print.
Conclusion
It seems simple now, probably, but understanding what it means to flatten your image or layers is very important knowledge if you ever want to have your photographs, illustrations, or designs printed.
So don’t forget to take care in preparing your files if you have intentions to print or share them long-term. In your case, you shouldn’t have any problems flattening your I’mages and sharing them with the world now that you’ve got this information in your tool belt.
Happy editing!