
Freeze frames are a versatile tool in video editing, allowing you to pause the action at a crucial moment for dramatic emphasis or to create unique effects. In After Effects, creating a freeze frame is as simple as right-clicking and selecting Time > Freeze Frame.
Hi, I’m Zoe, a graphic designer. I frequently use programs like Clip Studio Paint and Blender and then import my creations into After Effects. I find many reasons to use freeze frames: sometimes to extend footage created in other software without needing to edit the original, or sometimes just to add a dramatic pause. It’s a simple yet effective process, and with this guide, you’ll quickly learn how to master it!
In this article, I’ll walk you through the steps of creating freeze frames in After Effects and show you how to integrate them seamlessly into your projects.
Let’s get started!
Key Takeaways
- To create a freeze frame, navigate to the desired moment in your video, right-click on the clip, and choose Time > Freeze Frame.
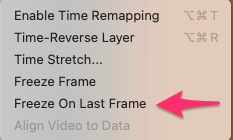
- For freezing the final frame of a clip, simply right-click and select the Freeze on Last Frame option.
- To freeze a frame at the center of your clip, create three copies of the layer. This method maintains continuous animation both before and after the frozen frame.
- If you’re freezing the beginning or end of a clip, duplicate the layer once and position it accordingly to seamlessly integrate the frozen frame.
- After applying the Freeze Frame function, you can control the duration of the still image by extending or shortening the length of the clip.
This is a comprehensive guide to freezing frames in After Effects.
Step-by-Step Guide to Freeze Frames in After Effects
A freeze frame is a technique used to hold a specific frame of a video for an extended period, creating a dramatic effect or emphasizing a particular moment. Follow these instructions to achieve freeze-frame effects in your videos:
Step 1: To create a freeze frame in After Effects, start by duplicating your clip. This is necessary because freezing a frame turns the entire clip into a static image.
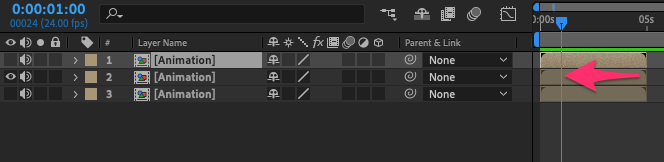
For instance, if you want to freeze a frame in the middle of your clip, you’ll need three layers: one for the animation before the freeze, one for the freeze frame itself, and one for the animation after.
To duplicate, select the layer in the timeline panel and press Ctrl + D (Windows) or Command + D (Mac). Do this twice to create three layers. Then, hide the top and bottom layers by clicking the eye icon next to them in the timeline, leaving only the middle layer visible.

Note: If you only want to freeze the beginning or the end of your video, you’ll need just two layers: one for the freeze frame and one for the animated portion either before or after the freeze.
Step 2: Scrub through the timeline to find the exact frame you want to freeze.
Step 3: Right-click on the middle layer and select Time > Freeze Frame. This will freeze the selected frame.
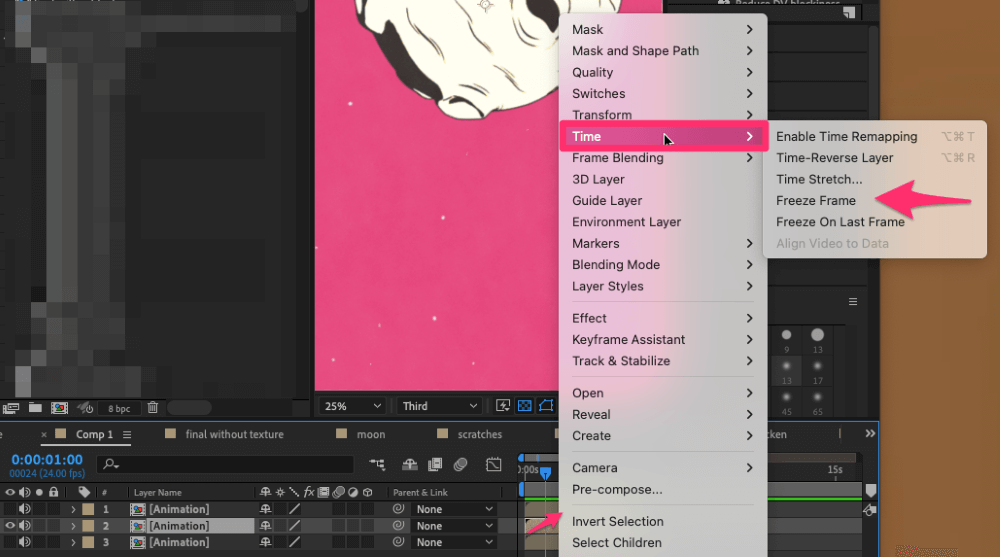
Note: If you’re freezing the last image of your clip, choose Freeze on Last Frame instead.
Step 4: The timeline will show a grayed-out section indicating the frozen frame. Extend or shorten the duration of the freeze frame by dragging the end of the layer.

Step 5: Unhide the top layer by clicking the eye icon. Adjust its duration and position to align seamlessly with the start of the middle layer.

Repeat for the bottom layer, ensuring it aligns with the end of the middle layer.
Step 6: With the freeze frameset, you can enhance it with effects:
- Transitions: Apply fades or wipes for smooth transitions into and out of the freeze frame.
- Scale Animation: Animate the scale property for a zoom-in or zoom-out effect.
- Rotation: Add rotation for a dynamic touch.
- Sound Design: You can add sound effects or music to add impact to your freeze frame.
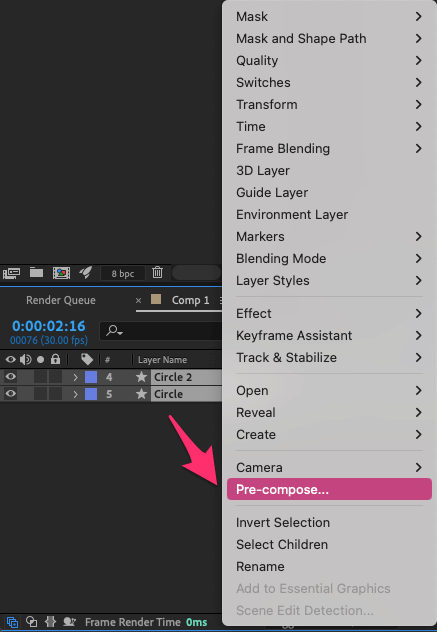
Step 7: Keep your workspace tidy by grouping your layers. Select them while holding Shift, right-click, and choose Pre-compose. This combines your edits into one composition, making further adjustments easier.
Final Thoughts
Freeze frames in After Effects are a fantastic tool for highlighting key moments, altering existing footage, or adding a unique style to your videos. By following the steps outlined, you can effortlessly create a still image from any point in your video and seamlessly integrate freeze frames into your projects.
Remember, freeze frames are just the start of what you can accomplish in After Effects. They serve as a foundational technique, giving you greater control over your footage and paving the way for additional effects.
I hope this tutorial has been helpful and that you’ve learned valuable tips to apply to your own projects. Feel free to leave any feedback or thoughts in the comments section below.