
Glow effects can add a magical touch to your artwork, making objects appear radiant and otherworldly. The easiest way to make something glow in Clip Studio Paint is by using the blending modes.
Hello, I’m Zoe, a freelance illustrator and graphic designer. When I made the switch from Photoshop to Clip Studio, I was disappointed by the absence of an automatic glow effect. However, this absence ultimately pushed me to create glow effects manually.
In this tutorial, we’ll explore the complete process of creating a glow effect in Clip Studio Paint. This includes selecting the right background, utilizing the most effective blending modes for lighting effects, crafting both basic and advanced glows, incorporating particles, and discovering a range of helpful tips and tricks along the way.
Let’s dive right in!
Table of Contents
Key Takeaways
- A darker background will boost the glow’s impact.
- Achieve various light effects using blending modes like Add Glow, Screen, and Overlay.
- Use blurs creatively by adjusting blending modes for unique interactions with the layers below.
- Test different colors by adjusting a white light layer’s hue via Layer Property options, creating unexpected results with blending modes.
- Duplicate the glow effect, and offset the copy slightly, adding vitality to your glow effect.
Choosing the Right Background
Before diving into the techniques, it’s essential to set the stage for your glow effect by selecting the right background.
While it doesn’t have to be pure black, darker backgrounds work best as they enhance the glow. A darker backdrop makes the glow stand out and creates a captivating visual impact.
Remember that the effectiveness of these blending modes may vary depending on your artwork’s specific colors and layers. Experimenting with these modes can help you achieve the desired light effects in Clip Studio Paint.
How to Make Something Glow in Clip Studio Paint
You can use the blending modes in Clip Studio Paint to add a glow effect to your drawings by following the steps below.
Note: All screenshots from this tutorial are taken from the CSP Mac version.
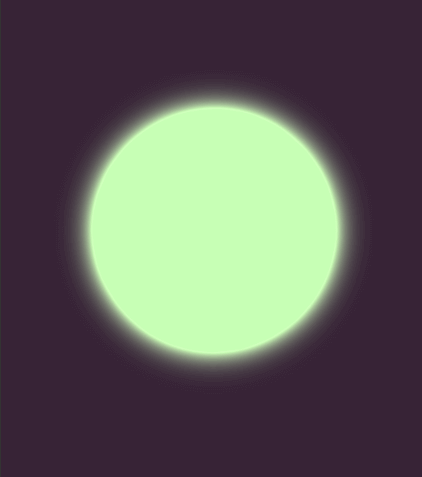
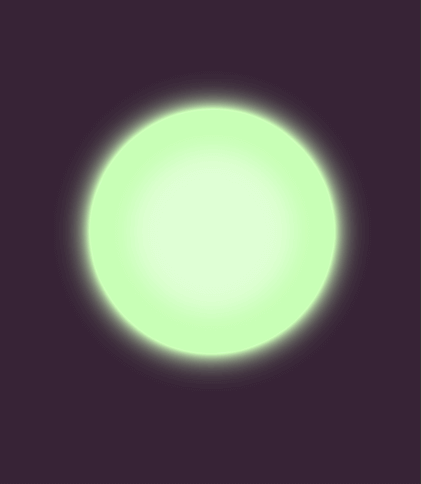
Step 1: Duplicate the object or layer you want to add a glow to and place it beneath the original.
Step 2: Navigate to Filter, select Blur, and choose Gaussian Blur. Adjust the blur intensity to your liking.
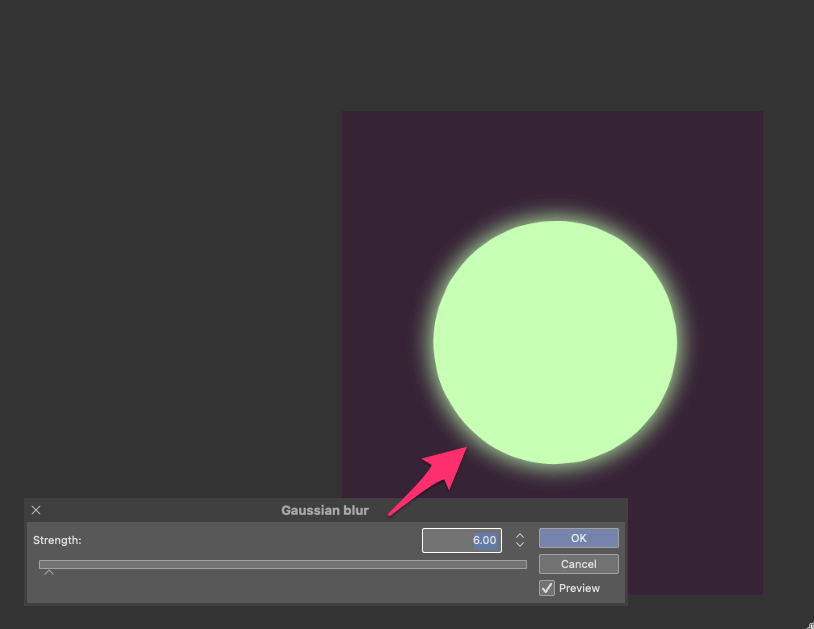
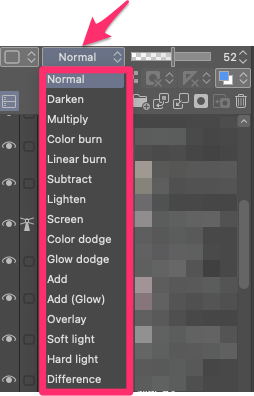
Step 3: Set the blending mode to a luminous option, such as Glow Dodge. If you’re not familiar with the blending mode, here’s a quick overview:
- Add Glow intensifies colors and works well for bright light sources, like glowing lamps or intense highlights.
- Screen is perfect for soft glows, such as ambient lighting or gentle reflections.
- Dodge increases brightness, suitable for creating lens flares or very bright highlights.
- Overlay combines the lightness of Screen mode and the contrast of Multiply mode, versatile for various light effects.
- Linear Dodge (Add) intensifies colors, but it can be more controlled for subtle highlights.
- Color Dodge brightens colors, suitable for intense and saturated light effects.
- Lighten keeps the brightest pixels from both layers, useful for softer light glows.
- Glow Dodge enhances highlights while preserving color, great for vibrant light sources.
- Luminosity focuses on the brightness of underlying colors, useful for adjusting light intensity without affecting the color.
- Soft Light is ideal for creating gentle, diffused lighting effects, especially for portraits or soft glows.
Step 4: Duplicate the glow layer, and apply Gaussian Blur once more. Set this layer to a different blending mode, like Add (Glow).
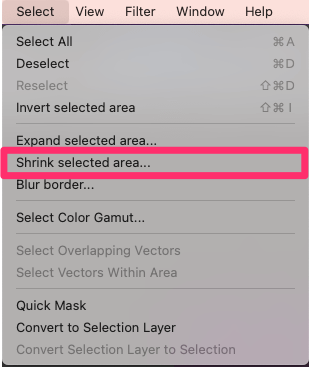
Step 5: In the Layer Palette, select your base layer while holding the Control (Windows) or Command key (Mac) to create a selection around its shape.

Step 6: Go to Select > Shrink selected area. Enter a value that creates a clear distinction between your new layer and the base layer, then click OK.
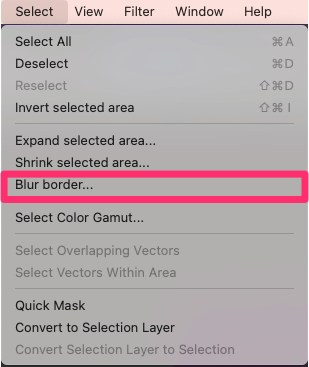
Step 7: Navigate to Select > Blur Border. Depending on your canvas size, you may need to repeat this step several times to achieve a smooth transition, as it’s limited to 200px.
Step 8: Create a new layer with the same color as your base layer selected and use Edit > Fill to color your selection.
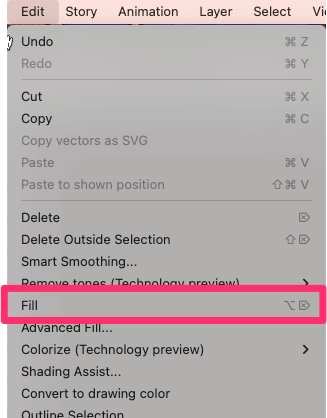
Step 9: Reduce its opacity and apply a luminous blending mode, such as Screen, for a subtle radiance.
Step 10: Repeat the process of selecting your base layer’s shape, shrinking the border, and blurring it until the selection is smaller than the glow layer.
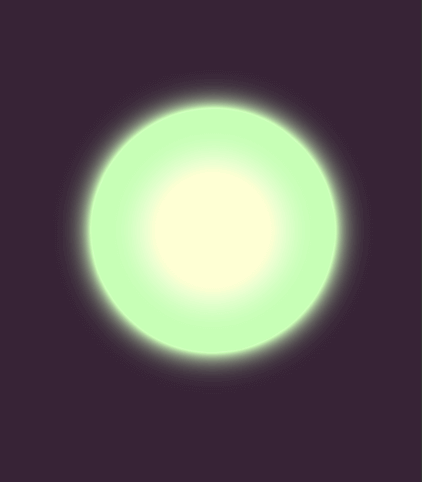
Step 11: Create another new layer and use Edit > Fill with a different color, like a more orange hue. This creates the illusion of the glow emanating from within the object.
Step 12: Set the blending mode to Add (Glow) and adjust the opacity as needed. If the transition from the center glow to the rest of the object is too sharp, apply Gaussian Blur as needed.
By following these steps, you can achieve a simple yet effective glow effect that adds depth and dimension to your artwork.
Adding Light Touches
If you want to add partial touches of light instead of a general glow, follow these steps:
Step 1: After completing your subject without any lighting effects, add initial lighting to your artwork using white on a new layer. This allows you to experiment with different lighting effects without affecting the rest of your artwork.

Step 2: Lower the layer’s opacity to reserve higher values for the glow.
Step 3: Apply one of the blending modes listed in the list above, such as Add (Glow) or Glow Dodge.
Step 4: After adding initial lighting, refine the glow by creating a new layer to sketch in the desired lighting using white. Focus on smaller areas that should glow the most, with some overlap with the initial lighting layer.

Step 5: Set the blending mode and adjust the opacity as needed, keeping it slightly higher than your initial lighting layer.
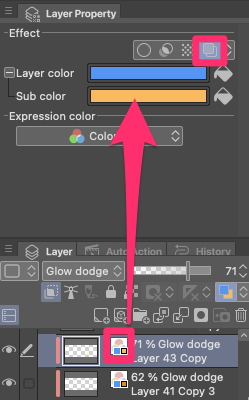
Step 6: Experiment with colors by selecting the lighting layer, navigating to the Layer Properties Palette, and changing the Sub Color. Try different colors and blending modes for your lighting layers to create unique effects.

Step 7: Continue adding highlight layers for more refinement. As you add new layers to your glow effect, keep experimenting with different blending modes and blending intensities to get the best result.

Enhancing with Particles and Light Motes
To take your glow effect to the next level, add particles or light motes:
Step 1: Create a new layer and set it to a luminous blending mode.
Step 2: Select the same color you used for your glow effect.
Step 3: Manually paint particles or use an airbrush with the spray option to add light motes around your object. Adjust the size and opacity of the sub tool for the desired effect.
Step 4: To add a dynamic touch, right-click on your particle layer, then select Duplicate Layer.
Step 5: Move the duplicate a few pixels to the side. This creates a sense of motion and dynamism in your glow effect.

Step 6: Lastly, cycle through blending modes to find the best combination between the two layers.
By adding particles or light motes, you can infuse movement and depth into your glow effect, making it even more captivating and magical.
Tips and Tricks for Vibrant Glow Effects
To make your glow effects more realistic, consider these tips:
- Experiment with different blending modes beyond the usual ones, like Add and Screen, for unique effects.
- Adjust the layer opacity to fine-tune glow intensity.
- Vary brush sizes and hardness for different levels of softness and intensity.
- Add subtle color variations within the glow for a dynamic look.
Final Thoughts
By following these techniques, tips, and tricks, you can create striking glow effects in Clip Studio Paint. Learning to create a glow effect can enhance your digital art by adding depth, visual interest, and a touch of magic to your illustrations.
As you become more comfortable with Glow effects, you will learn how to choose the right color for the glow, mix and match different glow blending modes, and create complex effects that make your artwork stand out.
Do you have any tips, questions, or feedback regarding glow effects in Clip Studio? Feel free to share them in the comments section below!