
While there is no substitute for a good quality microphone, the open-source Audacity software has several features to help improve the sound of your recording.
To improve the mic quality in Audacity, first test your recording levels and adjust the gain to avoid clipping. After recording, use the Noise Reduction and Normalize effects to improve the quality of your sound.
Hi, I’m Andrew, and I’ve been using Audacity for over a decade to record and edit audio. In this article, we’ll discuss all the steps you can take–before, durings, and after recording–to ensure your microphone quality is at its best.
Shall we dive in?
Table of Contents
Before Recording
Again, there’s no good substitute for a high-quality microphone. Nevertheless, if you have an average or even low-quality mic, there are several things you can do with Audacity to make the recording sound pretty darn good.
The converse is also true. Using the best microphone in the world can still yield awful-sounding audio if your environment and software settings are out of whack.
Many of the steps you need to take actually happen before you ever record. Here are some general guidelines.
1. Choose the right environment.
If you don’t have access to a professional studio, you can still find a suitable location to record in your own home.
Generally speaking, you want a quiet, enclosed space. Low ceilings and carpeted floors are a plus. Avoid large rooms, as sounds tend to echo. I record in a walk-in closet where the hanging clothing helps absorb sound, giving the audio a warmer quality. You can also hang blankets or towels to prevent echo.
2. Use a pop filter.
A pop filter is critical for softening the harsh popping impact of spoken or sung plosives–the burst of air produced when pronouncing certain consonants like p, t, or k.
Without a pop filter, these consonants can cause unpleasant sounds in your recording that can be difficult to correct in post-production. It’s much easier to prevent this phenomenon than to try to fix plosive sounds later.
Fortunately, you can purchase a pop filter for less than $10–money well-spent if you strive for professional-sounding audio.
3. Position yourself correctly.
Sit–or better yet, stand–so that your mouth is 6 to 10 inches from the microphone (with your pop filter between you and the microphone, of course).
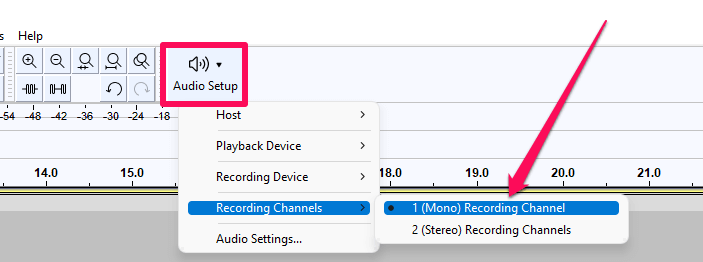
4. Record in mono.
You should set Audacity to record in mono unless you have a stereo mic. To do so, click the Audio Setup dropdown from the toolbar, then select Recording Channels > 1 (Mono) Recording Channel.
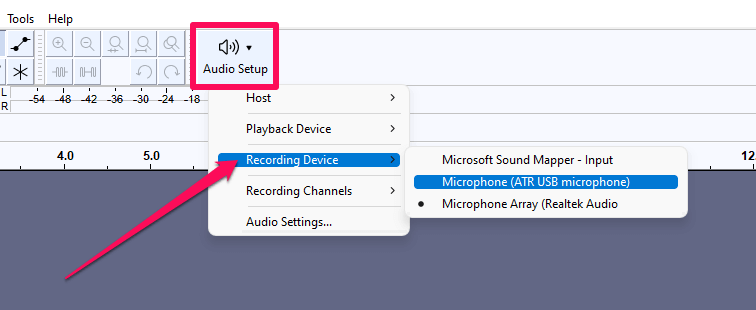
5. Select the proper mic in Audacity.
Many computers have built-in microphones, so if you’re using an external USB microphone, you must be sure Audacity uses the correct device.
After connecting your microphone, click on Audio Setup > Recording Device and then click on your microphone. If your mic isn’t listed, close Audacity and reopen the software.
6. Set the recording level.
It is important to adjust the recording level of your microphone in Audacity to prevent clipping. Clipping occurs when recorded input reaches or exceeds 0 dB.
You can monitor your levels without ever clicking the record button. To do so, click the microphone icon on the toolbar and choose Start Monitoring. Once monitoring is enabled, start speaking or singing into the microphone with the same volume you will record.
As you do so, watch the Recording Level meter. You want the slider as far to the right as possible but without your audio reaching levels in the red, i.e., beyond -6 dB. As you monitor the input, Audacity will place a vertical blue line on the Recording Level meter to indicate the loudest input sound.

If your audio tops out past -6 dB, click and drag the slider to the left. Shoot for a level at which your loudest sound tops out at -6. Just like with plosives, clipping can be hard to clean up in post, so make sure your recording level is not too hot.
You can also adjust the volume on some mics with a physical knob on the microphone itself. On some combination of microphones and operating systems, you might have to adjust levels in your system audio settings rather than in Audacity.
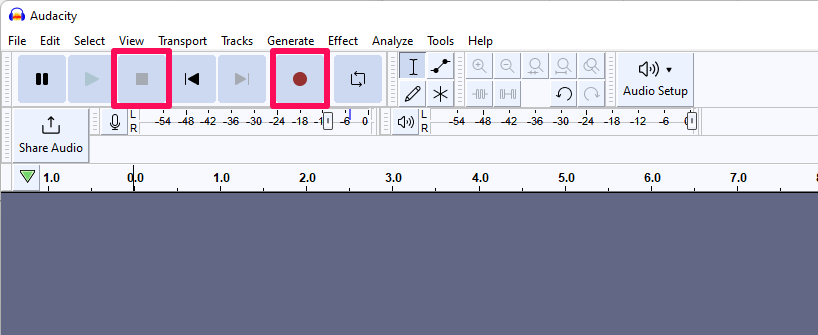
7. Record some test audio.
With your levels set, it’s time to record some test audio. Click the red record button, and begin speaking or singing using the same intonation and volume you plan to use during production.
After recording a minute or two of audio, click the stop button to stop recording.
Playback the recording so you can listen to how the audio sounds. I recommend doing this with headphones, if possible, as you’ll be more likely to notice issues with your audio.
As you playback your test audio, listen for environmental noise. Do you hear any whirring or buzzing sounds or anything else that doesn’t sound right? If so, do your best to remediate these issues. You might need to turn off the AC or unplug electrical devices.
After making changes, test your audio quality again.
While Recording
Once your test audio sounds decent, it’s time to start recording. There are two things to do while recording.
1. Stay still.
You want to maintain the same distance from the mic to stabilize your levels.
2. Record some silence.
Record a good 2 or 3 minutes of silence at the beginning of your recording. You’ll need this section of silence to generate a noise profile after the recording finishes.
After Recording
After you have finished recording your audio, there are some steps you can take to enhance its quality.
1. Reduce the noise in your audio.
No matter how silent your recording environment is, there is bound to be some background noise. The Noise Reduction effect can help remove environmental noise. To use this effect:
- Select the silent portion of the audio you recorded at the beginning of your track.
- Go to Effect > Noise Removal and Repair > Noise Reduction…
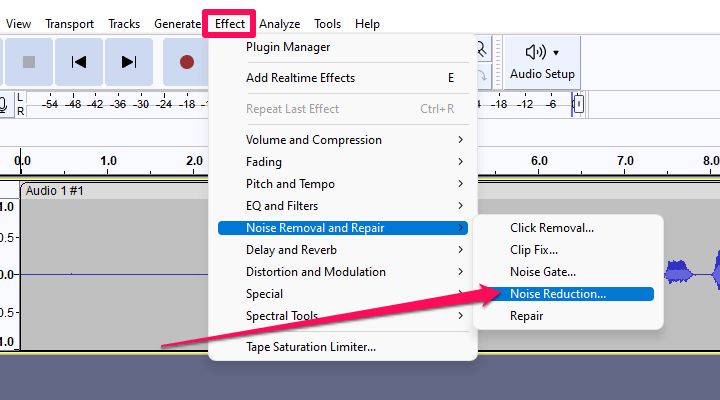
- Click the Get Noise Profile button.
- Select your entire track and open the Noise Reduction effect from the Effect menu.
- Click OK to apply the default noise reduction based on the noise profile.
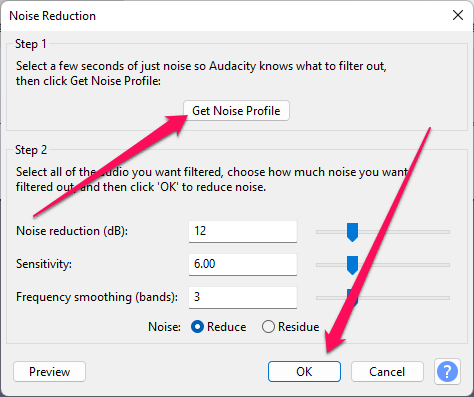
You can use the Preview button to preview how your audio will sound with the effect applied and adjust the three sliders as necessary. Keep in mind that the more aggressive the settings, the more likely your audio will sound distorted.
2. Normalize your recording’s volume.
It’s a good idea to apply normalization to your recording to set the peak amplitude to a standard level. To normalize your audio:
- Select your track.
- Click Effect > Volume and Compression > Normalize…
- Leave the settings at default and click the Apply button.
Noise Reduction and Normalize are two effects I always apply to recordings, but here are a few more to consider:
- Compressor – This effect can amplify vocals. Compressor is useful if the speaker in your recording is too far from the microphone.
- Graphic EQ – an equalization effect to adjust the volume for certain frequencies. You can also use the Bass and Treble effect to boost or reduce specific audio frequencies.
- Noise Gate – If Noise Reduction did not remove all your noise, you could use the Noise Gate effect to remove all sounds below a certain dB threshold.
Summary: Make Your Recording Sound Great
Following these basic guidelines, you can get the best possible sound from your recording hardware.
To improve your mic quality in Audacity, adjust your recording level to prevent clipping and apply the Noise Reduction and Normalize effects after the recording.
Now I’ll turn it over to you. What other tips do you have for producing great-sounding audio in Audacity?