
When your mouse cursor disappears on Mac, it can lead to a lot of frustration and headaches. But there are several possible causes and solutions to this issue. So how can you get your mouse cursor to show up again?
My name is Tyler, and I am an Apple computer expert. Over the years, I have seen and resolved thousands of bugs and issues on Macs. My favorite part of this job is knowing that I can help Mac owners get the most out of their computers.
In this post, I’ll explain why your mouse cursor might disappear on Mac. We’ll then review a few ways you can fix it and get your mouse cursor to appear again.
Let’s get to it!
Table of Contents
Key Takeaways
- When your mouse cursor disappears, it can be an awkward and annoying experience, but there are fixes.
- You can try shaking or jiggling the mouse to make the cursor show up. This will enlarge the cursor temporarily, letting you see it easier if you have a large monitor.
- You can also change your cursor settings to make it easier to find in the future.
- Running maintenance scripts via Terminal or with a third-party app like CleanMyMac X can fix any potential software problems.
- You can reset your SMC or NVRAM to fix this issue if all else fails.
Why Your Mouse Cursor Disappears on Mac
When the cursor disappears, it can seem like your Mac is out of control. While it might seem random, it can be very frustrating when this happens. Luckily, you can try a few quick fixes to get things back to normal.
The first clue to finding your mouse is to shake it. Jiggle your mouse or move your finger back and forth on the trackpad, and your cursor will enlarge for a moment, making it easier to spot. If your Mac has a larger screen, it can be easier to hunt down your cursor.
Another quick tip to find your mouse cursor is to right-click. By right-clicking anywhere on your desktop, you’ll get an options menu wherever your cursor is currently located. This is a quick and easy way to spot your mouse cursor.
One last easy method for finding your cursor is to click on the Dock.

You can quickly find your cursor at the bottom of your screen by moving your cursor along the dock.
Fix #1: Change Mouse Cursor Settings on Mac
If you often have trouble finding your mouse cursor, macOS has a few handy options to help you out. Changing your mouse cursor settings will make it easier to keep track of your cursor on the screen. You can make your cursor larger or smaller and enable various settings.
To get started changing your mouse settings, locate the System Preferences app from the Dock or the LaunchPad.

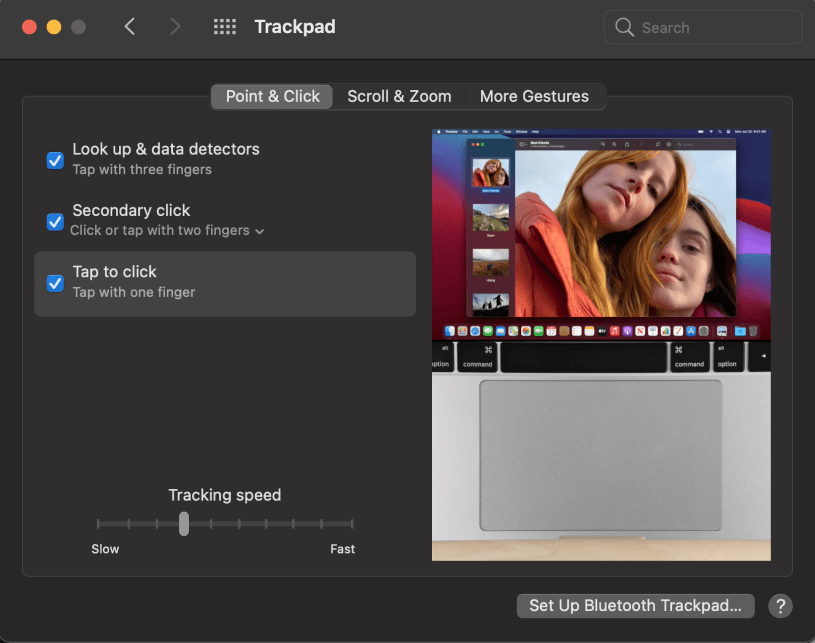
From here, select Trackpad to access your pointer speed. Here, you can change your tracking speed with the slider on the bottom.
You may also change the cursor size to make it easier to find in the future. You can do this by accessing the System Preferences. From here, locate the option marked Accessibility.
From the Accessibility options along the left, select Display. You will be presented with a window letting you change the cursor size. Just drag the slider to the right or left to set the cursor to your preferred size.
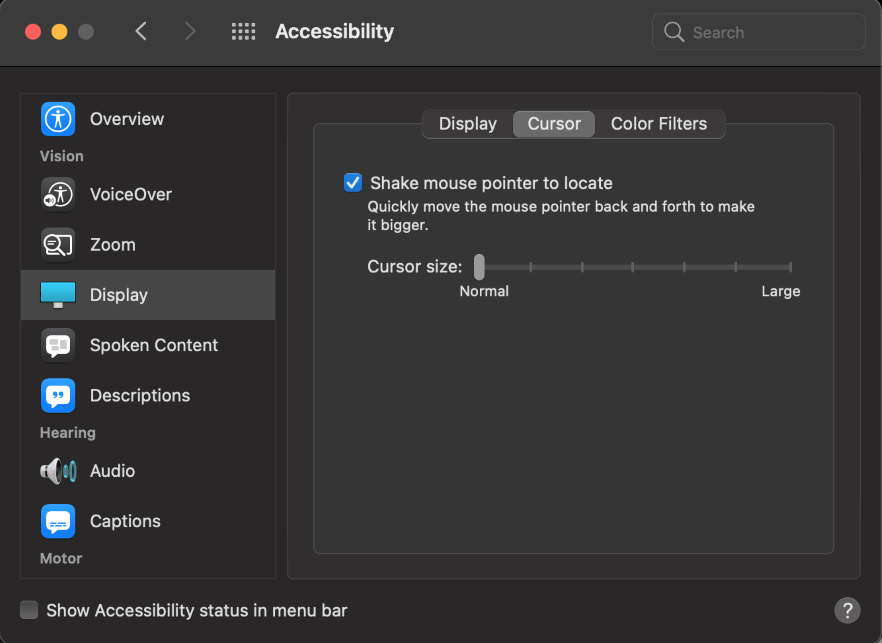
Additionally, you should ensure that the “Shake mouse pointer to locate” is enabled on your Mac.
Fix #2: Run Maintenance Scripts
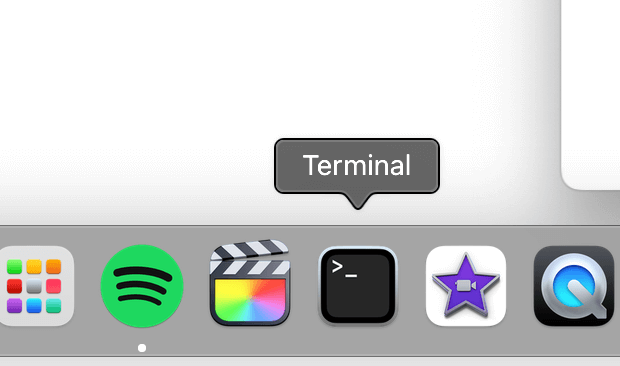
If your mouse cursor doesn’t show up, one potential remedy is to run maintenance scripts via the Terminal. Removing system logs, scripts, and temp files can solve many potential problems. To do this, locate the Terminal icon from the Dock or Launchpad.
With the Terminal open, type the following command and hit enter:
Sudo periodic daily weekly monthly
Your Mac may prompt you for the password. Just enter your credentials and hit enter; the script will run in a few moments. If you don’t like using the Terminal, you can try third-party apps like CleanMyMac X that handle everything for you.
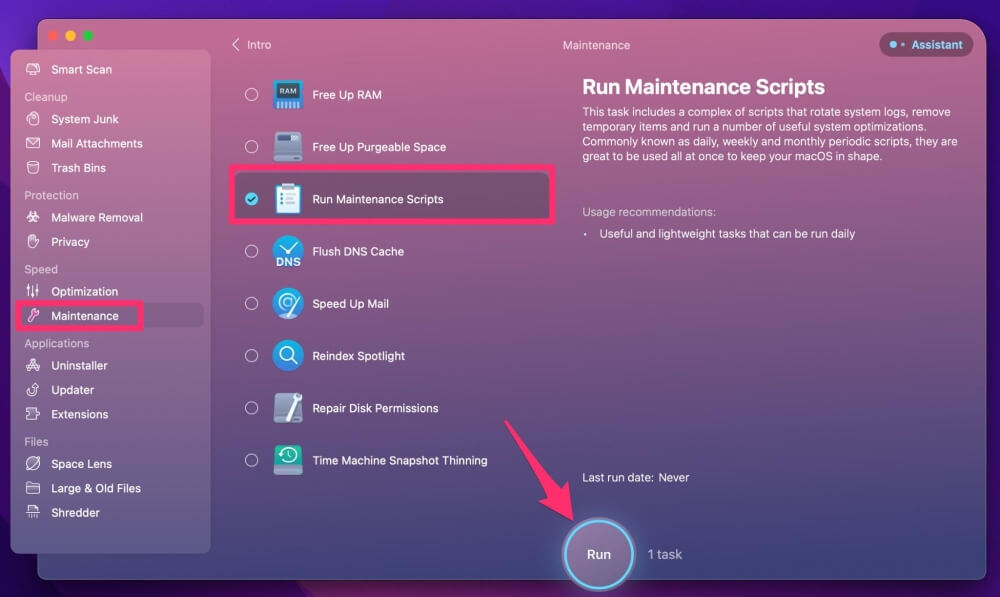
Running maintenance scripts with CleanMyMac X is relatively easy. Just download and run the program, and select Maintenence from the options on the left. Hit Run Maintenence Scripts from the options and click the Run button. The program will take care of it from there.
Fix #3: Reset Your Mac’s SMC and NVRAM
If the simple fixes don’t work, you might have to reset your Mac’s SMC or System Management Controller. This is a chip on your motherboard that controls essential functions like keyboard and trackpad input. If your mouse cursor disappears, this could be the cause.
To reset your SMC, you must determine what type of Mac you have. If you are using a silicon-based Mac, all you have to do is restart your computer.
For Intel Macs, all you need to do is a simple key combination. First, turn off your Mac. Next, hold down the Control, Option, and Shift keys while turning your Mac on. Keep holding these keys until you hear the startup chime.
Release the keys and let your Mac boot up. If this does not fix the issue, you can try resetting the NVRAM. NVRAM is nonvolatile random-access memory and refers to the tiny amount of memory your system uses for storing specific files and settings for quick access.
To reset your Mac’s NVRAM, first shut down your computer completely. Then, hold the Command, Option, P, and R keys while turning on your Mac. Keep holding these keys until you hear the startup chime, then release them.
Final Thoughts
It can be a frustrating experience when your mouse cursor disappears on your Mac. A mouse cursor may malfunction for various reasons, from program errors to hardware issues. Fortunately, you can try a few quick fixes to get you out of a jam.
In many cases, your mouse cursor is just hiding, and you can locate it by shaking the mouse, right-clicking, or clicking on the Dock. This will instantly show you where the cursor is hiding. You can also change settings like cursor size and tracking speed. You can reset your Mac’s SMC or NVRAM if all else fails.