
The anchor point in After Effects is what defines the center of rotation, scaling, and position. Adjusting the anchor point helps achieve specific visual outcomes that wouldn’t be possible with a fixed, central anchor point.
Hello, I’m Zoe, a graphic designer. Many new animators, including myself initially, overlook the importance of adjusting the anchor point. But when I tried animating a swing, its value became clear.
In this article, we’ll explore the anchor point in After Effects, its role in animations, and why it’s important to set it before applying any effects. Then I’ll guide you through the steps to adjust it properly.
Let’s look into it!
Table of Contents
Key Takeaways
- The anchor point is central to animations in After Effects, determining how layers move, scale, and rotate.
- While the default anchor point is in the middle of a layer, there are instances where adjusting its position can enhance the realism of animations.
- It’s essential to set the anchor point before applying effects or adding keyframes to avoid unexpected results.
- The Pan-Behind Tool allows for precise adjustments of the anchor point, with shortcuts available for added efficiency.
- Hit Y on your keyboard to quickly access the Pan-Behind Tool, and V to switch back to the Selection Tool.
Note: All screenshots from this tutorial are taken from the After Effects Mac version.
This post provides the step-by-step method for moving the anchor point in After Effects.
Why Move the Anchor Point?
Before diving into the steps, it’s essential to understand the significance of the anchor point.
The anchor point is the point from which all transformations are manipulated. In practical terms, it’s the point around which your layer will move, scale, and rotate.
Now, if you try to change the anchor point from the Transform menu, you might notice your whole layer moves too. This can be confusing, and you might think the anchor point and the layer’s position are the same thing. But they’re not.
By default, the anchor point is placed in the middle of your layer. This central placement ensures that any scaling or rotation occurs symmetrically from the layer’s center.
But sometimes, you might want it somewhere else. Like if you’re making a door swing open, you’d want it to rotate from the edge, not the middle.

So, moving the anchor point lets you control how and where your layer moves from, making your animations look just right.
Importance of Moving the Anchor Point Before Applying Effects
Always adjust the anchor point before applying any effects or adding keyframes to your layer. If you move the anchor point after making modifications the effects won’t consider the new anchor point position, leading to unexpected results.
This is because effects and keyframes use the anchor point’s position at the time of their application as a reference. So, always ensure you’ve set the anchor point correctly before diving into animations or effects.
Steps to Move the Anchor Point in After Effects
Moving the anchor point is key to getting your elements to animate just how you want them to. Here’s how you can do it in three simple steps.
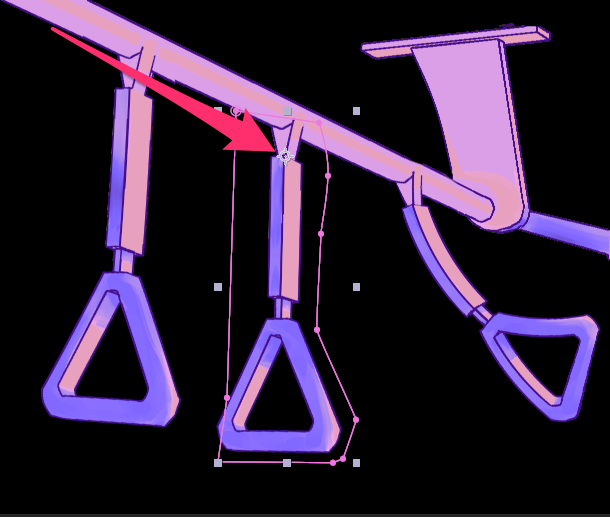
Step 1: Activate the Pan-Behind Tool by pressing the Y key on your keyboard or selecting it from the toolbar at the top of the After Effects interface. It resembles a small square with arrows.

Step 2: You’ll see a small crosshair icon, which represents the anchor point. With the Pan-Behind Tool active, drag the anchor point to your desired location.
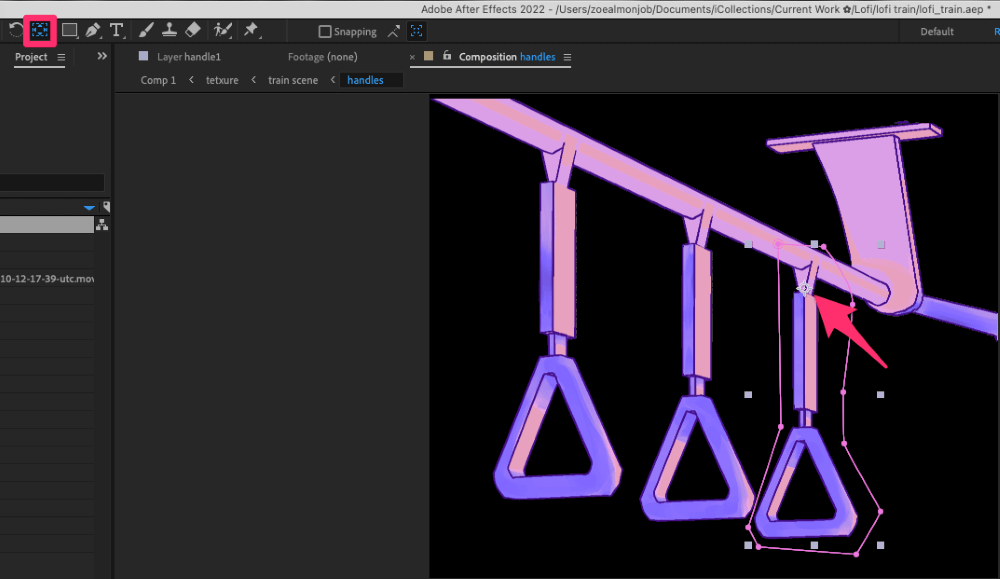
You can hold down Shift while dragging the anchor point with the Pan-Behind Tool to move it perfectly along the X or Y-Axis.
To align your anchor point with an object in your composition, hold down Ctrl (Windows) or Command (Mac). As you drag, the anchor point will snap to illuminated crosshairs in your composition, ensuring precise placement.
Step 3: After adjusting the anchor point, switch back to the Selection Tool by pressing V on your keyboard or selecting it from the toolbar. This is to ensure you don’t move the anchor points of other layers accidentally.
Note: If you’ve moved the anchor point and want to revert it to the center of your layer, use the shortcut: Ctrl + Alt + Home (Windows) or Command + Option + Home (Mac)
With these steps in hand, you’re now equipped to move the anchor point with ease and precision, giving you more control over your animations and compositions in After Effects.
Final Thoughts
Whether you’re animating a rotating clock hand, an opening door, or any other element, the anchor point is the pivot of your animation. In animation and motion graphics, it’s often these small details that make the biggest difference.
With the steps provided, you now have a clear roadmap to adjust the anchor point with confidence. Knowing its importance and mastering its placement ensures your animations move just as intended. Before diving into animation, always double-check that your anchor points are set correctly.
Have questions or additional insights about anchor points in After Effects? Share them in the comments section below!