
In iMovie for the Mac, you can easily create a split screen effect so that two different videos play at the same time on your screen.
iMovie also allows you to adjust where the videos appear on your screen, and how the split screen effect appears and disappears. As a long-time filmmaker in professional video editing programs, I can tell you iMovie’s split-screen effect is a surprisingly powerful feature and easy to implement.
So, let’s learn how to do it! Below I will cover how you create the split screen effect, how you can adjust the size and position of your two videos on the screen, and the basics of changing when – and how – your split screen effect appears and fades out.
Table of Contents
How to Create a Split-Screen Effect
Step 1: Select a clip in your timeline and drag it on top of another clip you want it to share the screen with. As shown in the screenshot below, I have dragged a clip (the one with the yellow border) on top of another clip.
Note the blue line, which is called a stem, highlighted by the red arrow in the screenshot. This signifies where the top clip is attached to the bottom clip, and is where the split screen effect will start.

Step 2: Make sure the video you dragged on top of another is highlighted and, in your Viewer settings (in the upper right corner of iMovie) you will notice a row of Video Overlay Settings. This row only appears when a selected video clip is on top of another video clip.
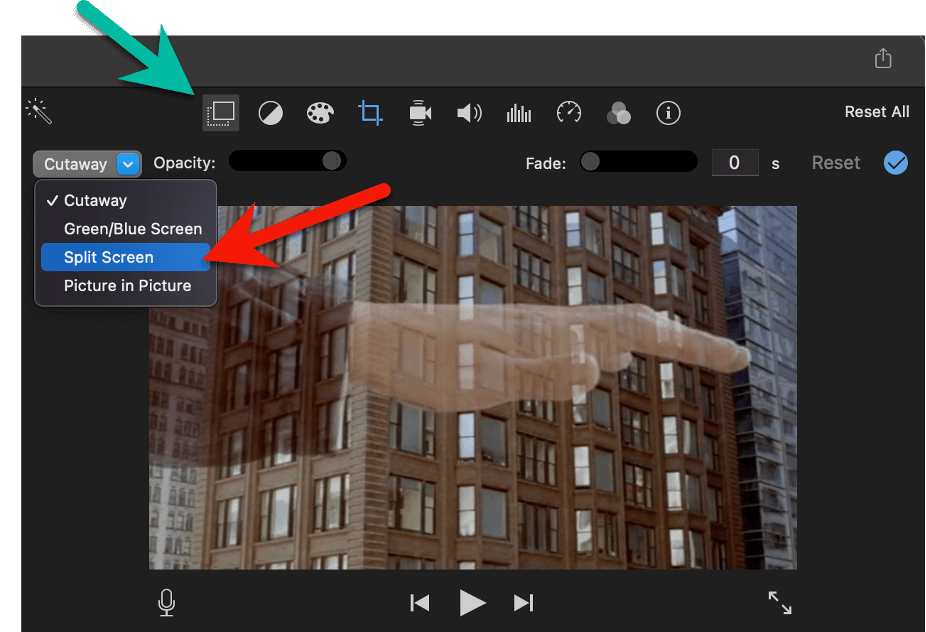
If the video overlay controls aren’t visible, click the Video Overlay Settings button, highlighted by the green arrow in the screenshot above.
To enable the two clips to share your screen, select Split Screen (see the red arrow in the screenshot above) from the dropdown menu on the left side of the Video Overlay Settings.
The viewer should now show you something like the screenshot above, where the bottom video (in my case the shot of a Famous Actor looking up to the heavens) appears on the right side of the screen, and the top video (of an enormous floating hand) appears on the left side.
And that’s it – you have created a split screen in iMovie!
How to Adjust the Size and Position of your Split-Screen Effect
Once your split screen is enabled, you will probably want to make a few adjustments to how it looks. iMovie gives you a range of options in the Video Overlay settings.
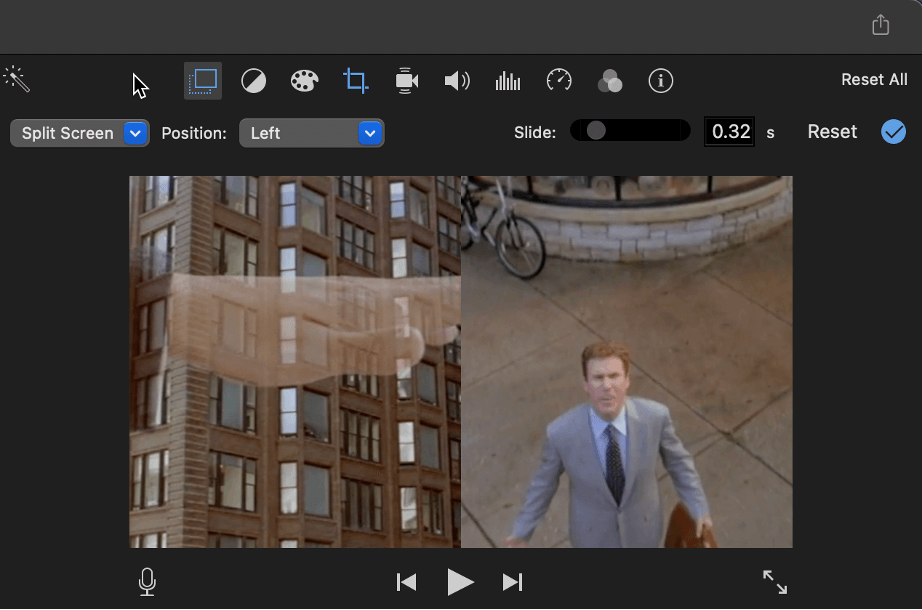
To adjust the clips’ positions: Just to the right of the dropdown menu where you chose the Split Screen option is the Position menu.
As can be seen in the screenshot below, this setting allows you to choose whether your selected (top) clip is shown on the left or right side, or on the top or the bottom.
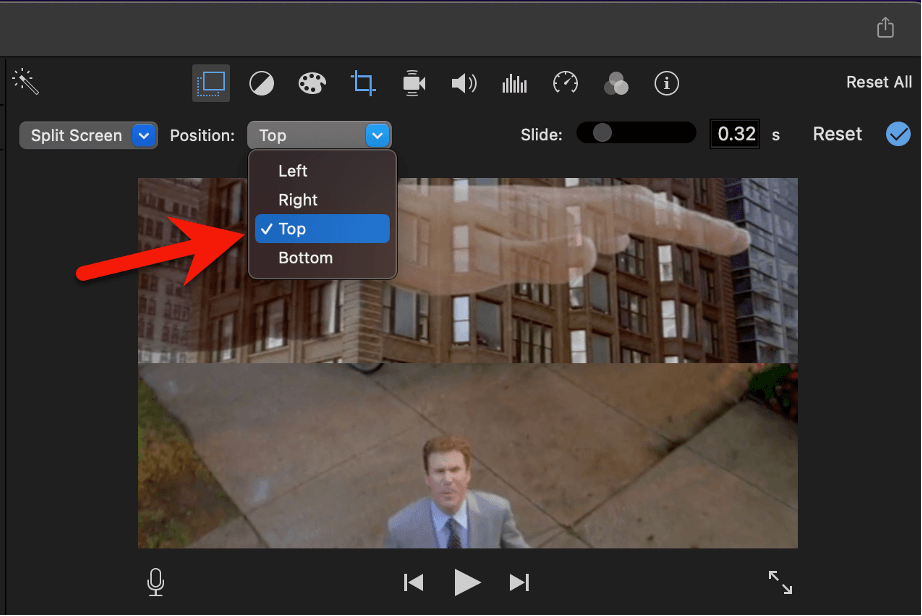
In my example, shown in the screenshot above, I wanted the hand to look like it was over the Famous Actor in my split screen, so selected the clip of the hand in my timeline, and then selected Top (highlighted by the red arrow) from the Position menu.
How to crop one (or both) of the clips: When iMovie puts your two videos onto the same screen, it automatically crops the images to fit into the available space. But chances are you’ll want a slightly different part of your image to appear.
To crop one of your clips, simply select the clip you want to crop, and then select the Crop Tool (highlighted by the green arrow in the screenshot below) from the Viewer settings.
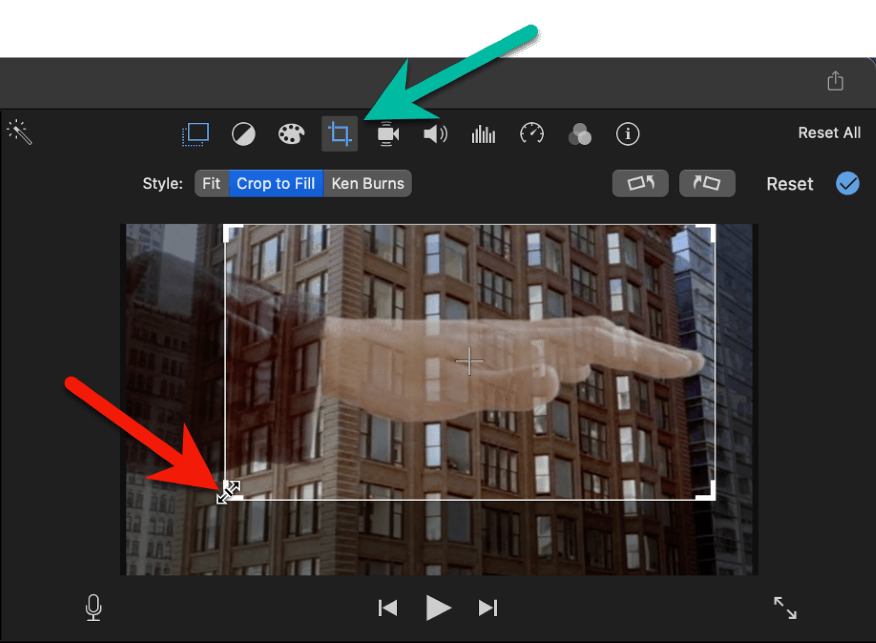
A full-screen image of your clip will now appear in the Viewer window, surrounded by a white border with adjustment handles in each corner. If you click on any of these (highlighted by the red arrow in the screenshot above), your pointer will turn into a pair of small black arrows.
As you drag one of these handles towards the center of the image, the white borders follow, cropping the size of the image that will be displayed in our movie.
In my example above, I wanted the ghostly hand to be larger (filling more of the screen) than iMovie assumed, so dragged the adjustment handles toward the center.
How to Adjust When your Split-Screen Effect Appears
Unless you tell iMovie otherwise, the split screen will appear the instant your movie reaches the stem of the video you placed on top. (Recall from Step 1, when you dragged one video on top of another, that we showed you where the stem was.)
So, if the split screen is appearing a little too soon or too late for your taste, you can drag the top clip to the left (to start the split screen sooner) or to the right (to start it later).
Just remember – wherever the stem connecting the top clip to the bottom clip is, that is exactly where the split screen will start.
But what if you want the split screen effect to last longer, or be shorter? No problem.
Just like any video clip, you can lengthen or shorten the duration of your split screen by adjusting the length of the top clip. Clicking on either edge of the clip and dragging it will lengthen or shorten the clip, and thus lengthen or shorten your split screen effect.
Note that you can drag the top clip over multiple clips – even your entire movie, if you want it to.
How to Adjust How Your Split Screen Effect Appears
By default, your split screen will simply appear when your movie reaches the stem of the top clip and then disappear when the top clip is played through.
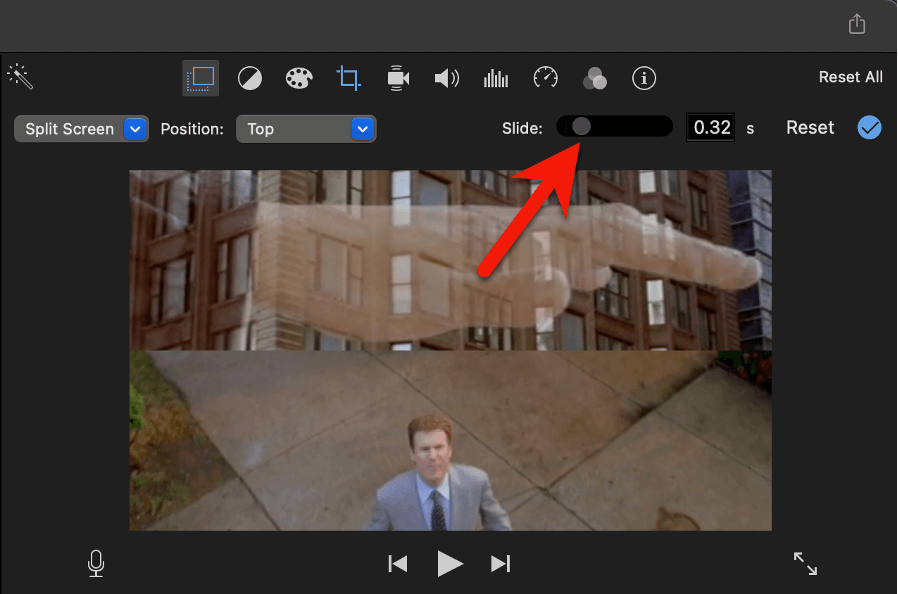
But iMovie offers a cool transition right in the Viewer settings. In the screenshot below, the red arrow is pointing at the Slide control. A Slide transition is when an image literally slides onto the screen, pushing the other image out of the way.
This control is set to zero by default, and thus there is no slide effect. But by dragging the gray circle to the left you automatically add a slide transition.
The further you drag the control left, the longer the transition will take, and thus the slower the image will slide onto your screen.
Some Final Thoughts on Splitting Screens
A split screen effect can be jarring to a viewer. We just aren’t used to seeing two things at once. But that is also precisely the strength of the effect. Judicious use of a split screen effect can grab a viewer’s attention, unsettle them, and create a unique impression.
In my example, my split screen shows (on the bottom) a Famous Actor yelling at the heavens. By adding the quivering hand right on top of that scene it creates an impression that the heavens are talking back – either by patting the actor on the head, or shushing them, or…
Regardless of what I intended, I created some complexity in the scene. This can be engaging to a viewer or jarring depending on how successfully I pulled it off. So, take some time, play around with split screens, and find the jarring complexity that works for your movie!
Speaking of jarring complexity, please don’t hesitate to let me know in the comments below if you found this article helpful, see room for improvement, or just have questions. Happy to help. Thank you.