
Easy Ease in After Effects smooths the start and stop speeds of animations for a more natural feel. To revert to linear interpolation, click on the keyframes with Easy Ease while holding Ctrl (Windows) or Alt/Option (Mac).
Hi there! I’m Zoe, back with another After Effects tutorial. Today, we’re diving into a common question: how to remove or undo Easy Ease in After Effects.
Easy Ease is a fantastic tool for making animations smoother and more dynamic, but sometimes it might not produce the effect you’re looking for. If you find yourself needing to reverse its application, you’re in the right place.
In this guide, we’ll cover three methods to remove Easy Ease: a quick keyboard shortcut, adjusting Keyframe Interpolation Settings, and using the Graph Editor. While the keyboard shortcut might be the fastest route, understanding the other two methods will give you a deeper insight into keyframe manipulation and greater flexibility and control in your animation projects.
Let’s get started!
Table of Contents
Key Takeaways
- You can quickly remove Easy Ease from keyframes by holding Ctrl (Windows) or Alt/Option (Mac) and clicking on the keyframes until they revert to their original diamond shape.
- For more precise control, use the Keyframe Interpolation method to change keyframes from Bezier to Linear, effectively removing Easy Ease.
- The Graph Editor provides a visual approach to adjust keyframes, including the removal of Easy Ease, by allowing you to select keyframes and convert them to linear.
Note: All screenshots from this tutorial are taken from the After Effects Mac version.
This article provides the three best methods to remove Easy Ease from keyframes in After Effects.
Understanding Easy Ease in After Effects
Before diving into how to remove Easy Ease, let’s quickly understand what it is and when you might want to use it or opt for something else.
Easy Ease is a feature in After Effects that smooths out your animations, making them start and stop more naturally, like how objects move in real life. For example, think of how a thrown ball speeds up and then slows down. Easy Ease replicates this smooth, natural motion, making your animations look more sophisticated and visually appealing.
However, there are times when linear keyframes might be a better choice:
- Creative Choices: For projects that need a sharper, more energetic feel, like a fast-paced video, the abrupt motion of linear keyframes might be more suitable.
- Technical Requirements: If your animation needs precise timing or synchronization, linear keyframes offer more predictability.
- Stylistic Preferences: In some cases, the mechanical or stylized look of linear motion fits better. For instance, animating a robot’s jerky movements might work better with linear interpolation.
Now that we’ve covered the basics, let’s learn how to remove Easy Ease!
Method 1: Using a Keyboard Shortcut
Removing Easy Ease can be done swiftly and effortlessly using a keyboard shortcut. Here’s how you can do it:
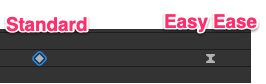
Step 1: Identify the keyframes with Easy Ease applied. These are marked by hourglass-shaped icons on your timeline.

Step 2: Press and hold the Ctrl key (Windows) or the Alt/Option key (Mac) and click on the keyframes.

This action toggles through various keyframe interpolation types. Continue clicking until the keyframes revert to their original diamond shape, indicating that Easy Ease has been removed.
And just like that, you’re back to the standard keyframe interpolation!
Method 2: Detailed Control through Keyframe Interpolation
For those who prefer a more detailed approach to keyframe management, this method offers greater control:
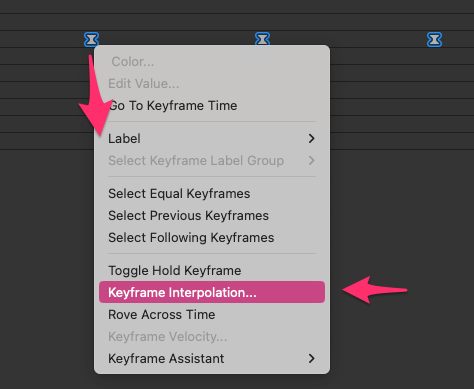
Step 1: Select your Easy Ease keyframes. Drag your mouse across your timeline to select multiple keyframes simultaneously.

Step 2: Right-click on any of the selected keyframes to bring up a context menu. From there, select Keyframe Interpolation.
Step 3: In the Keyframe Interpolation dialog box, change the settings set to Bezier to Linear.
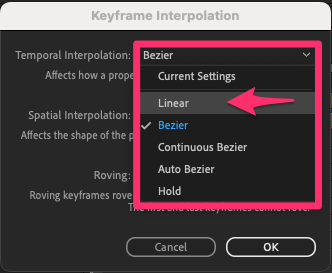
This change will effectively remove Easy Ease, reverting your keyframes to a linear motion. This method not only helps in adjusting keyframes but also serves as a useful tool for exploring and applying different keyframe types in your projects.
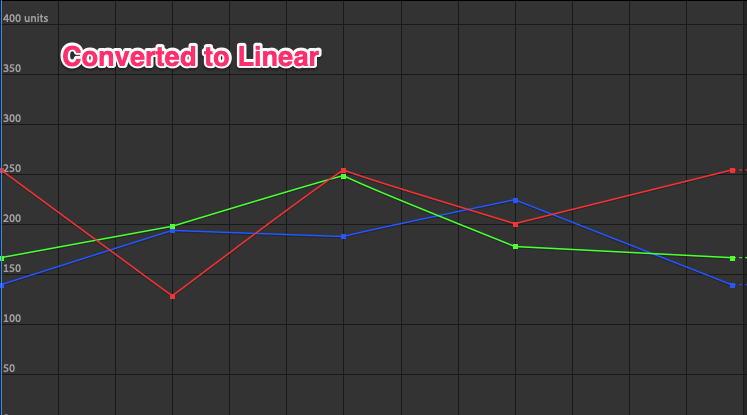
Method 3: Visual Adjustment with the Graph Editor
The Graph Editor in After Effects offers a visual way to adjust keyframes, including removing Easy Ease:
Step 1: Open the Graph Editor by clicking its button at the top of the timeline panel.
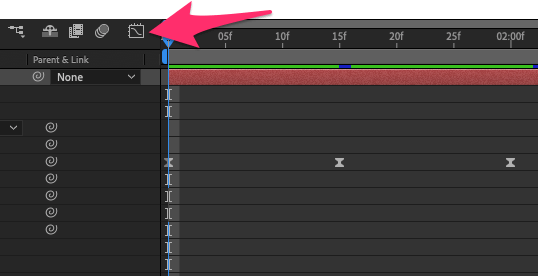
Step 2: Inside the Graph Editor, select the keyframes you wish to modify. These are represented as points or boxes on the graph.
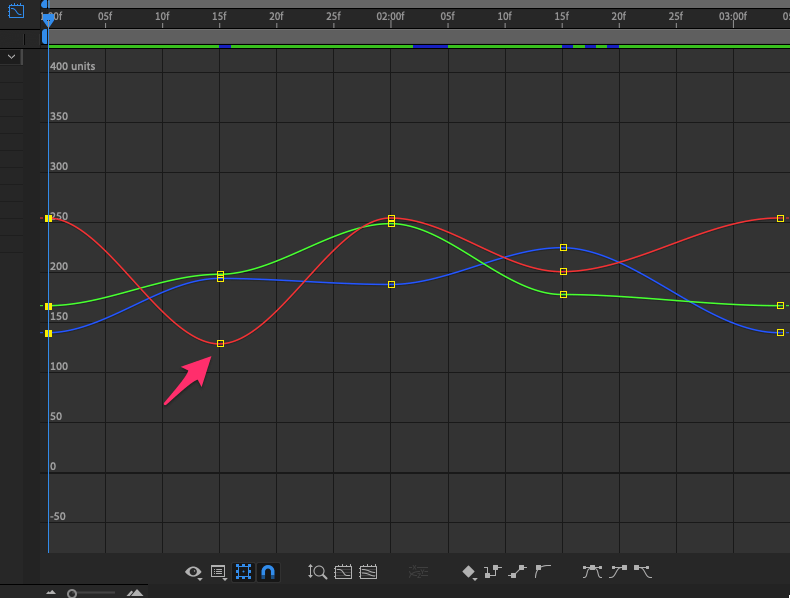
Step 3: Look for the option at the bottom of the Graph Editor panel labeled Convert Selected Keyframes to Linear and click on it.

That’s all there is to it!
It’s worth noting the Graph Editor isn’t just for removing Easy Ease. It allows you to manipulate the motion curve between keyframes, giving you precise control over the animation’s pacing. A steeper curve in the graph indicates quicker motion, while a more gradual slope suggests slower movement.
This tool is essential for fine-tuning your animations, enabling you to create everything from subtle easing to dynamic, rapid movements.
Final Thoughts
Removing or undoing Easy Ease in After Effects is a simple process that can significantly impact your animation’s look and feel. Whether you’re going for a more mechanical motion or just prefer the control of linear keyframes, knowing how to make these adjustments is a valuable skill in your After Effects toolkit.
Have you tried removing Easy Ease from your animations? What impact did it have on your project? Share your experiences and tips in the comments below!