
Learning how to shade is essential for giving depth and realism to your art. Shading adds dimension, defines form, and creates mood and atmosphere. Fortunately, Clip Studio Paint comes equipped with a wide range of tools that help you easily create shading effects.
Hi there! I’m Zoe, a freelance illustrator and graphic designer. The more I draw, the more I appreciate that shading isn’t just about making your base colors a few shades darker. It’s about discovering intriguing shadow hues that can truly make your artwork come alive, even though they might not always be easy to find.
In this article, We’ll explore shading theory and four ways to add shading to your drawing in Clip Studio Paint.
So let’s get started!
Table of Contents
Key Takeaways
- Use blending modes like Multiply for soft shadows, Darken for depth, Overlay for contrast, and Add (Glow) for intense highlights to improve shading.
- Keep different layers for line art, fill colors, shading, and highlights.
- Experiment with Cel Shading, Soft Shading, Cross-Hatching, and Toning for different artistic effects in Clip Studio Paint.
- Don’t forget to explore Shading Assist as a tool for shading, even if you’re just using it as a draft.
- Incorporate 3D models for shading reference, even if they’re basic shapes.
Note: All screenshots from this tutorial are taken from the CSP Mac version.
Understanding the Basics of Shading
Before diving into the specifics of shading in Clip Studio Paint, it’s important to have a solid understanding of the basic principles of shading. Shading is the technique of adding depth to artwork by simulating the way light interacts with objects. Here are some key concepts to keep in mind:
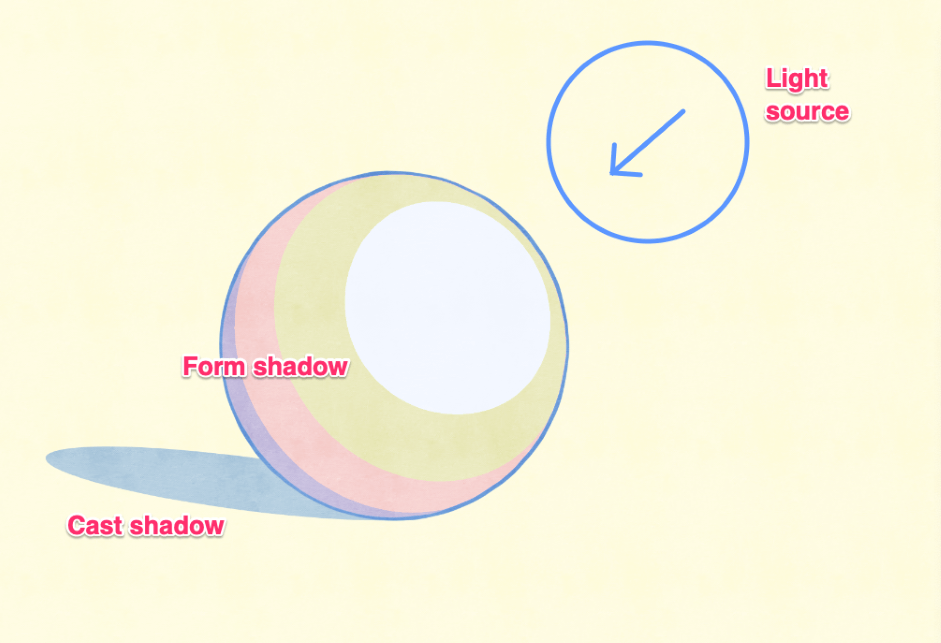
- Light Source: The direction and intensity of the light source determine where the shadows and highlights will fall on an object.
- Shadow Types: Shadows can be categorized into two main types: cast shadows and form shadows. Cast shadows are formed when an object blocks the light, while form shadows occur on the object itself due to its three-dimensional form.
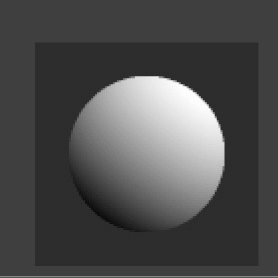
- Value Scale: The value scale represents the range of tones from light to dark. Achieving smooth transitions between these values creates more realistic shading, while sharp transitions can give a more cartoonish appearance.
Useful Tools for Shading in Clip Studio Paint
Clip Studio Paint offers a suite of tools and options you can use for shading:
- Brushes: Clip Studio Paint provides a wide array of brushes that can be used for shading. Brushes with soft edges or custom brushes with texture can create various shading effects.
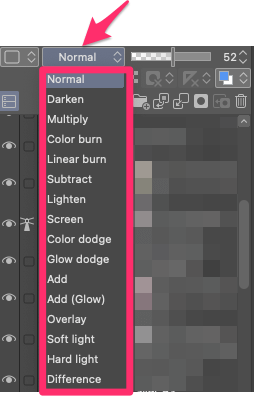
- Blending Modes: Experiment with layer blending modes like Multiply, Overlay, and Soft Light to apply shadows and highlights to your artwork. Adjust the opacity of these layers for subtler or more intense shading.
- Gradient Tool: The Gradient tool is useful for creating smooth transitions between light and shadow. You can customize the gradient’s direction and colors to suit your scene.
- Airbrush Tool: The Airbrush tool is excellent for adding soft, diffuse shading. Adjust the brush size and opacity to control the intensity of the shadows.
Method 1: Blending Modes
Blending modes in Clip Studio Paint are very handy tools for achieving various shading effects. Let’s explore some of the most useful blending modes for shading:
Multiply and Darken are the go-to choices for shadows. When you paint with Multiply or Darken, the underlying colors remain visible, while your brush color darkens the image. It’s perfect for adding depth and richness to shadowed areas.
Overlay blends your brush color with the underlying colors to create a high-contrast effect. It’s useful for both shading and adding highlights. When you apply white in Overlay mode, it intensifies highlights, while applying black enhances shadows.
Soft Light blends your brush color with the underlying colors while preserving mid-tones. It’s versatile for shading and can be used for subtle adjustments to highlights and shadows.
Add (Glow) and Glow Dodge are ideal for adding intense highlights. When you paint with a bright color, it adds a radiant glow to your artwork, perfect for reflective surfaces or strong light sources.
5 Steps to Create Shading in Clip Studio Paint
With the theory covered, it’s time to start shading! By following a few simple steps, you can quickly apply shading to your artwork and achieve professional-looking results:
Step 1: Begin by creating individual layers for your line art and fill layers. Above the base color layer(s), add a new layer and label it as Shading.
It’s always best to maintain separate layers for your linework, fill colors, shading, and highlights. This approach allows for easy adjustments as you progress.
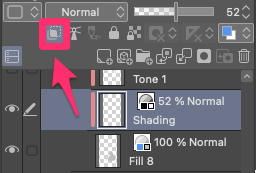
Step 2: To ensure that your shading remains within the intended areas, click on the Clip to Layer Below icon in the Layers Palette.
Step 3: Choose a darker color than the base color for the shading. Use a brush tool to carefully paint in the shadows on the shading layer.

Step 4: To achieve various shading intensities, continue to create separate shading layers with differing opacities.
Step 5: Experiment with blending modes, such as Multiply or Overlay.

That’s it! By following these steps, you can easily create shading in Clip Studio Paint using multiple layers. To add highlights, repeat the same process, but remember to apply distinct blending modes like Add (Glow).
Different Shading Styles in Clip Studio Paint
Now that you know the steps, let’s explore some different shading styles you can apply in Clip Studio Paint and how to achieve them:
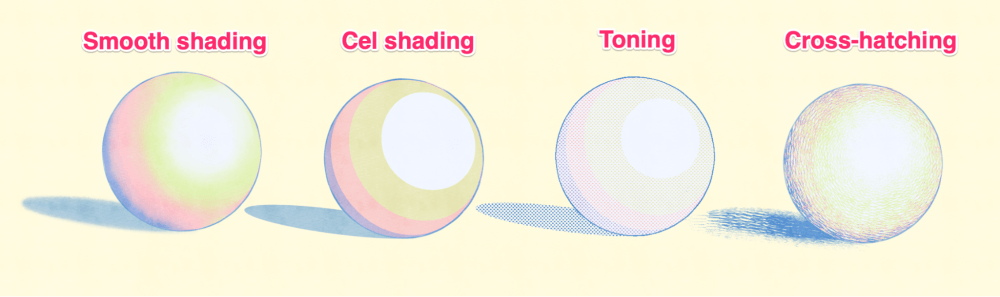
Cel Shading: Cel shading is a technique characterized by the use of flat, solid areas of color for shading, resulting in a stylized and graphic appearance. To achieve this look, employ a hard-edged brush and work with multiple layers to create opacity variations for a layered effect.
Soft Shading: Soft shading aims to produce smooth transitions between light and shadow, making it ideal for achieving a realistic and painterly look. Utilize brushes with soft edges and lower opacity settings to gradually build up shadows. You can also use blending tools for seamless transitions.
Toning: This technique is what you find in old-school manga, and involves adding shading using tiny dots. To replicate this effect, create a flat shadow layer. Then, apply the Tone effect from the Layer Property Palette. You’ll discover options to adjust the dot size, frequency, and even the shape of the dots.
Cross-Hatching: Employ the Pen tool or a hatching stamp to create crosshatched lines for shading. Clip Studio Paint offers various default hatching brushes, and you can explore additional options in the Assets. Experiment with line spacing and angles to control the texture and density of your shading.
Method 2: Shading Assist
The Shading Assist tool works by analyzing your color and line art layers to generate light and shadow effects. Here’s how to use it.
Step 1: Before you start using Shading Assist, it’s important to make sure your illustration is set up correctly. You’ll need a canvas with separate line art and color layers.

If you’ve already colored details like eyes or hair, consider temporarily hiding them so only your base layer is visible. This will result in a cleaner automatic shadow process.
Step 2: Select the lineart layer in the Layer palette and click on the Set as Reference Layer button at the top of the palette. Once a layer is set as a reference layer, it will be indicated by a lighthouse icon in the Layer palette.
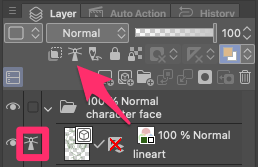
Step 3: In the Layer palette, select the fill layer that you want Shading Assist to apply shading.
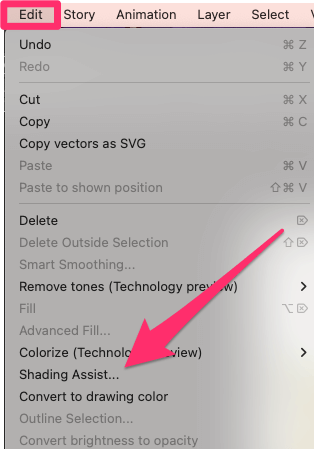
Step 4: Go to the Edit menu > Shading Assist, and the Shading Assist dialog will appear. Make sure the Shading and Light Source sections are expanded to access detailed settings.
Step 5: If you have set your line art as a reference layer, you can turn on the Refer to lines on reference layer option and set the setting’s strength. This will make the generated shading refer to the line art, creating a more accurate and realistic effect.

Step 6: Select a preset from the dropdown menu in the dialog. The presets offer different settings for various situations, allowing you to achieve the desired shading effect.

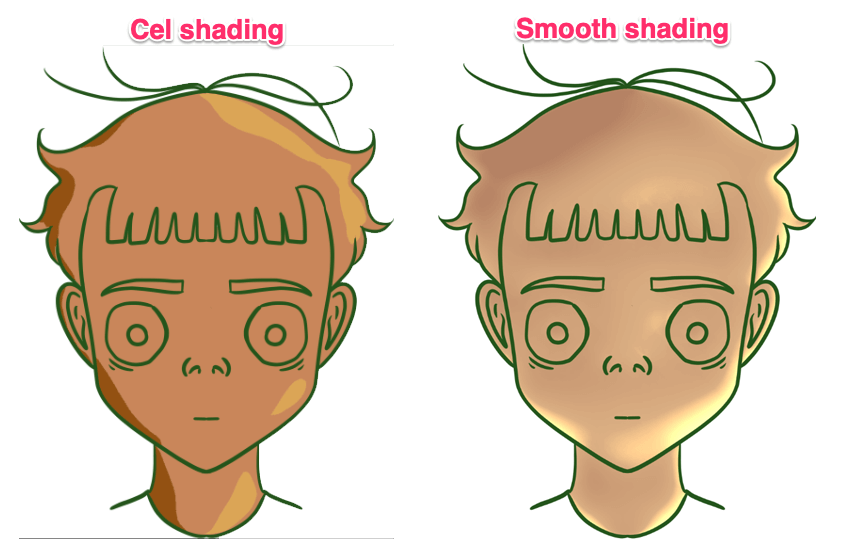
Step 7: You will find two different Shadow type options: Smooth Shading and Cel Shading. Both offer several parameters that you can adjust to fine-tune your shading. By tweaking these settings, you can control the intensity and appearance of the highlights and shadows in your illustration.

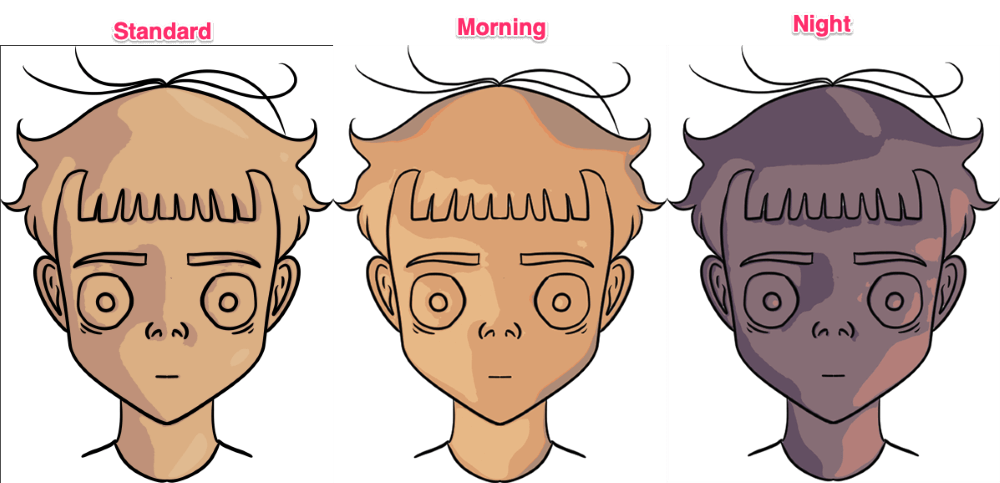
Step 8: Clip Studio Paint also offers two types of light sources: Ball Light and Directional Light. Ball Light allows you to place a movable light source anywhere on the canvas, while Directional Light applies light to the entire canvas at a fixed angle and intensity.
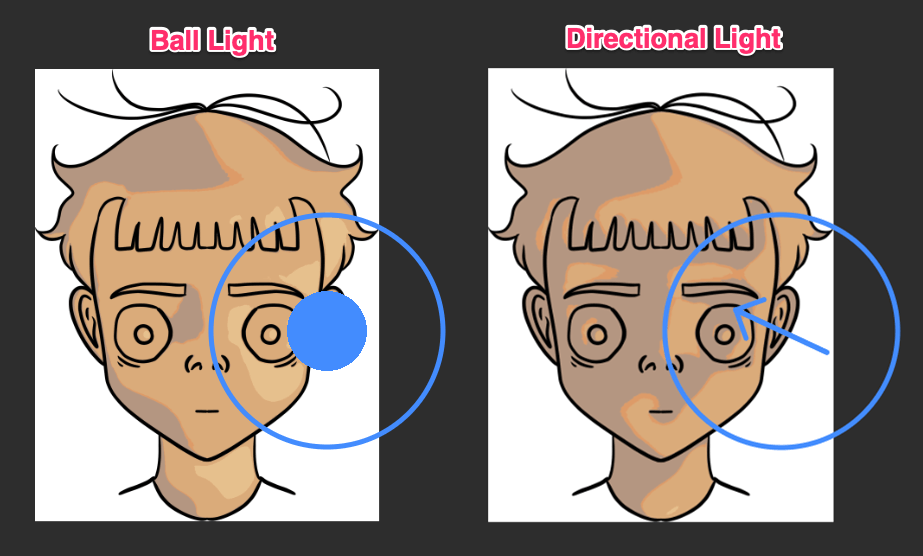
Experiment with both types of light sources to create different lighting effects in your artwork.
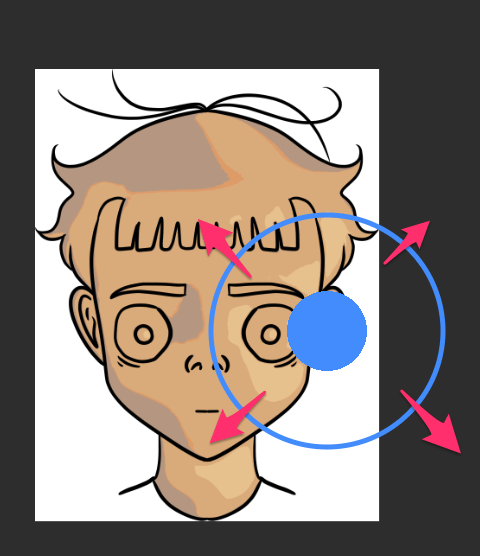
Step 9: To fine-tune the highlights and shadows in your artwork, you can use the handles on the manipulator. These handles allow you to achieve the desired balance between light and dark in your illustration.
Step 10: Once you are satisfied with the color and light settings, click OK in the dialog to create a shading layer(s) on top of the selected layer in the Layer palette.

Remember, this feature is quite new, and it works best when your lineart is simple and your base layer is straightforward, without gradients or many colors, as these can interfere with the shading it creates.
While the results may not be perfect, it can be a fast way to add shadows and get a sense of the colors, which you can refine later.
Method 3: Using 3D Models for Shading Reference
Another valuable tool within Clip Studio Paint for shading is the use of 3D models. These models provide an excellent reference for understanding light and shadow in complex poses. Here’s how to do it and make your art look more lifelike:
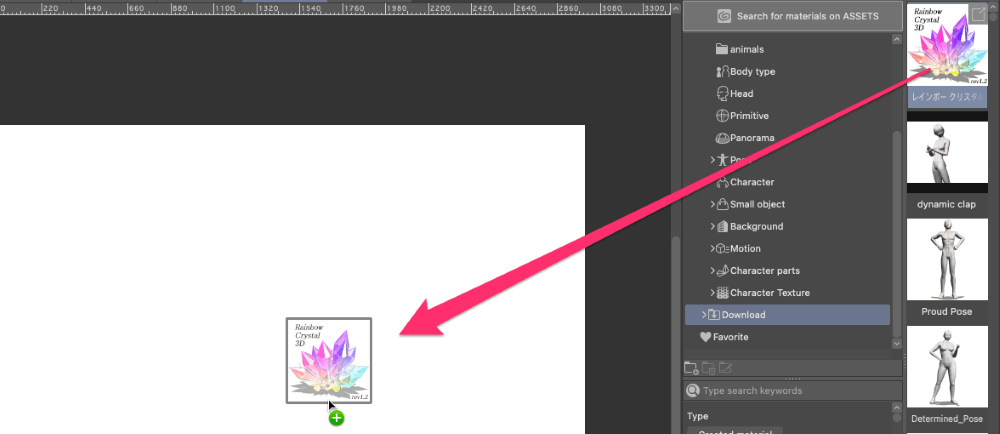
Step 1: Access the 3D materials from your Materials Palette.
Step 2: Import a 3D model by dragging and dropping it onto your canvas.
Step 3: Resize and pose the model as desired to match your purpose.
Step 4: With the 3D model selected, click on the wrench icon to access the Sub Tool Detail window. Select Light Source.
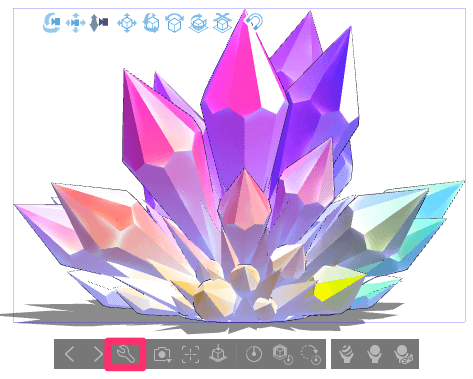
Step 5: Rotate the 3D sphere to adjust the lighting and shadows on the 3D model. Once you’re satisfied with the shading, feel free to close the window.
Step 6: As you begin drawing, take note of the shadow shapes cast by the model and use them as a reference for shading your artwork. Shadows can convey mood, expression, and dramatic effects.
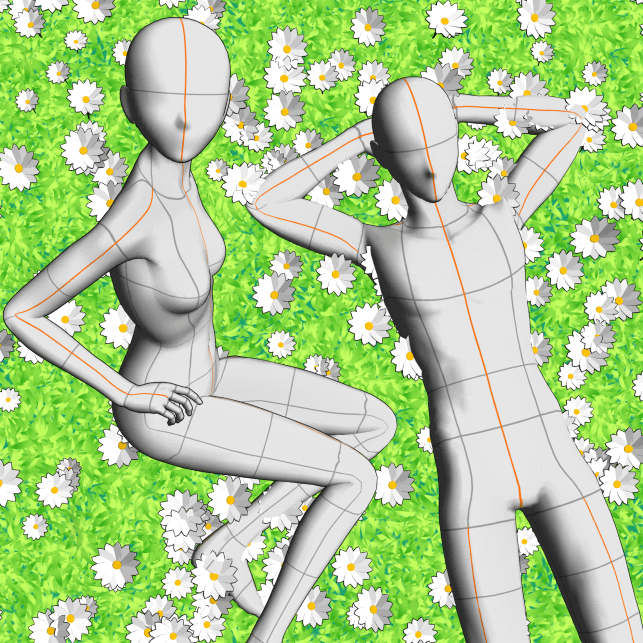
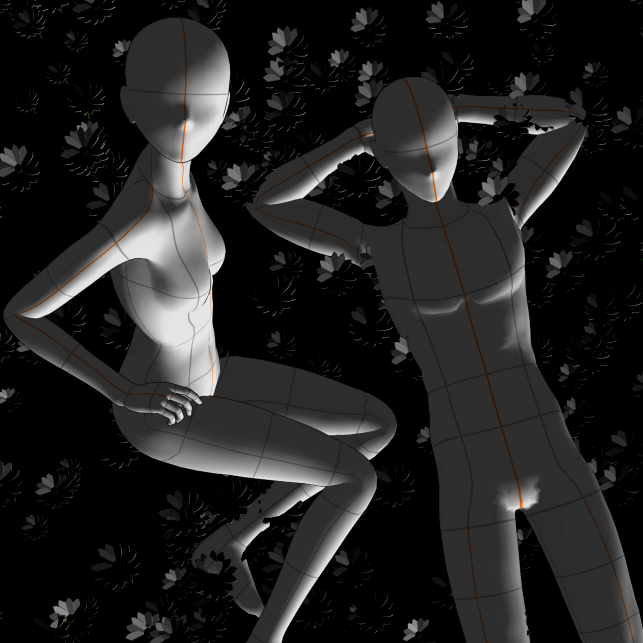
Using 3D models for shading in Clip Studio Paint can be a great way to learn how light and shadows work.
Method 4: Gradient Maps
Gradient Maps may not be a tool directly for shading but can be incredibly useful for adding color to your artwork based on brightness levels. This makes them a great companion to the shading process.
Now, let’s dive into how to use Gradient Maps:
Step 1: Go to the Layer menu and select New Correction Layer, then choose Gradient Map. This adds a new layer on top of your artwork, and the Gradient Map dialog box will appear.
Step 2: In the Gradient Map dialog box, you’ll find a variety of gradients to choose from. Clip Studio Paint provides pre-installed gradients, or you can create custom ones.
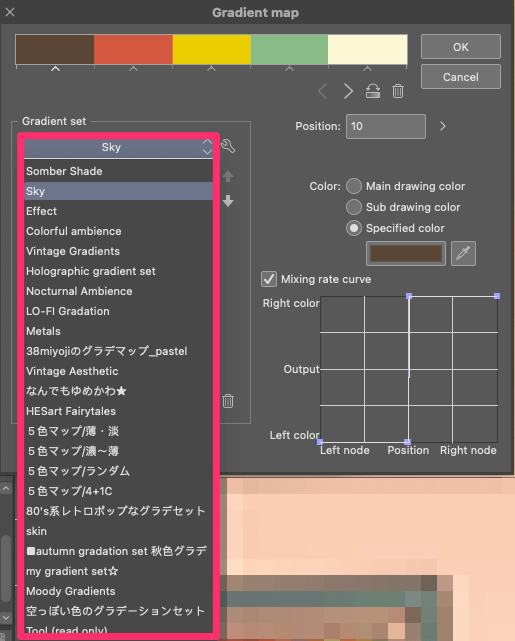
Step 3: Select a gradient by clicking on the Gradient Set box and choosing the one that suits your artwork.
Step 4: Once you’ve chosen a gradient, refine it for your desired shading effect.

In the Gradient Map dialog box, you’ll see at least two color stops representing the darkest and lightest tones of the gradient. Drag these color stops and change their colors to control shadow and highlight intensity and hue. Add more color stops by clicking anywhere along the gradient bar.
Step 5: When you’re satisfied, click OK.
Congratulations! You’ve successfully used Gradient Maps for shading in Clip Studio Paint.

Keep in mind that the colors you select for shading can significantly impact the mood and atmosphere of your artwork. When experimenting with gradient maps, consider the emotions you want to convey and choose colors that align with your artistic vision.
Final Thoughts
When you’re just starting out, your drawings might seem a bit flat, but these shading techniques will help you bring life to your art in Clip Studio Paint. Shading is key for adding depth, making things look three-dimensional, and creating a mood.
Clip Studio Paint has lots of easy-to-use tools for shading. Whether you’re playing with blending modes like Multiply for soft shadows, trying different shading styles, or exploring advanced tools like Shading Assist and 3D models, this guide equips you with the knowledge to create beautifully shaded artwork.
Your thoughts, tips, or feedback about shading techniques in Clip Studio Paint are very welcome! Please don’t hesitate to drop a comment below.