
Speeding up videos in After Effects adds energy to your footage and can be done easily with Time Stretch for quick changes, Time Remapping for specific sections, and TimeWarp for advanced control.
Hi there, I’m Zoe! As a graphic designer, I often find myself needing to adjust the pace of my videos, and After Effects offers several efficient ways to do this. Speeding up a video in After Effects can be a game-changer for your projects, whether you’re creating a time-lapse effect, matching the beat of a soundtrack, or simply condensing your footage.
In this guide, we’ll explore three main techniques to speed up your videos: Time Stretch, Time Remapping, and the TimeWarp Effect. Each method has its unique benefits, and I’ll walk you through them step by step.
Plus, you’ll learn a quick way to add motion blur, giving your fast-paced videos an extra sharp and dynamic look!
Let’s jump in and get your videos moving faster!
Table of Contents
Key Takeaways
- Speeding up videos in After Effects can be achieved through Time Stretch, Time Remapping, and TimeWarp.
- Time Stretch is great for quickly increasing the speed of an entire clip.
- Time Remapping allows for variable speed changes within a single clip.
- The TimeWarp effect offers advanced control for creating dynamic fast-motion effects.
- CC Force Motion Blur can add a dynamic blur effect to videos you’ve sped up using the Time Stretch or Time Remapping methods.
Note: All screenshots from this tutorial are taken from the After Effects Mac version.
Keep reading to learn all you need to know about speeding up videos in After Effects.
Method 1: Time Stretch
Time Stretch is the fastest way to speed up your footage. It’s ideal for uniformly increasing the speed across the entire clip.
Step 1: Right-click on the clip in your timeline, navigate to Time, and choose Time Stretch.
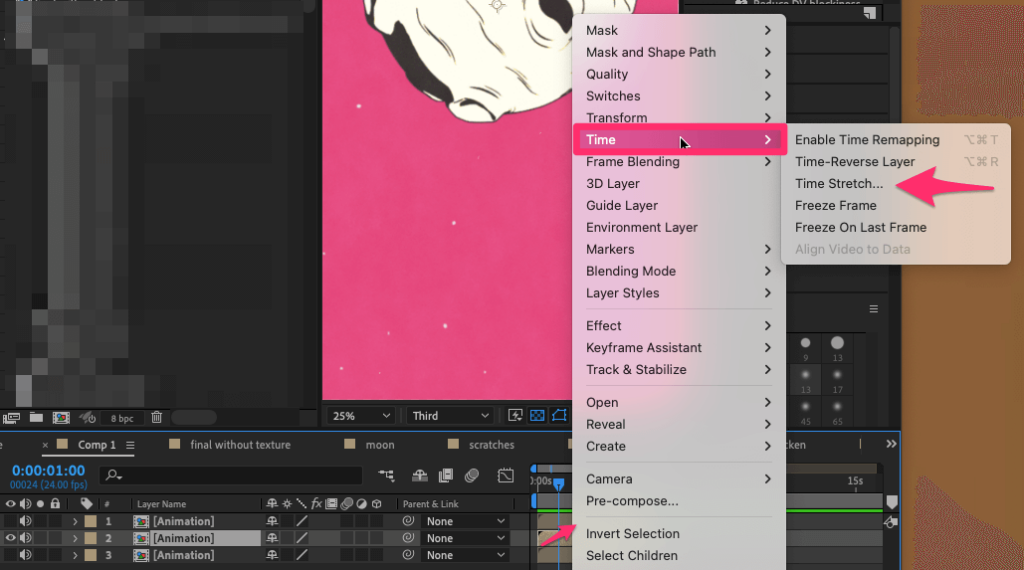
Step 2: In the dialog box, enter a value less than 100% to speed up your video. For instance, setting it to 50% will double the speed of your clip.

Step 3: You can also enter a Duration instead if you know exactly how long you want your video to last.
Click OK, and your video will play at the new, faster speed.
Method 2: Time Remapping
For more control and to speed up specific parts of your clip, use Time Remapping.
Step 1: Right-click on your clip, and go to Time > Enable Time Remapping.
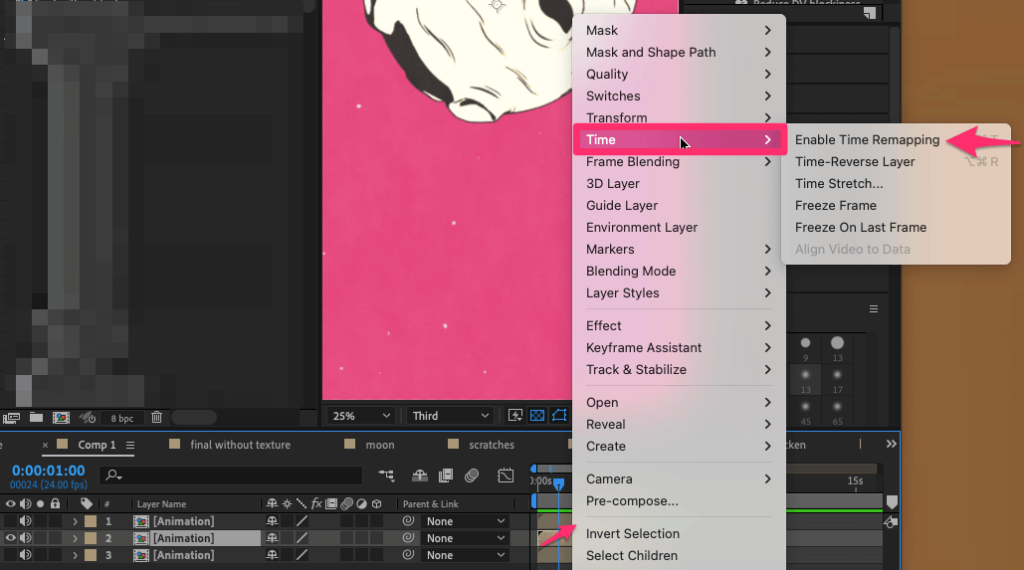
Two keyframes will be added at the beginning and end of the clip.

Step 2: Place two more keyframes at the start and end of the section you want to speed up.
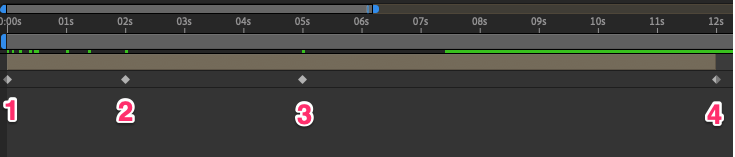
Step 3: Move the keyframes closer together to speed up the section between them. The closer the keyframes, the faster the playback.

That’s it! You now know how to precisely control the speed of specific sections in your video using Time Remapping in After Effects.
Method 3: TimeWarp Effect
The TimeWarp effect is perfect for creating more complex fast-motion effects with greater control over the speed and quality of your modified footage.
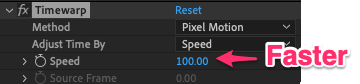
Step 1: Search for TimeWarp in the Effects & Presets panel and apply it to your clip.
Step 2: In the Effect Controls, adjust the Speed setting. Values over 50 will speed up your footage.
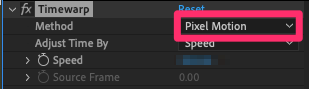
Step 3: For a smoother look, especially in fast scenes, choose Pixel Motion in the Method option. This helps create new frames more naturally, avoiding choppy motion.
Step 4: Play with the Vector Detail and Smoothness in the Tuning section to get the fast-motion effect just right. These adjustments help make the new frames blend in better.

And there you have it! With the TimeWarp effect, you’ve mastered creating dynamic, high-quality fast-motion effects, giving you full control over the speed and smoothness of your video in After Effects.
Pro Tip: Motion Blur for Enhanced Fast Motion
When speeding up footage, especially with significant speed changes, adding motion blur can enhance the realism and smoothness of your video.
If you’re working with live footage that’s been sped up, you can’t directly use the Enable Motion Blur feature as you would with animations created in After Effects. Instead, you can simulate motion blur.
Note: This technique is particularly useful if you’ve sped up your video using Time Stretch or Time Remapping, as the TimeWarp effect already includes a motion blur feature (through its Pixel Motion method).
Here’s how to apply CC Force Motion Blur:
Step 1: After speeding up your video using Time Stretch or Time Remapping, select the layer you want to apply motion blur to. Go to Effects > Time > CC Force Motion Blur.
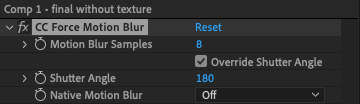
Step 2: Under the Effect Controls, adjust these settings:
- Override Shutter Angle: Check this box to gain full control over the motion blur effect.
- Motion Blur Samples: This determines how many samples After Effects uses for the motion blur calculation. Higher values mean smoother blur but also longer render times.
- Shutter Angle: Adjusting this changes the extent of the blur. A higher value simulates a longer exposure, creating more blur.
CC Force Motion Blur works well with videos that have been sped up directly within After Effects, enhancing the realism of fast-motion effects.

Final Thoughts
Speeding up a video in After Effects can bring energy and excitement to your projects. Whether you need a quick adjustment with Time Stretch, precise control with Time Remapping, or the advanced capabilities of TimeWarp, After Effects has you covered.
These techniques not only enhance the pace of your footage but also open up creative possibilities for storytelling and visual effects. From creating time-lapse sequences to emphasizing action scenes, the ability to speed up videos in After Effects is a valuable skill for any video editor.
Have you experimented with speeding up videos in After Effects? What techniques do you find most effective? Share your thoughts and experiences in the comments below!